Руководство Java JSP Standard Tag Library (JSTL)
1. Что такое JSTL?
2. Обзор функций JSTL
Functions | Description / Declaration |
Core Tags | Core tags provide support for iteration, conditional logic, catch exception, url, forward or redirect response etc. To use JSTL core tags, you should include it in the JSP page like below. |
Core Tags |
|
Formatting and Localization Tags | These tags are provided for formatting of Numbers, Dates and i18n support through locales and resource bundles. You can include these tags in JSP with below syntax: |
Formatting and Localization Tags |
|
SQL Tags: | JSTL SQL Tags provide support for interaction with relational databases such as Oracle, MySql etc. Using SQL tags you can run database queries, you include it in JSP with below syntax: |
SQL Tags: |
|
XML Tags | XML tags are used to work with XML documents such as parsing XML, transforming XML data and XPath expressions evaluation. Syntax to include XML tags in JSP page is: |
XML Tags |
|
JSTL Functions Tags | JSTL tags provide a number of functions that you can use to perform common operation, most of them are for String manipulation such as String Concatenation, Split String etc. Syntax to include JSTL functions in JSP page is: |
JSTL Functions Tags |
|
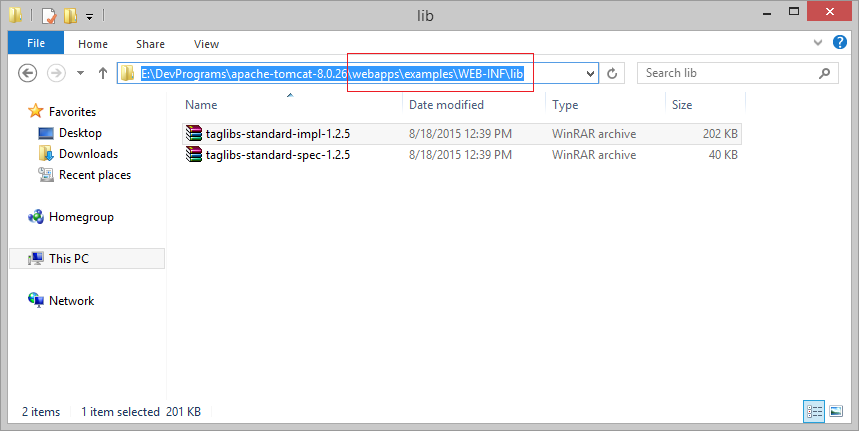
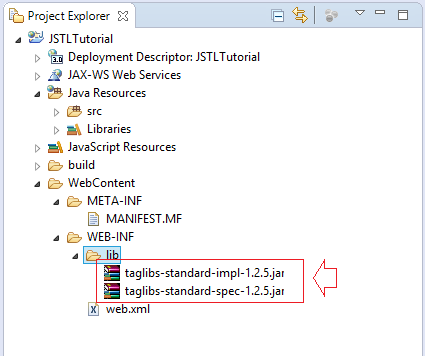
3. Скачать библиотеку JSTL
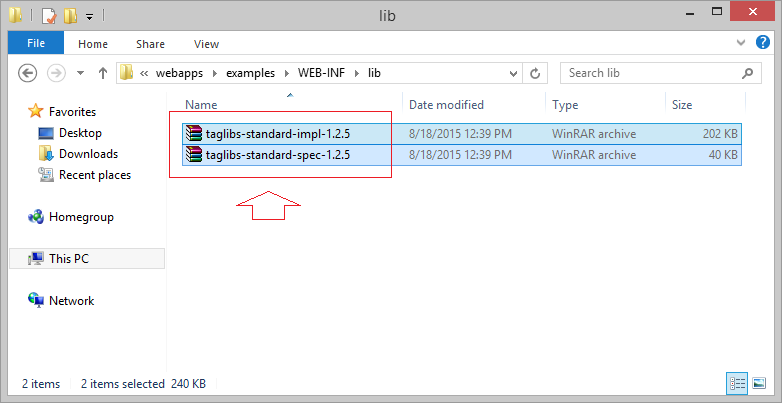
- <Tomcat>/webapps/examples/WEB-INF/lib
- taglibs-standard-impl-**.jar
- taglibs-standard-spec-**.jar
JSTL library (Provided by Apache) | JSTL library (Provided by Glassfish) |
taglibs-standard-spec-*.jar | javax.servlet.jsp.jslt-api-*.jar |
taglibs-standard-impl-*.jar | javax.servlet.jsp.jstl-*.jar |
- Обеспечиваетеся Apache:
<!-- taglibs-standard-spec-*.jar -->
<!-- http://mvnrepository.com/artifact/org.apache.taglibs/taglibs-standard-spec -->
<dependency>
<groupId>org.apache.taglibs</groupId>
<artifactId>taglibs-standard-spec</artifactId>
<version>1.2.5</version>
</dependency>
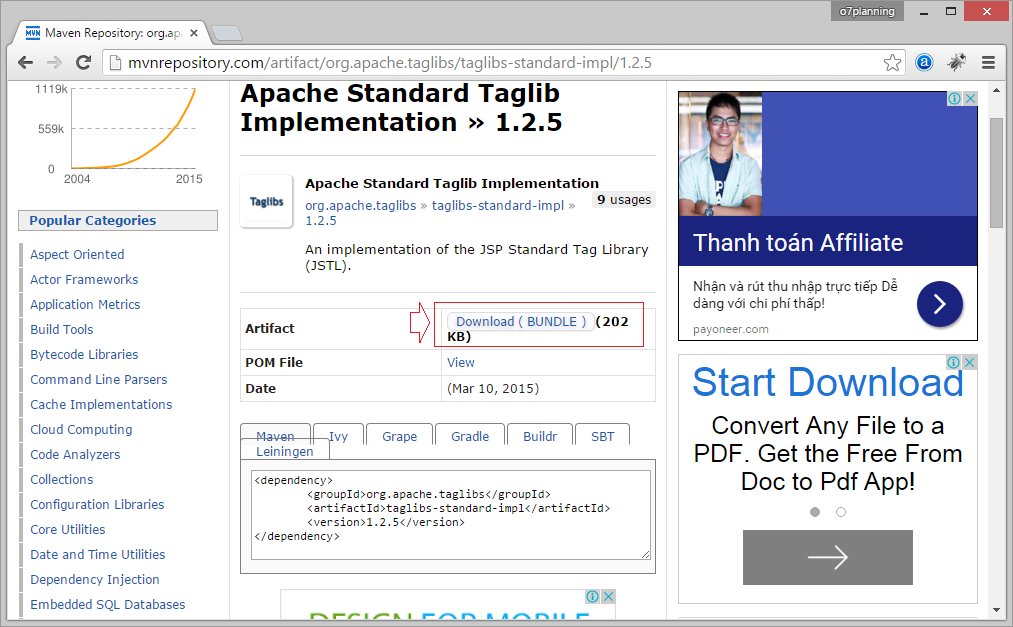
<!-- taglibs-standard-impl-*.jar -->
<!-- http://mvnrepository.com/artifact/org.apache.taglibs/taglibs-standard-impl -->
<dependency>
<groupId>org.apache.taglibs</groupId>
<artifactId>taglibs-standard-impl</artifactId>
<version>1.2.5</version>
</dependency>- Или обеспечивается Glassfish:
<!-- http://mvnrepository.com/artifact/org.glassfish.web/javax.servlet.jsp.jstl -->
<dependency>
   <groupId>org.glassfish.web</groupId>
   <artifactId>javax.servlet.jsp.jstl</artifactId>
   <version>1.2.4</version>
</dependency>

<!-- http://mvnrepository.com/artifact/javax.servlet.jsp.jstl/javax.servlet.jsp.jstl-api -->
<dependency>
   <groupId>javax.servlet.jsp.jstl</groupId>
   <artifactId>javax.servlet.jsp.jstl-api</artifactId>
   <version>1.2.1</version>
</dependency>- Обеспечивается Sun (чуть старый, сейчас используется редко).
<!-- standard.jar -->
<!-- http://mvnrepository.com/artifact/taglibs/standard -->
<dependency>
   <groupId>taglibs</groupId>
   <artifactId>standard</artifactId>
   <version>1.1.2</version>
</dependency>

<!-- jstl-*.jar -->
<!-- http://mvnrepository.com/artifact/javax.servlet/jstl -->
<dependency>
   <groupId>javax.servlet</groupId>
   <artifactId>jstl</artifactId>
   <version>1.2</version>
</dependency>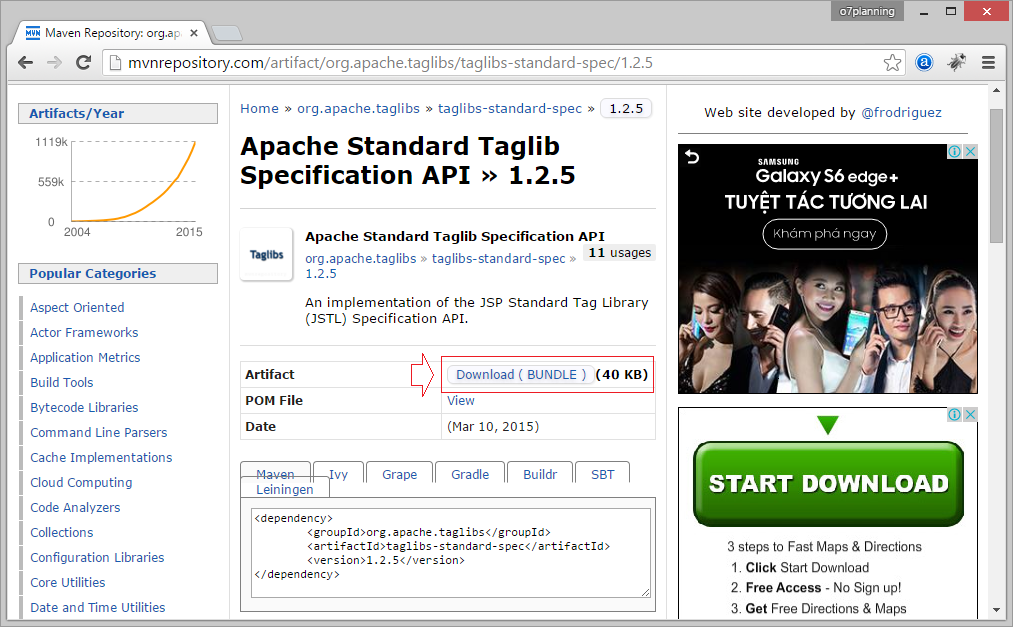
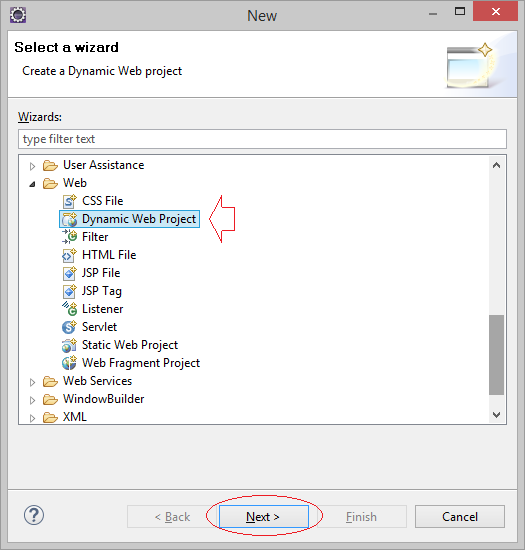
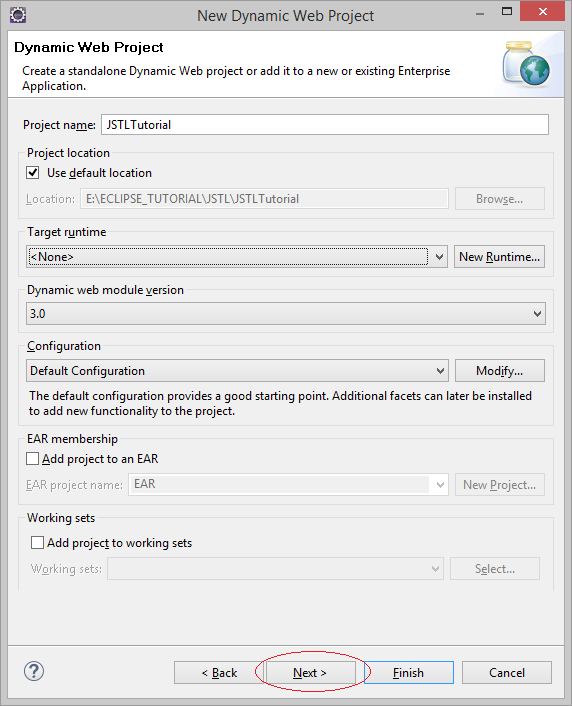
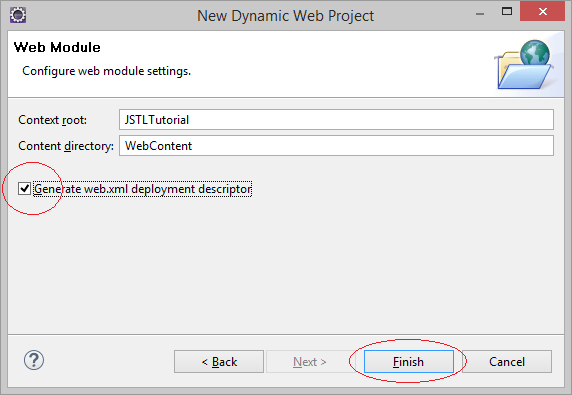
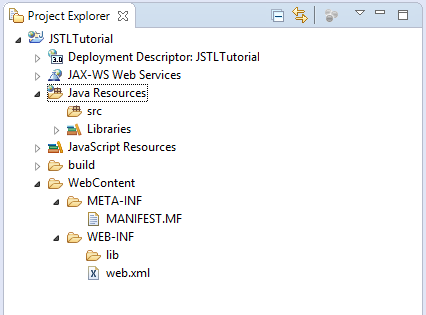
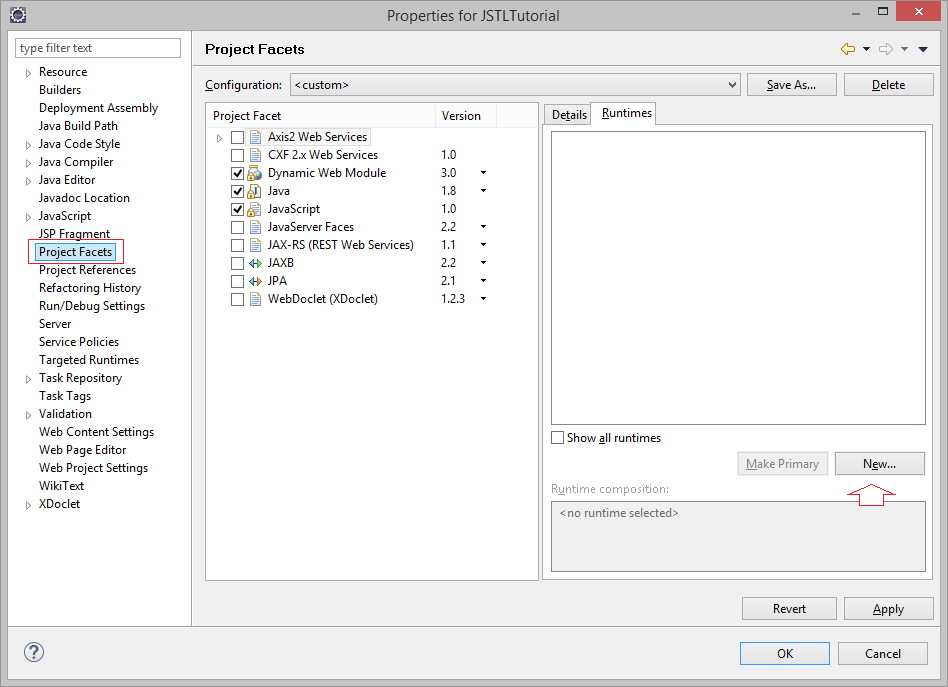
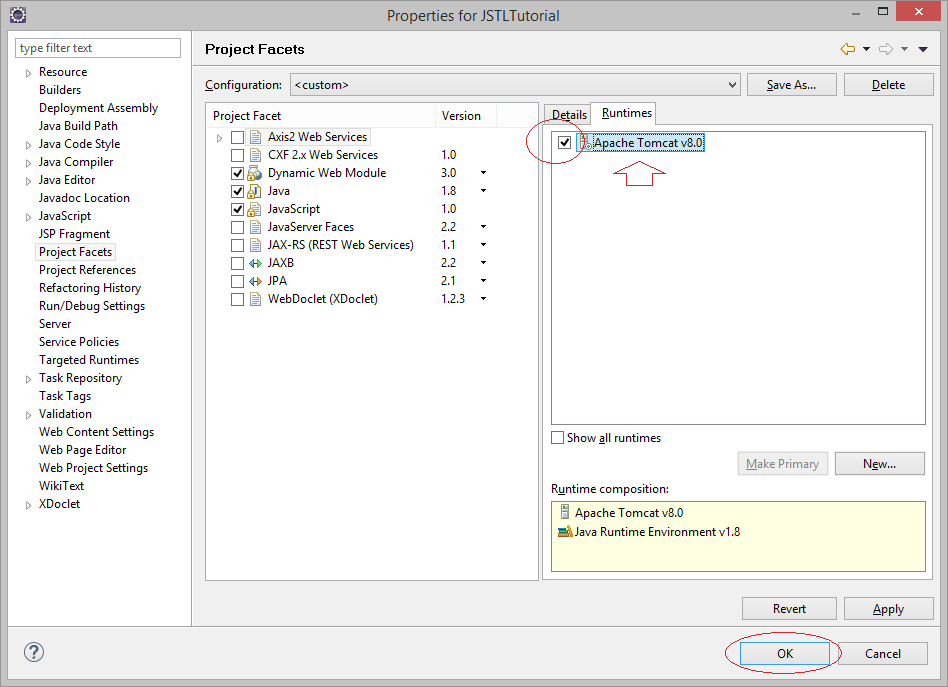
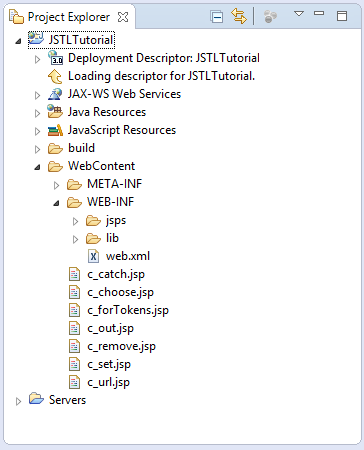
4. Создать WebApp Project
- File/New/Other..
- JSTLTutorial
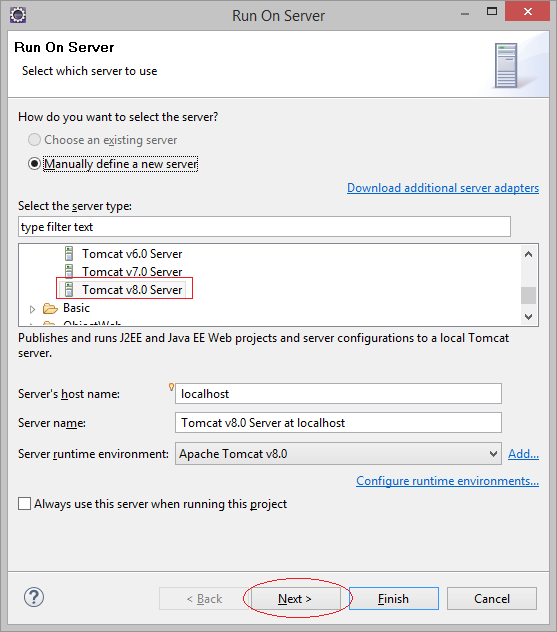
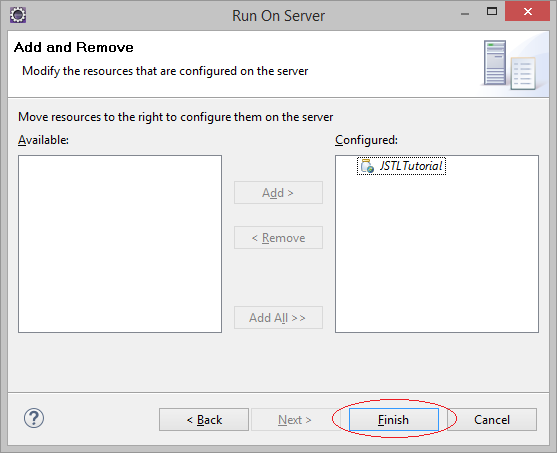
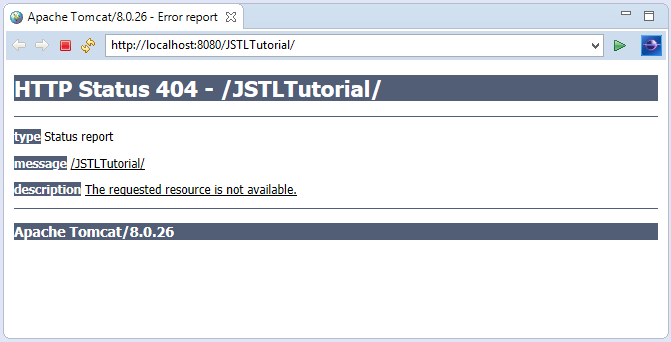
6. Конфигурация запуска Webapp
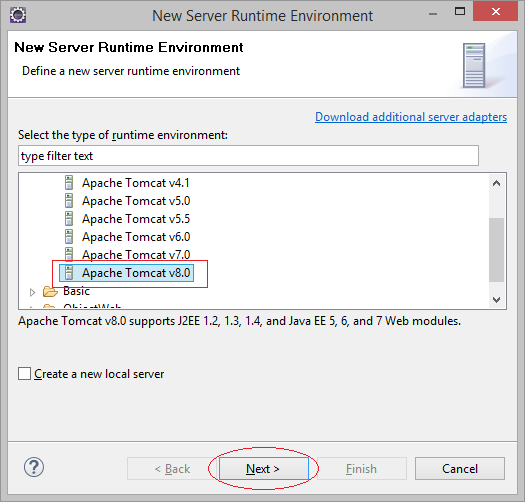
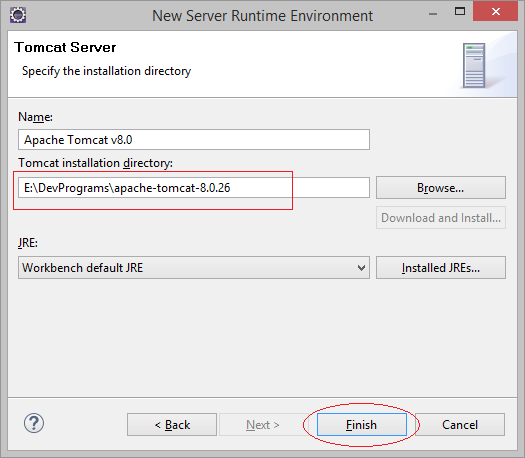
- Run As/Run on Server

7. Некоторые классы участвующие в примерах
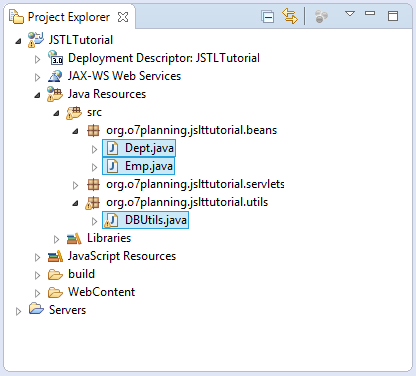
package org.o7planning.jslttutorial.beans;

import java.util.HashSet;
import java.util.Set;

public class Dept {

  private int deptNo;
  private String deptName;
  private String location;

  private Set<Emp> employees;

  public Dept() {

  }

  public Dept(int deptNo, String deptName, String location) {
      this.deptNo = deptNo;
      this.deptName = deptName;
      this.location = location;
  }

  public int getDeptNo() {
      return deptNo;
  }

  public void setDeptNo(int deptNo) {
      this.deptNo = deptNo;
  }

  public String getDeptName() {
      return deptName;
  }

  public void setDeptName(String deptName) {
      this.deptName = deptName;
  }

  public String getLocation() {
      return location;
  }

  public void setLocation(String location) {
      this.location = location;
  }

  public Set<Emp> getEmployees() {
      return employees;
  }

  public void setEmployees(Set<Emp> employees) {
      this.employees = employees;
  }

  public void addEmployee(Emp employee)  {
      if(this.employees== null)  {
          this.employees= new HashSet<Emp>();
      }
      this.employees.add(employee);
  }
}package org.o7planning.jslttutorial.beans;
import java.text.DateFormat;
import java.text.ParseException;
import java.text.SimpleDateFormat;
import java.util.Date;
public class Emp {
private int empNo;
private String empName;
private String job;
private Date hireDate;
private float salary;
private static final DateFormat df = new SimpleDateFormat("MM/dd/yyyy");
public Emp() {
}
// @hireDateStr - must have the format 'MM/dd/yyyy'.
public Emp(int empNo, String empName, String job,
String hireDateStr, float salary) {
this.empNo = empNo;
this.empName = empName;
this.job = job;
this.salary = salary;
try {
this.hireDate = df.parse(hireDateStr);
} catch (ParseException e) {
throw new RuntimeException(e);
}
}
public int getEmpNo() {
return empNo;
}
public void setEmpNo(int empNo) {
this.empNo = empNo;
}
public String getEmpName() {
return empName;
}
public void setEmpName(String empName) {
this.empName = empName;
}
public String getJob() {
return job;
}
public void setJob(String job) {
this.job = job;
}
public Date getHireDate() {
return hireDate;
}
public void setHireDate(Date hireDate) {
this.hireDate = hireDate;
}
public float getSalary() {
return salary;
}
public void setSalary(float salary) {
this.salary = salary;
}
}package org.o7planning.jslttutorial.utils;
import java.util.ArrayList;
import java.util.List;
import java.util.Set;
import org.o7planning.jslttutorial.beans.Dept;
import org.o7planning.jslttutorial.beans.Emp;
public class DBUtils {
private static final List<Dept> DEPARTMENTS = new ArrayList<Dept>();
static {
initData();
}
// Симуляция данных в Database.
private static void initData() {
Dept accountingDept = new Dept(10, "ACCOUNTING", "NEW YORK");
accountingDept.addEmployee(new Emp(7782, "CLARK", "MANAGER", "6/9/1981", 2450.00f));
accountingDept.addEmployee(new Emp(7839, "KING", "PRESIDENT", "11/17/1981", 5000.00f));
accountingDept.addEmployee(new Emp(7934, "MILLER", "CLERK", "6/9/1981", 1300.00f));
//
Dept reseachDept = new Dept(20, "RESEARCH", "DALLAS");
reseachDept.addEmployee(new Emp(7369, "SMITH", "CLERK", "12/17/1980", 800.00f));
reseachDept.addEmployee(new Emp(7788, "SCOTT", "ANALYST", "4/19/1987", 3000.00f));
reseachDept.addEmployee(new Emp(7876, "ADAMS", "CLERK", "5/23/1987", 1100.00f));
reseachDept.addEmployee(new Emp(7876, "FORD", "ANALYST", "12/3/1981", 3000.00f));
reseachDept.addEmployee(new Emp(7566, "JONES", "MANAGER", "4/2/1981", 2975.00f));
//
//
Dept salesDept = new Dept(30, "SALES", "CHICAGO");
salesDept.addEmployee(new Emp(7654, "MARTIN", "SALESMAN", "9/28/1981", 1250.00f));
salesDept.addEmployee(new Emp(7499, "ALLEN", "SALESMAN", "2/20/1981", 1600.00f));
salesDept.addEmployee(new Emp(7521, "WARD", "SALESMAN", "2/22/1981", 1250.00f));
salesDept.addEmployee(new Emp(7844, "TURNER", "SALESMAN", "9/8/1981", 1500.00f));
salesDept.addEmployee(new Emp(7900, "JAMES", "CLERK", "12/3/1981", 950.00f));
//
Dept openrationsDept = new Dept(40, "OPERATIONS", "BOSTON");
//
DEPARTMENTS.add(accountingDept);
DEPARTMENTS.add(reseachDept);
DEPARTMENTS.add(salesDept);
DEPARTMENTS.add(openrationsDept);
}
// Запрос таблицы Department.
public static List<Dept> queryDepartments() {
return DEPARTMENTS;
}
// Запрос таблицы Employee.
// Получить список сотрудников 1 отдела.
public static Set<Emp> queryEmployees(int deptNo) {
for (Dept dept : DEPARTMENTS) {
if (deptNo == dept.getDeptNo()) {
return dept.getEmployees();
}
}
return null;
}
}8. Стандартные теги JSTL (JSTL Core Tags)
Tag | Description |
<c:out> | To write something in JSP page, you can use EL also with this tag |
<c:import> | Same as <jsp:include> or include directive |
<c:redirect> | redirect request to another resource |
<c:set> | To set the variable value in given scope. |
<c:remove> | To remove the variable from given scope |
<c:catch> | To catch the exception and wrap it into an object. |
<c:if> | Simple conditional logic, used with EL and you can use it to process the exception from <c:catch> |
<c:choose> | Simple conditional tag that establishes a context for mutually exclusive conditional operations, marked by <c:when> and <c:otherwise> |
<c:when> | Subtag of <c:choose> that includes its body if its condition evalutes to ‘true’. |
<c:otherwise> | Subtag of <c:choose> that includes its body if its condition evalutes to ‘false’. |
<c:forEach> | for iteration over a collection |
<c:forTokens> | for iteration over tokens separated by a delimiter. |
<c:param> | used with <c:import> to pass parameters |
<c:url> | to create a URL with optional query string parameters |
Равно
(equals) | == | eq |
Неравно
(Not equals) | != | ne |
Меньше
(Less than) | < | lt |
Больше
(Greater than) | > | gt |
Меньше или равно
(Less than or equals) | <= | le |
Больше или равно
(Greater than or equals) | >= | ge |
Понятие | Условие EL | Результат |
Число меньше | ${1 < 2} | true |
Число больше | ${1 > 2} | false |
Число меньше
(Less than) | ${1 lt 2} | true |
Число больше
(Greater than) | ${1 gt 2} | false |
Число больше или равно | ${1 >= 1} | true |
Число меньше или равно | ${1 <= 1} | true |
Число меньше или равно
(Less equals) | ${1 le 1} | true |
Число больше или равно
(Greater than or equal) | ${1 ge 1} | true |
Число равно | ${1 == 1} | true |
Число равно
(equal) | ${1 eq 1} | true |
Число неравно | ${1 != 2} | true |
Число неравно
(not equal) | ${1 ne 2} | true |
Буква меньше | ${'abe' < 'ade'} | true |
Буква больше | ${'abe' > 'ade'} | false |
Буква равна
(Equals) | ${'abe' eq 'abe'} | true |
Буква неравна
(Not equals) | ${'abe' ne 'ade'} | true |
Оператор | Описание |
&& | И |
|| | Или |
${(guess >= 10) && (guess <= 20)} | ${ guess >= 10 && guess <= 20 } |
${(guess < 10) || (guess > 20)} | ${ guess < 10 || guess > 20 } |
Если вы не хотите, чтобы у пользователя был прямой доступ в страницы JSP, вы можете встроить их в каталог WEB-INF или его подкаталоги.
// Получить данные из DB (Симулированной).
List<Dept> list = DBUtils.queryDepartments();

// Записыать данные в атрибут 'departments' в request.
request.setAttribute("departments", list);<c:forEach items="${requestScope.departments}" var="dept">
${dept.deptName}
</c:forEach>
<!-- Or (no need requestScope) -->
<c:forEach items="${departments}" var="dept">
${dept.deptName}
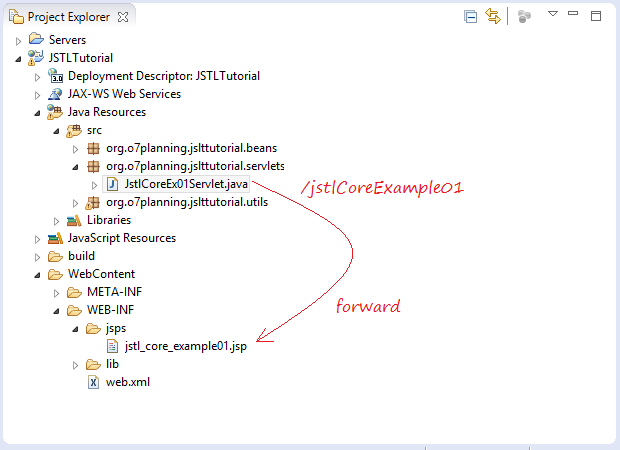
</c:forEach>package org.o7planning.jslttutorial.servlets;
import java.io.IOException;
import java.util.List;
import javax.servlet.RequestDispatcher;
import javax.servlet.ServletException;
import javax.servlet.annotation.WebServlet;
import javax.servlet.http.HttpServlet;
import javax.servlet.http.HttpServletRequest;
import javax.servlet.http.HttpServletResponse;
import org.o7planning.jslttutorial.beans.Dept;
import org.o7planning.jslttutorial.utils.DBUtils;
@WebServlet("/jstlCoreExample01")
public class JstlCoreEx01Servlet extends HttpServlet {
private static final long serialVersionUID = 1L;
public JstlCoreEx01Servlet() {
super();
}
@Override
protected void doGet(HttpServletRequest request, HttpServletResponse response)
throws ServletException, IOException {
// Запрос данных из DB (Симулированной).
List<Dept> list = DBUtils.queryDepartments();
// Сохранить данные в атрибут 'departments' в request.
request.setAttribute("departments", list);
// Создать объект RequestDispatcher
// чтобыForward (перенаправить) запрос к jstl_core_example01.jsp
RequestDispatcher dispatcher = getServletContext()
.getRequestDispatcher("/WEB-INF/jsps/jstl_core_example01.jsp");
// Forward (перенаправить) запрос, чтобы отобразить данные на странице JSP.
dispatcher.forward(request, response);
}
@Override
protected void doPost(HttpServletRequest request, HttpServletResponse response)
throws ServletException, IOException {
doGet(request, response);
}
}<%@ page language="java" contentType="text/html; charset=UTF-8"
pageEncoding="UTF-8"%>
<%@ taglib uri="http://java.sun.com/jsp/jstl/core" prefix="c" %>
<!DOCTYPE html>
<html>
<head>
<meta charset="UTF-8">
<title>JSTL Core Tags Example 01</title>
</head>
<body>
<h2>Departments and Employees</h2>
<c:forEach items="${departments}" var="dept">
<h3>${dept.deptName}</h3>
<ul>
<c:forEach items="${dept.employees}" var="emp">
<li>
${emp.empName} - (${emp.job})
</li>
</c:forEach>
</ul>
</c:forEach>
</body>
</html>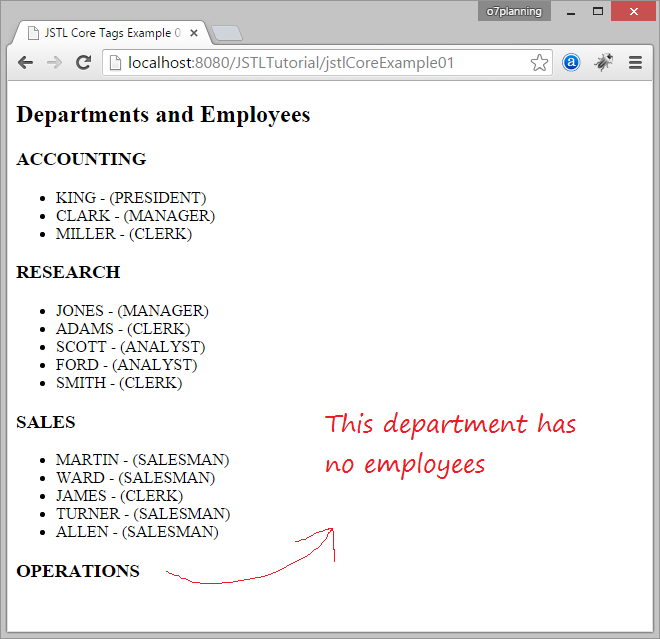
package org.o7planning.jslttutorial.servlets;

import java.io.IOException;
import java.util.List;

import javax.servlet.RequestDispatcher;
import javax.servlet.ServletException;
import javax.servlet.annotation.WebServlet;
import javax.servlet.http.HttpServlet;
import javax.servlet.http.HttpServletRequest;
import javax.servlet.http.HttpServletResponse;

import org.o7planning.jslttutorial.beans.Dept;
import org.o7planning.jslttutorial.utils.DBUtils;

@WebServlet("/jstlCoreExample02")
public class JstlCoreEx02Servlet extends HttpServlet {
	private static final long serialVersionUID = 1L;

	public JstlCoreEx02Servlet() {
		super();
	}

	@Override
	protected void doGet(HttpServletRequest request, HttpServletResponse response)
			throws ServletException, IOException {

		// Приготовить данные из  DB (Симмулированной).
		List<Dept> list = DBUtils.queryDepartments();

		// Сохранить данные в атрибут (attribute) 'departments' в request.
		request.setAttribute("departments", list);

		// Создать объект RequestDispatcher
		// чтобы forward (перенаправить) запрос к jstl_core_example02.jsp
		RequestDispatcher dispatcher = getServletContext()
				.getRequestDispatcher("/WEB-INF/jsps/jstl_core_example02.jsp");

		// Forward (Перенаправить) запрос, чтобы отобразить страницу JSP.
		dispatcher.forward(request, response);
	}

	@Override
	protected void doPost(HttpServletRequest request, HttpServletResponse response)
			throws ServletException, IOException {
		doGet(request, response);
	}

}<%@ page language="java" contentType="text/html; charset=UTF-8"
pageEncoding="UTF-8"%>
<%@ taglib uri="http://java.sun.com/jsp/jstl/core" prefix="c" %>
<!DOCTYPE html>
<html>
<head>
<meta charset="UTF-8">
<title>JSTL Core Tags Example 01</title>
</head>
<body>
<h2>Departments and Employees</h2>
<c:forEach items="${departments}" var="dept">
<!-- Check if collection is not null or not empty -->
<c:if test="${not empty dept.employees}">
<h3>${dept.deptName}</h3>
<ul>
<c:forEach items="${dept.employees}" var="emp">
<li>
${emp.empName} - (${emp.job})
</li>
</c:forEach>
</ul>
</c:if>
</c:forEach>
</body>
</html>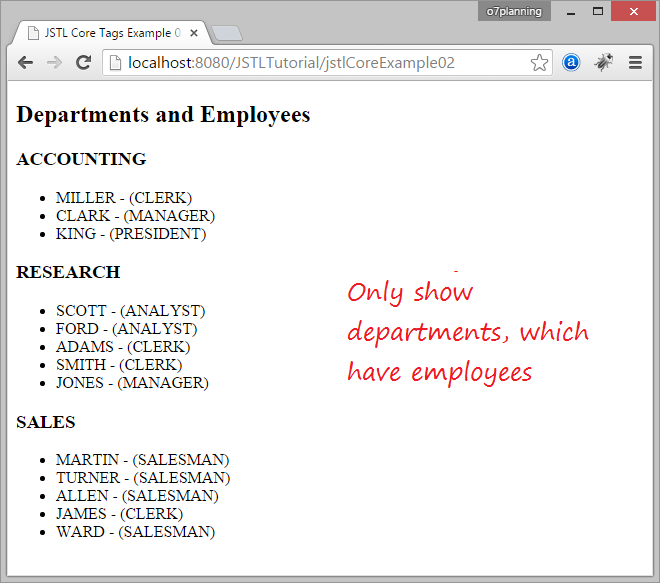
<c:choose>
    <c:when test="${condition1}">
       <%-- do something if condition1 is true  --%>
    </c:when>
    <c:when test="${condition2}">
        <%-- do something if condition2 is true  --%>
    </c:when>
    <c:otherwise>
        <%-- Statements which gets executed when all <c:when> tests are false.  --%>
    </c:otherwise>
</c:choose><%@ taglib uri="http://java.sun.com/jsp/jstl/core" prefix="c" %>
<!DOCTYPE html>
<html>
<head>
<meta charset="UTF-8">
<title>c:choose,c:when,c:otherwise example</title>
</head>
<body>
<h2>c:choose,c:when,c:otherwise example</h2>
<c:choose>
<%-- When color parameter == 'red' --%>
<c:when test="${param.color=='red'}">
<p style="color:red;">RED COLOR</p>
</c:when>
<%-- When color parameter == 'blue' --%>
<c:when test="${param.color=='blue'}">
<p style="color:blue;">BLUE COLOR</p>
</c:when>
<%-- Otherwise --%>
<c:otherwise>
<b>Other color</b>
</c:otherwise>
</c:choose>
</body>
</html>
Escape значит, что если есть особенные символы <> или & находящиеся в <с:out>, при распечатывании будет преобразован в < и > и & amp;
- Например:
- <c:out value = "$ { '<atag> &'}" />
- Распечатать (смотреть исходный код страницы в браузере).
- & lt; atag & lt; & amp;
<%@ taglib uri="http://java.sun.com/jsp/jstl/core" prefix="c" %>

<!DOCTYPE html>
<html>
<head>
<meta charset="UTF-8">
<title>c:out example</title>
</head>
<body>

<h2>c:out example</h2>

<c:out value="${'This is true: 10 > 1 '}" />

<br/>
Tag: <c:out value="${'<atag> , &'}"/>

</body>
</html>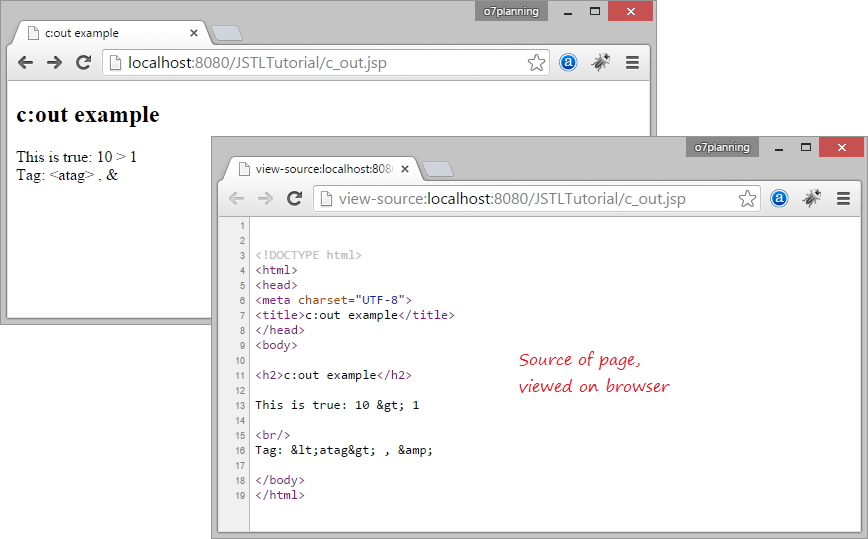
<%@ taglib uri="http://java.sun.com/jsp/jstl/core" prefix="c" %>

<!DOCTYPE html>
<html>
<head>
<meta charset="UTF-8">
<title>c:set example</title>
</head>
<body>

<h2>c:set example</h2>

<c:set scope="request" var="greeting" value="Hello every body" />


Greeting: <c:out value="${greeting}"/>

</body>
</html>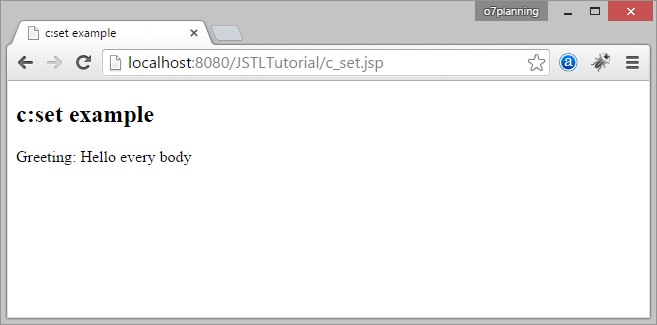
<%@ taglib uri="http://java.sun.com/jsp/jstl/core" prefix="c" %>

<!DOCTYPE html>
<html>
<head>
<meta charset="UTF-8">
<title>c:remove example</title>
</head>
<body>

<h2>c:remove example</h2>

<c:set scope="request" var="greeting" value="Hello every body" />


Greeting: <c:out value="${greeting}"/>
<br/><br/>

<c:remove scope="request" var="greeting" />
After remove:
<br/>
Greeting: <c:out value="${greeting}"/>

</body>
</html>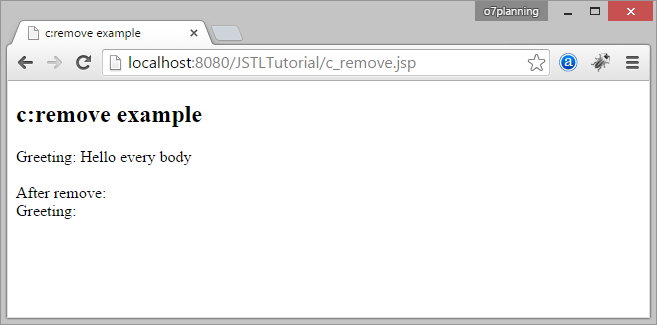
<%@ taglib uri="http://java.sun.com/jsp/jstl/core" prefix="c" %>

<!DOCTYPE html>
<html>
<head>
<meta charset="UTF-8">
<title>c:catch example</title>
</head>
<body>

<h2>c:catch example</h2>

<c:catch var ="ex">
  <%
   int a = 100/0;
  %>
</c:catch>

<c:if test = "${ex != null}">
 Exception : ${ex}
 <br />
 Message: ${ex.message}
</c:if>

</body>
</html>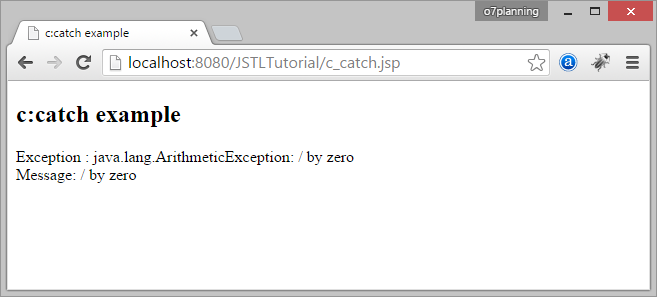
<%@ taglib uri="http://java.sun.com/jsp/jstl/core" prefix="c" %>

<!DOCTYPE html>
<html>
<head>
<meta charset="UTF-8">
<title>c:forTokens example</title>
</head>
<body>

<h2>c:forTokens example</h2>


<c:forTokens items="Tom,Jerry,Donald" delims="," var="name">
  <c:out value="${name}"/><p>
</c:forTokens>

</body>
</html>
<%@ taglib uri="http://java.sun.com/jsp/jstl/core" prefix="c" %>

<!DOCTYPE html>
<html>
<head>
<meta charset="UTF-8">
<title>c:url,c:param example</title>
</head>
<body>

<h2>c:url,c:param example</h2>


<c:url value="http://example.com/showPage.jsp" var="myURL">
  <c:param name="color" value="red"/>
  <c:param name="background" value="blue"/>
</c:url>

<c:out value="${myURL}"/>

</body>
</html>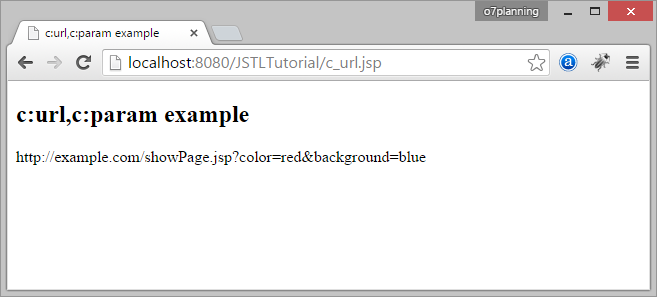
9. JSTL Formatting and Localization Tags
Tag | Description |
<fmt:formatNumber> | To render numerical value with specific precision or format. |
<fmt:parseNumber> | Parses the string representation of a number, currency, or percentage. |
<fmt:formatDate> | Formats a date and/or time using the supplied styles and pattern |
<fmt:parseDate> | Parses the string representation of a date and/or time |
<fmt:bundle> | Loads a resource bundle to be used by its tag body. |
<fmt:setLocale> | Stores the given locale in the locale configuration variable. |
<fmt:setBundle> | Loads a resource bundle and stores it in the named scoped variable or the bundle configuration variable. |
<fmt:timeZone> | Specifies the time zone for any time formatting or parsing actions nested in its body. |
<fmt:setTimeZone> | Stores the given time zone in the time zone configuration variable |
<fmt:message> | To display an internationalized message. |
<fmt:requestEncoding> | Sets the request character encoding |
<fmt:formatNumber
  value="<number>"
  type="<string>"
  pattern="<string>"
  currencyCode="<string>"
  currencySymbol="<string>"
  groupingUsed="<string>"
  maxIntegerDigits="<integer>"
  minIntegerDigits="<integer>"
  maxFractionDigits="<integer>"
  minFractionDigits="<integer>"
  var="<string>"
scope="<string>"/>Name | Required | Type | Default | Description |
value | Yes | Number | Numeric value to be formatted. | |
type | String | number | Determines whether the value is formatted as a number, currency or percentage. | |
pattern | String | Formatting pattern. | ||
currencyCode | String | From the default locale | The currency code to be used if the type attribute is currency. | |
currencySymbol | String | From the default locale | The currency symbol to be used if the type attribute is currency. | |
groupingUsed | String | true | Whether any grouping separated to be used when formatting the output. | |
maxIntegerDigits | Integer | Maximum number of digits in the integer portion. | ||
minIntegerDigits | Integer | Minimum number of digits in the integer portion. | ||
maxFractionDigits | Integer | Maximum number of digits in the fraction portion. | ||
minFractionDigits | Integer | Minimum number of digits in the fraction portion. | ||
var | String | Print to page | Name of the variable which stores the formatted result. | |
scope | String | Scope to store the var. |
<%@ taglib uri="http://java.sun.com/jsp/jstl/core" prefix="c" %>
<%@ taglib uri="http://java.sun.com/jsp/jstl/fmt" prefix="fmt" %>
<!DOCTYPE html>
<html>
  <head>
     <meta charset="UTF-8">
     <title>fmt:formatNumber example</title>
  </head>
  <body>
     <h2>fmt:formatNumber example</h2>
     <c:set var="accountBalance" value="12345.6789" />
     <h3>accountBalance=<c:out value="${accountBalance}"/></h3>

     The Account Balance can be displayed using various ways:

     <p>
        formatNumber (type='currency'):
        <strong>
           <fmt:formatNumber value="${accountBalance}" type="currency"/>
        </strong>
     </p>
     <p>
        formatNumber (type='number', maxIntegerDigits= '3'):
        <strong>
           <fmt:formatNumber type="number" maxIntegerDigits="3" value="${accountBalance}" />
        </strong>
     </p>
     <p>
        formatNumber (type='number', maxFractionDigits= '3'):
        <strong>
           <fmt:formatNumber type="number" maxFractionDigits="3" value="${accountBalance}" />
        </strong>
     </p>
     <p>
        formatNumber (type='number', groupingUsed= 'false'):
        <strong>
           <fmt:formatNumber type="number" groupingUsed="false" value="${accountBalance}" />
        </strong>
     </p>
     <p>
        formatNumber (type='percent', maxIntegerDigits= '3'):
        <strong>
           <fmt:formatNumber type="percent" maxIntegerDigits="3" value="${accountBalance}" />
        </strong>
     </p>
     <p>
        formatNumber (type='percent', maxIntegerDigits= '10'):
        <strong>
           <fmt:formatNumber type="percent" minFractionDigits="10" value="${accountBalance}" />
        </strong>
     </p>
     <p>
        formatNumber (type='number', pattern= '###.###E0'):
        <strong>
           <fmt:formatNumber type="number" pattern="###.###E0" value="${accountBalance}" />
        </strong>
     </p>
     <p>
        Account Balance in USA (fmt:setLocale value='en_US'):
        <br/>
        formatNumber (type='currency'):
        <fmt:setLocale value="en_US"/>
        <strong>
           <fmt:formatNumber value="${accountBalance}" type="currency"/>
        </strong>
     <p>
        Account Balance in Canada (fmt:setLocale value='fr_CA'):
        <br/>
        formatNumber (type='currency'):
        <fmt:setLocale value="fr_CA"/>
        <strong>
           <fmt:formatNumber value="${accountBalance}" type="currency"/>
        </strong>
  </body>

</html>
<fmt:parseNumber
   value="<string>"
   type="<string>"
   pattern="<string>"
   parseLocale="<string>"
   integerOnly="<string>"
   var="<string>"
scope="<string>"/>Name | Required | Type | Default | Description |
value | Yes | String | String to be parsed. | |
type | String | number | Determines whether the String provided in the value attribute to be parsed as a NUMBER, CURRENRY or PERCENTAGE. Default is NUMBER. | |
pattern | String | Pattern on how the given string in the value attribute is parsed. | ||
parseLocale | String | Default locale | Locale to use when parsing the value using the given pattern. | |
integerOnly | String | false | Specifies whether only the integer part of the value is parsed. | |
var | String | Print to page | Name of the variable which stores the result of the parsed value. The result is of type java.lang.Number. | |
scope | String | page | Scope for the var to store. |
<%@ taglib uri="http://java.sun.com/jsp/jstl/core" prefix="c" %>
<%@ taglib uri="http://java.sun.com/jsp/jstl/fmt" prefix="fmt" %>
<!DOCTYPE html>
<html>
  <head>
     <meta charset="UTF-8">
     <title>fmt:parseNumber example</title>
  </head>
  <body>
     <h2>fmt:parseNumber example</h2>

   <!-- a String in currency format -->
   <c:set var="accountBalance" value="$12345.6789" />

   <h4>Input <c:out value="${accountBalance}"/></h4>

   <fmt:parseNumber var="parsedNumber" type="currency"
                  parseLocale="en_US"
                  value="${accountBalance}" />

   <p>Account Balance: <c:out value="${parsedNumber}" /></p>

   <!-- integerOnly="true" : Specifies whether only
              the integer part of the value is parsed. -->

   <fmt:parseNumber var="parsedNumber" type="currency"
                   integerOnly="true" parseLocale="en_US"
                   value="${accountBalance}" />

   <p>Account Balance (without cents): <c:out value="${parsedNumber}" /></p>
  </body>

</html>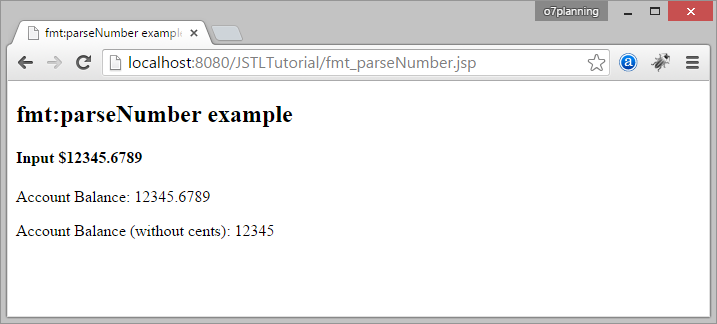
Name | Required | Type | Default | Description |
value | True | Date | Date or time to be formatted. | |
type | False | String | date | Determines whether date or time or both to be formatted in the given date. |
dateStyle | False | String | default | Formatting style for date. The date format can be specified with similar semantics in class java.text.DateFormat. |
timeStyle | False | String | default | Formatting style for time. The time format can be specified with similar semantics in class java.text.DateFormat. |
pattern | False | String | Pattern to be used for date and time when formatting. | |
timeZone | False | String | Default time zone | Time zone to represent for the formatted time. |
var | False | String | Print to Page | Name of the variable to store the resulted formatted date or time. |
scope | False | String | page | Scope to store the var. |
Code | Purpose | Sample |
G | The era designator | AD |
y | The year | 2002 |
M | The month | April & 04 |
d | The day of the month | 20 |
h | The hour(12-hour time) | 12 |
H | The hour(24-hour time) | 0 |
m | The minute | 45 |
s | The second | 52 |
S | The millisecond | 970 |
E | The day of the week | Tuesday |
D | The day of the year | 180 |
F | The day of the week in the month | 2 (2nd Wed in month) |
w | The week in the year | 27 |
W | The week in the month | 2 |
a | The a.m./p.m. indicator | PM |
k | The hour(12-hour time) | 24 |
K | The hour(24-hour time) | 0 |
z | The time zone | Central Standard Time |
' | The escape for text | |
'' | The single quote |
<%@ page language="java" contentType="text/html; charset=UTF-8"
   pageEncoding="UTF-8"%>

<%@ taglib uri="http://java.sun.com/jsp/jstl/core" prefix="c" %>
<%@ taglib uri="http://java.sun.com/jsp/jstl/fmt" prefix="fmt" %>
<!DOCTYPE html>
<html>
  <head>
     <meta charset="UTF-8">
     <title>fmt:formatDate example</title>
  </head>
  <body>
     <h2>fmt:formatDate example</h2>
     <c:set var="now" value="<%=new java.util.Date()%>" />
     <p>
        Time (fmt:formatDate type="time"):
        <strong>
           <fmt:formatDate type="time" value="${now}" />
        </strong>
     </p>
     <p>
        Date (fmt:formatDate type="date"):
        <strong>
           <fmt:formatDate type="date" value="${now}" />
        </strong>
     </p>
     <p>
        Date, Time (fmt:formatDate type="both"):
        <strong>
           <fmt:formatDate type="both" value="${now}" />
        </strong>
     </p>
     <p>
        Date, Time Short (fmt:formatDate type="both" dateStyle="short"):
        <strong>
           <fmt:formatDate type="both" dateStyle="short" timeStyle="short" value="${now}" />
        </strong>
     </p>
     <p>
        Date, Time Medium (fmt:formatDate type="both" dateStyle="medium" timeStyle="medium"):
        <strong>
           <fmt:formatDate type="both" dateStyle="medium" timeStyle="medium" value="${now}" />
        </strong>
     </p>
     <p>
        Date, Time Long (fmt:formatDate type="both" dateStyle="long" timeStyle="long"):
        <strong>
           <fmt:formatDate type="both" dateStyle="long" timeStyle="long" value="${now}" />
        </strong>
     </p>
     <p>
        Date, Time (dd-MM-yyyy HH:mm:ss):
        <strong>
           <fmt:formatDate pattern="dd-MM-yyyy HH:mm:ss" value="${now}" />
        </strong>
     </p>

     <!-- Store in variable -->
     <fmt:formatDate pattern="dd-MM-yyyy HH:mm" value="${now}" var="nowString"/>

      <p>
        Now String (dd-MM-yyyy HH:mm):
        <strong>
           <c:out value="${nowString}" />
        </strong>
      </p>
  </body>
</html>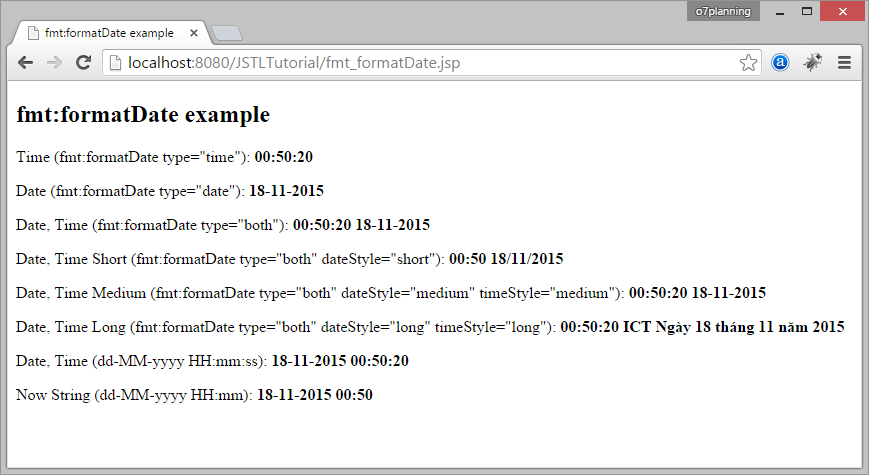
<fmt:parseDate
   value="<string>"
   type="<string>"
   dateStyle="<string>"
   timeStyle="<string>"
   pattern="<string>"
   timeZone="<string>"
   parseLocale="<string>"
   var="<string>"
scope="<string>"/>Name | Required | Type | Default | Description |
value | False | String | Body | The date string to be parsed. |
type | False | String | date | Determines whether value specified in the value attribute contains a date, time or both. |
dateStyle | False | String | default | Specifies date style (SHORT, LONG, FULL, MEDIUM or DEFAULT). |
timeStyle | False | String | default | Specifies time style (SHORT, LONG, FULL, MEDIUM or DEFAULT). |
pattern | False | String | Specifies the pattern on how the date string to be parsed. | |
timeZone | False | String | Default time zone | Time zone to interpret if date string contains any time information. |
parseLocale | False | String | Default Locale | Locale whose date time formatting will be used to parse the date time. |
var | False | String | Print to Page | Name of the variable to store the parsed result. |
scope | False | String | page | Scope to store the var. |
<%@ taglib uri="http://java.sun.com/jsp/jstl/core" prefix="c" %>
<%@ taglib uri="http://java.sun.com/jsp/jstl/fmt" prefix="fmt" %>
<!DOCTYPE html>
<html>
  <head>
     <meta charset="UTF-8">
     <title>fmt:parseDate example</title>
  </head>
  <body>
     <h2>fmt:parseDate example</h2>
     <!-- a Date time string -->

     <c:set var="dateTimeString" value="17-11-2015 11:49" />
     <h4>
        dateTimeString:
        <c:out value="${dateTimeString}"/>
     </h4>

     <!-- Parsing a date time string, and store in a variable type of java.util.Date -->
     <fmt:parseDate value="${dateTimeString}"
        type="both" var="parsedDatetime" pattern="dd-MM-yyyy HH:mm" />
     <p>
        The date time after parsing:
        <c:out value="${parsedDatetime}" />
     </p>
     <br/>
     <p>
        Date only (dd/MM/yyyy):
        <fmt:formatDate value="${parsedDatetime}" pattern="dd/MM/yyyy"/>
  </body>

</html>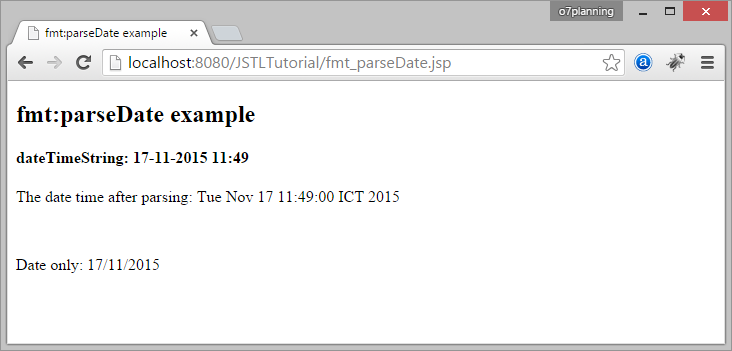
<fmt:bundle baseName="<string>" prefix="<string>"/>Name | Required | Type | Default | Description |
baseName | True | String | Resource bundle’s fully qualified name. Follows the Java’s fully qualified class name convention (‘.’ is used to separate the package names). For example: org.o7planning.MyBundle. | |
prefix | False | String | When used with <fmt:message> this attribute specifies the value to be prepended in the key value so that each time we do not have to provide the prefix repeatedly. |
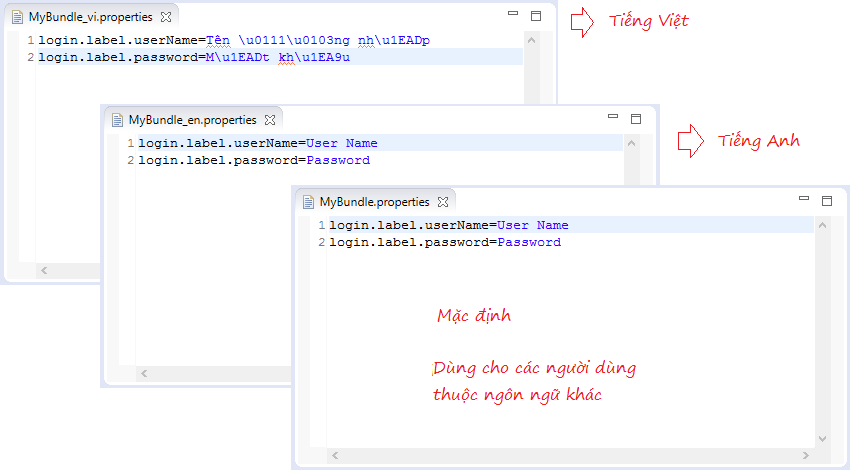
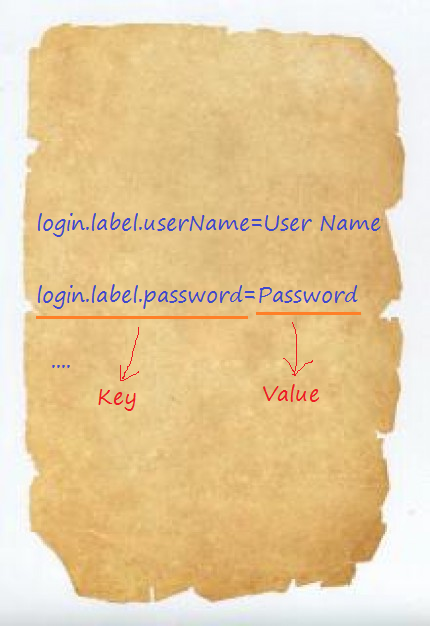
login.label.userName=User Name
login.label.password=Passwordlogin.label.userName=Tên \u0111\u0103ng nh\u1EADp
login.label.password=M\u1EADt kh\u1EA9uК сожалению, при чтении файла .properties через ResourceBundle, он всегда читается с кодированием 'ISO-8859-1'. Вы не можете использовать Unicode в файле properties. Обычным подходом являются Escapse символы Unicode в файле Properties. Тогда, он будет выглядеть как ниже:
Escapse ===>
- login.label.password=Mật khẩu
- login.label.password=M\u1EADt kh\u1EA9u
Когда вы вводите символы Unicode в файлы properties выше "Properties File Editor" в Eclipse, он автоматически заменяет символы не являющиеся ASCII (None-ASCII).
<%@ taglib uri="http://java.sun.com/jsp/jstl/core" prefix="c" %>
<%@ taglib uri="http://java.sun.com/jsp/jstl/fmt" prefix="fmt" %>
<c:if test="${not empty param.language}">
<c:set var="language" value="${param.language}" scope="session"/>
</c:if>
<fmt:setLocale value="${language}" />
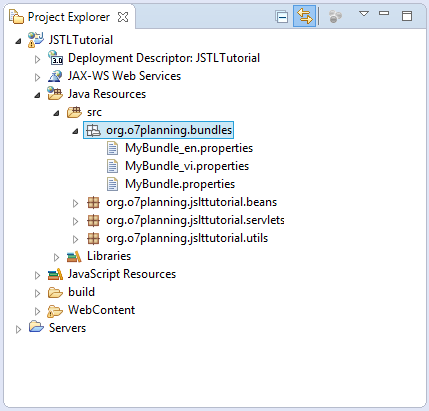
<fmt:setBundle basename="org.o7planning.bundles.MyBundle" />
<!DOCTYPE html>
<html>
<head>
<meta charset="UTF-8">
<title>fmt:bundle example</title>
</head>
<body>
<h2>fmt:bundle example</h2>
<form action="">
<table border="0">
<tr>
<td>
<fmt:message key="login.label.userName"/>
</td>
<td>
<input type="text" name="userName" />
</td>
</tr>
<tr>
<td>
<fmt:message key="login.label.password"/>
</td>
<td><input type="text" name="userName" /></td>
</tr>
</table>
<input type="submit" value="Submit"/>
</form>
</body>
</html>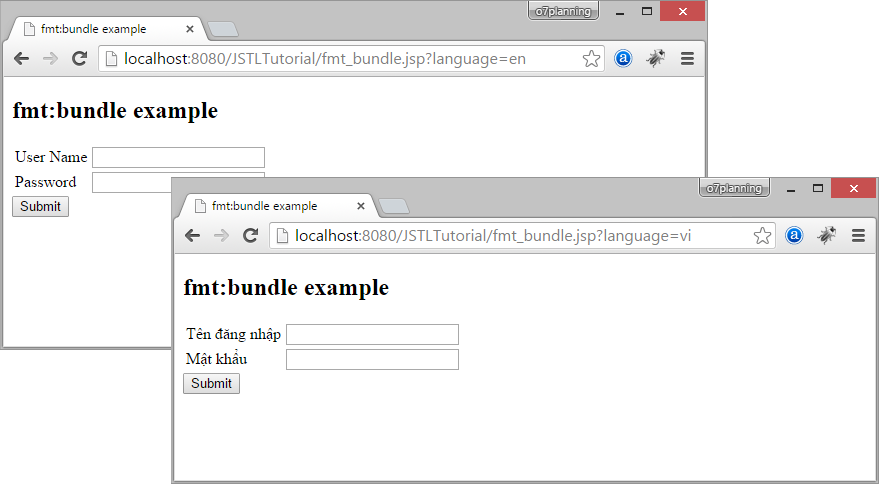
Примечание:<!-- If the user has used one language on a page, variable 'language' in 'session' scope, its value will stored in user session, and the website will be displayed in that language, if the parameters of the page does not specify different values for it. --> <c:set var="language" value="${param.language}" scope="session"/> <fmt:setLocale value="${language}" />
<fmt:message
   key="<string>"
   bundle="<string>"
   var="<string>"
scope="<string>"/>Name | Required | Type | Default | Description |
key | False | String | Body | Key of the message to be looked up from the resource bundle. |
bundle | False | String | Default bundle | Which resource bundle the key to be looked up. |
var | False | String | Print to Page | Name of the variable to store the localized message. |
scope | False | String | page | The scope in which the localized message variable to be stored. |
Руководства Java Servlet/JSP
- Установите Tomcat Server для Eclipse
- Установите Glassfish Web Server в Windows
- Запускать веб-приложение Java Maven в Tomcat Maven Plugin
- Запуск веб-приложения Java Maven в Jetty Maven Plugin
- Запуск фоновой задачи в приложении Java Servlet
- Руководство Java Servlet для начинающих
- Руководство Java Servlet Filter
- Руководство Java JSP для начинающих
- Руководство Java JSP Standard Tag Library (JSTL)
- Установите Web Tools Platform для Eclipse
- Создайте простое приложение для входа и закрепите его с помощью Java Servlet Filter
- Создание простого веб-приложения Java с использованием Servlet, JSP и JDBC
- Загрузка и загрузка файлов, хранящихся на жестком диске с помощью Java Servlet
- Выгрузка и загрузка файлов из базы данных с помощью Java Servlet
- Отображение изображения из базы данных с помощью Java Servlet
- Перенаправление 301 Постоянное перенаправление в Java Servlet
- Как автоматически перенаправить http на https в веб-приложение Java?
- Используйте Google reCAPTCHA в веб-приложении Java