Руководство Spring MVC для начинающих

1. Введение
Статья основана на:
- Eclipse 4.6 (NEON)
- Spring 4.0.3.RELEASE
Подсказка: Вам стоит просмотреть статью про структуру Spring Framework, и что на самом деле делает Spring, через инструкцию HelloWorld Spring по ссылке:
(Цель: Представить о Spring, объяснить @Service, @Component, @Repository, ... и дать пример HelloWorld)
Предварительно посмотреть пример:

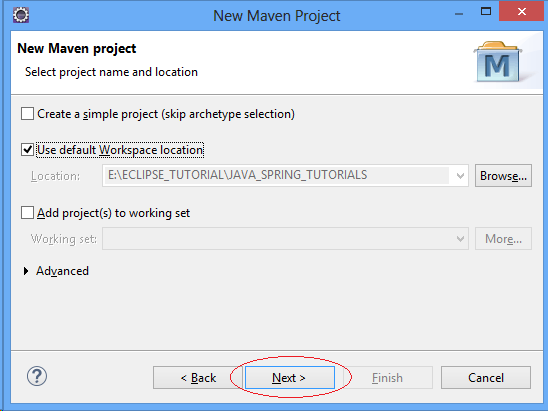
2. Создать Maven Project
Создать Project вида Maven. Maven помогает нам управлять библиотеку лучшим способом. Вы сможете иметь больше времени на обработку других задач.
В Eclipse выберите:
- File/New/Other...
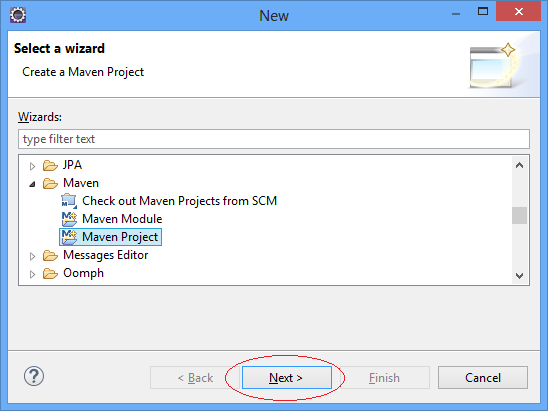
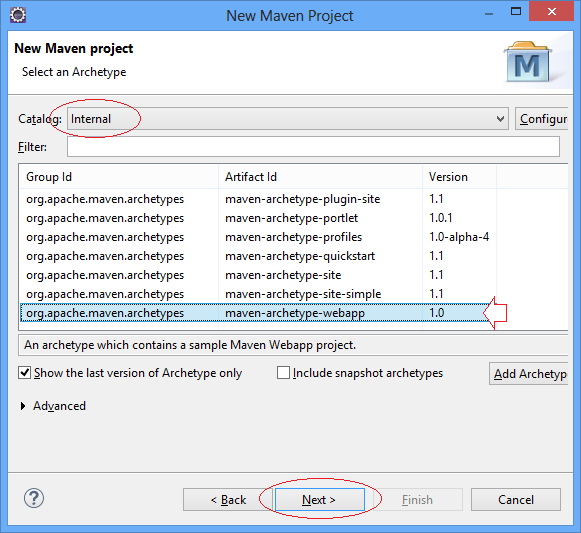
Выбрать архетип (archetype) "maven-archetype-webapp".
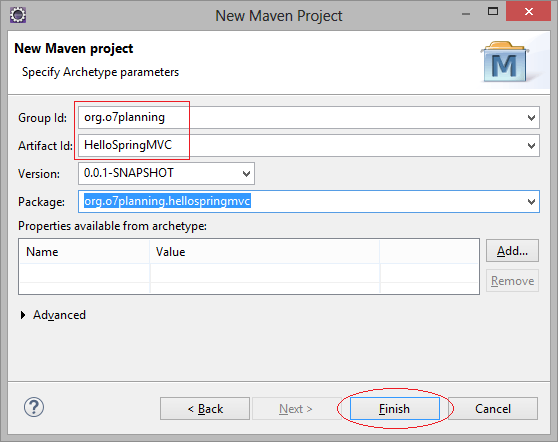
Ввести:
- Group Id: org.o7planning
- Artifact Id: HelloSpringMVC
- Package: org.o7planning.hellospringmvc
Это структура созданного Project:
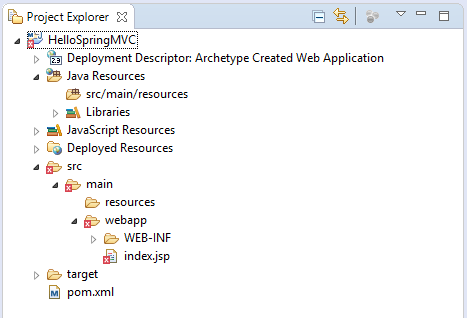
Не беспокойтес об оповещении ошибки при только что созданном Project. Причиной является то, что вы не объявили библиотеку Servlet.
Eclipse создает project Maven с возможно неправильной струкутурой. Вам нужно проверить.
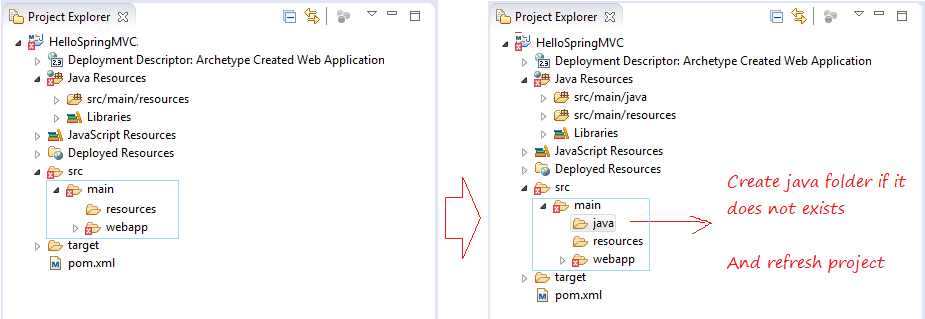
Удостоверьтесь что вы используете Java >= 6
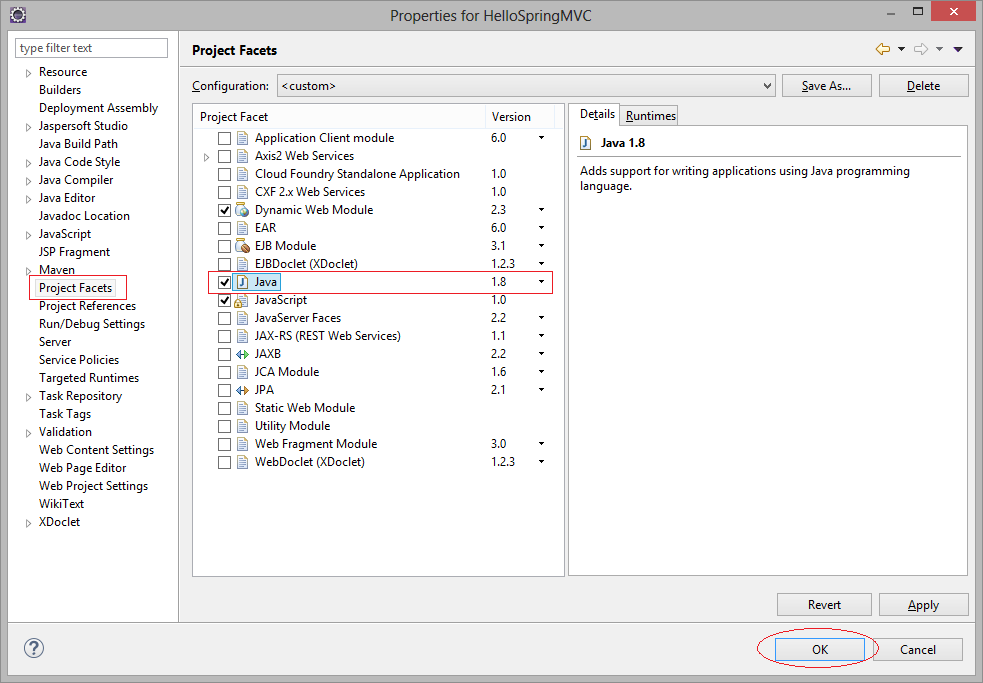
Project Properties:
3. Объявить Maven и web.xml
Объявить использование библиотеки:
pom.xml
<project xmlns="http://maven.apache.org/POM/4.0.0" xmlns:xsi="http://www.w3.org/2001/XMLSchema-instance"
  xsi:schemaLocation="http://maven.apache.org/POM/4.0.0 http://maven.apache.org/maven-v4_0_0.xsd">
  <modelVersion>4.0.0</modelVersion>
  <groupId>org.o7planning</groupId>
  <artifactId>HelloSpringMVC</artifactId>
  <packaging>war</packaging>
  <version>0.0.1-SNAPSHOT</version>
  <name>HelloSpringMVC Maven Webapp</name>
  <url>http://maven.apache.org</url>


    <dependencies>

        <dependency>
            <groupId>junit</groupId>
            <artifactId>junit</artifactId>
            <version>3.8.1</version>
            <scope>test</scope>
        </dependency>

        <!-- Servlet Library -->
        <!-- http://mvnrepository.com/artifact/javax.servlet/javax.servlet-api -->
        <dependency>
            <groupId>javax.servlet</groupId>
            <artifactId>javax.servlet-api</artifactId>
            <version>3.1.0</version>
            <scope>provided</scope>
        </dependency>

        <!-- Spring dependencies -->
        <!-- http://mvnrepository.com/artifact/org.springframework/spring-core -->
        <dependency>
            <groupId>org.springframework</groupId>
            <artifactId>spring-core</artifactId>
            <version>4.3.1.RELEASE</version>
        </dependency>

        <!-- http://mvnrepository.com/artifact/org.springframework/spring-web -->
        <dependency>
            <groupId>org.springframework</groupId>
            <artifactId>spring-web</artifactId>
            <version>4.3.1.RELEASE</version>
        </dependency>

        <!-- http://mvnrepository.com/artifact/org.springframework/spring-webmvc -->
        <dependency>
            <groupId>org.springframework</groupId>
            <artifactId>spring-webmvc</artifactId>
            <version>4.3.1.RELEASE</version>
        </dependency>

    </dependencies>


    <build>
        <finalName>HelloSpringMVC</finalName>
        <plugins>

            <!-- Config: Maven Tomcat Plugin -->
            <!-- http://mvnrepository.com/artifact/org.apache.tomcat.maven/tomcat7-maven-plugin -->
            <plugin>
                <groupId>org.apache.tomcat.maven</groupId>
                <artifactId>tomcat7-maven-plugin</artifactId>
                <version>2.2</version>
                <!-- Config: contextPath and Port (Default: /HelloSpringMVC : 8080) -->
                <!--
                <configuration>
                    <path>/</path>
                    <port>8899</port>
                </configuration>
                -->
            </plugin>
        </plugins>
    </build>

</project>
Использовать Servlet API 3 или версию новее:
web.xml
<?xml version="1.0" encoding="UTF-8"?>
<web-app xmlns:xsi="http://www.w3.org/2001/XMLSchema-instance"
    xmlns="http://java.sun.com/xml/ns/javaee"
    xsi:schemaLocation="http://java.sun.com/xml/ns/javaee
    http://java.sun.com/xml/ns/javaee/web-app_3_0.xsd"
    id="WebApp_ID" version="3.0">

    <display-name>HelloSpringMVC</display-name>

</web-app>
4. Конфигурация Spring MVC
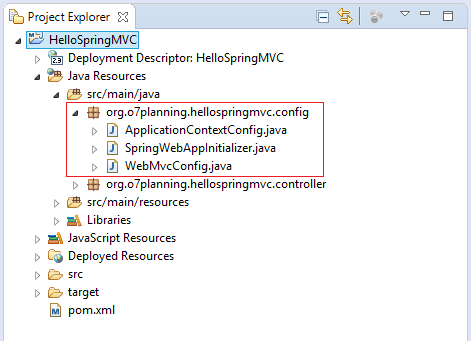
SpringWebAppInitializer это класс выполняющий (implements) интейрфейс WebApplicationInitializer. Spring прочитает информацию конфигурации в этом классе, чтобы инициализировать (initial) ваше веб приложение.
Обычно в данном классе вы можете зарегистрировать Servlet, Servlet Filter, и Servlet Listener вместо того, чтобы регистрировать их в web.xml.
Важный servlet это org.springframework.web.servlet.DispatcherServlet, вам нужно его зарегистрировать.
Обычно в данном классе вы можете зарегистрировать Servlet, Servlet Filter, и Servlet Listener вместо того, чтобы регистрировать их в web.xml.
Важный servlet это org.springframework.web.servlet.DispatcherServlet, вам нужно его зарегистрировать.
SpringWebAppInitializer.java
package org.o7planning.hellospringmvc.config;

import javax.servlet.FilterRegistration;
import javax.servlet.ServletContext;
import javax.servlet.ServletException;
import javax.servlet.ServletRegistration;

import org.springframework.web.WebApplicationInitializer;
import org.springframework.web.context.ContextLoaderListener;
import org.springframework.web.context.support.AnnotationConfigWebApplicationContext;
import org.springframework.web.filter.CharacterEncodingFilter;
import org.springframework.web.servlet.DispatcherServlet;

public class SpringWebAppInitializer implements WebApplicationInitializer {

    @Override
    public void onStartup(ServletContext servletContext) throws ServletException {
        AnnotationConfigWebApplicationContext appContext = new AnnotationConfigWebApplicationContext();
        appContext.register(ApplicationContextConfig.class);

        // Dispatcher Servlet
        ServletRegistration.Dynamic dispatcher = servletContext.addServlet("SpringDispatcher",
                new DispatcherServlet(appContext));
        dispatcher.setLoadOnStartup(1);
        dispatcher.addMapping("/");

        dispatcher.setInitParameter("contextClass", appContext.getClass().getName());

        servletContext.addListener(new ContextLoaderListener(appContext));

        // UTF8 Charactor Filter.
        FilterRegistration.Dynamic fr = servletContext.addFilter("encodingFilter", CharacterEncodingFilter.class);

        fr.setInitParameter("encoding", "UTF-8");
        fr.setInitParameter("forceEncoding", "true");
        fr.addMappingForUrlPatterns(null, true, "/*");
    }

}
Класс ApplicationContextConfig используется для объявления Spring BEAN. Он аннотирован с помощью @Configuration.
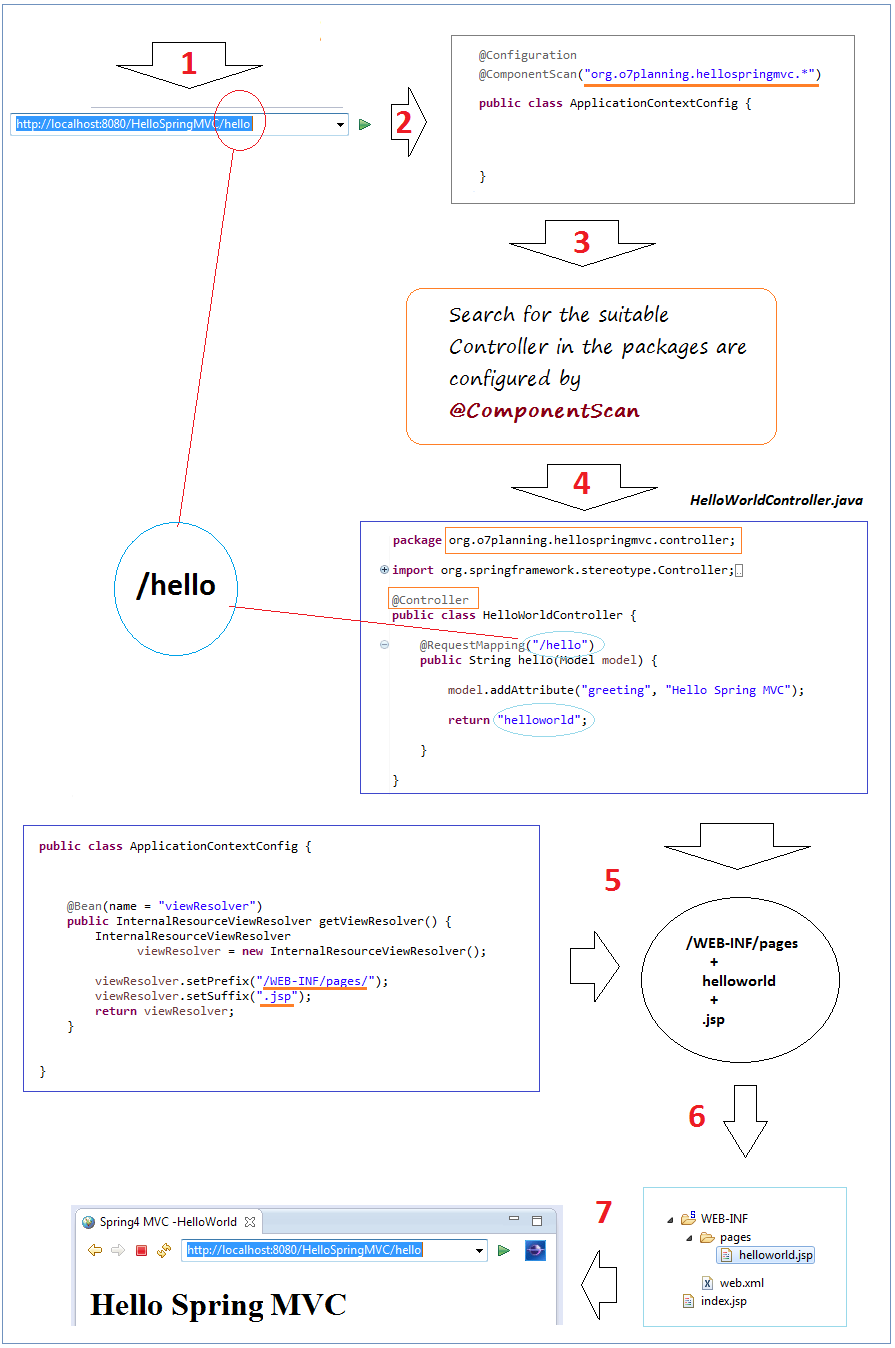
@ComponentScan("org.o7planning.hellospringmvc.*") - Говорит Spring искать другие Spring BEAN, и Controller в подпакетах пакета org.o7planning.hellospringmvc.
@ComponentScan("org.o7planning.hellospringmvc.*") - Говорит Spring искать другие Spring BEAN, и Controller в подпакетах пакета org.o7planning.hellospringmvc.
ApplicationContextConfig.java
package org.o7planning.hellospringmvc.config;

import org.springframework.context.annotation.Bean;
import org.springframework.context.annotation.ComponentScan;
import org.springframework.context.annotation.Configuration;
import org.springframework.web.servlet.view.InternalResourceViewResolver;

@Configuration
@ComponentScan("org.o7planning.hellospringmvc.*")
public class ApplicationContextConfig {


    @Bean(name = "viewResolver")
    public InternalResourceViewResolver getViewResolver() {
        InternalResourceViewResolver viewResolver = new InternalResourceViewResolver();
        viewResolver.setPrefix("/WEB-INF/pages/");
        viewResolver.setSuffix(".jsp");
        return viewResolver;
    }


}
WebMvcConfig class extended from WebMvcConfigurerAdapter is used to configure the resources used in the Spring MVC, for example, static resources (image, CSS, Javascript,...)
WebMvcConfig.java
package org.o7planning.hellospringmvc.config;

import org.springframework.context.annotation.Configuration;
import org.springframework.web.servlet.config.annotation.DefaultServletHandlerConfigurer;
import org.springframework.web.servlet.config.annotation.EnableWebMvc;
import org.springframework.web.servlet.config.annotation.ResourceHandlerRegistry;
import org.springframework.web.servlet.config.annotation.WebMvcConfigurerAdapter;


@Configuration
@EnableWebMvc
public class WebMvcConfig extends WebMvcConfigurerAdapter {

    // Static Resource Config
    @Override
    public void addResourceHandlers(ResourceHandlerRegistry registry) {
        registry.addResourceHandler("/css/**").addResourceLocations("/css/").setCachePeriod(31556926);
        registry.addResourceHandler("/img/**").addResourceLocations("/img/").setCachePeriod(31556926);
        registry.addResourceHandler("/js/**").addResourceLocations("/js/").setCachePeriod(31556926);
    }


    @Override
    public void configureDefaultServletHandling(DefaultServletHandlerConfigurer configurer) {
        configurer.enable();
    }

}
5. Jsp & Spring Controller
Классы Controller используются для управления потока приложения.
HelloWorldController.java
package org.o7planning.hellospringmvc.controller;

import org.springframework.stereotype.Controller;
import org.springframework.ui.Model;
import org.springframework.web.bind.annotation.RequestMapping;

@Controller
public class HelloWorldController {

    @RequestMapping("/hello")
    public String hello(Model model) {

        model.addAttribute("greeting", "Hello Spring MVC");

        return "helloworld";

    }

}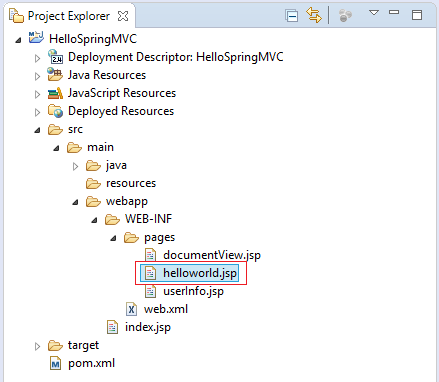
/WEB-INF/pages/helloworld.jsp
<!DOCTYPE html>
<html>
<head>
<meta charset="UTF-8">
<title>Spring MVC -HelloWorld</title>
</head>


<body>
    <h1>${greeting}</h1>
</body>


</html>
6. Запустить приложение Spring MVC
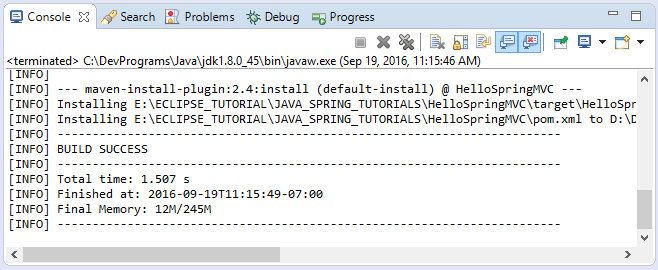
В первый раз, перед запуском приложения вам нужно построить (build ) весь project.
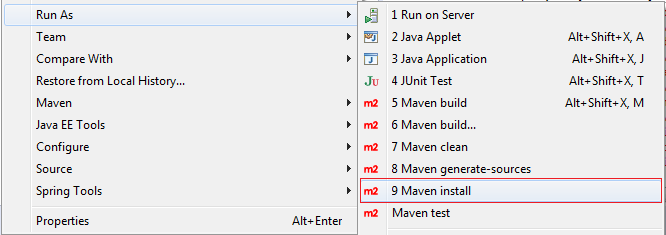
Нажмите на правую кнопку мыши на project, выберите:
- Run As/Maven install
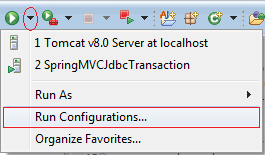
Конфигурация для запуска приложения:
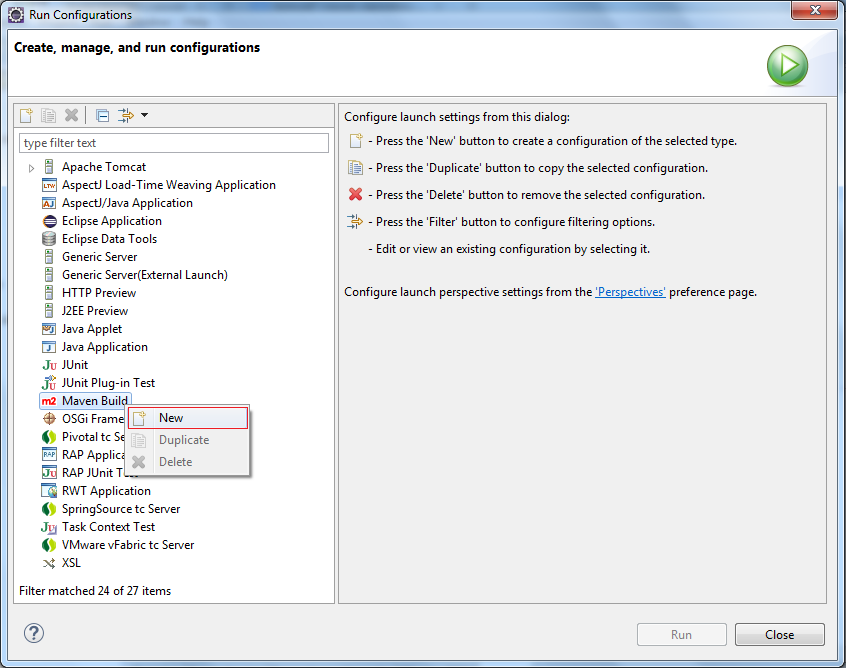
Ввести:
- Name: Run HelloSpringMVC
- Base directory: ${workspace_loc:/HelloSpringMVC}
- Goals: tomcat7:run
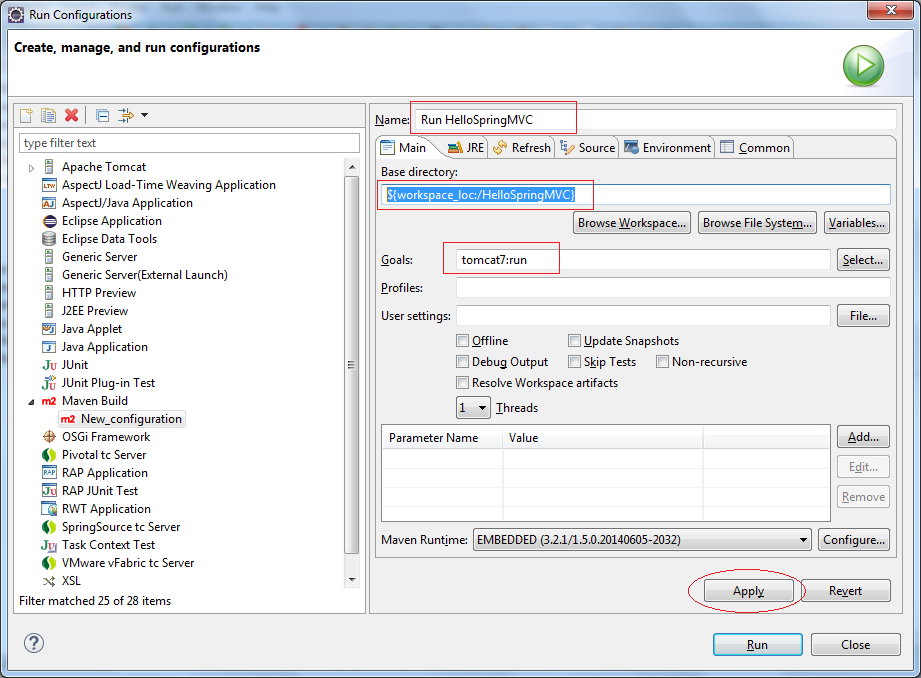
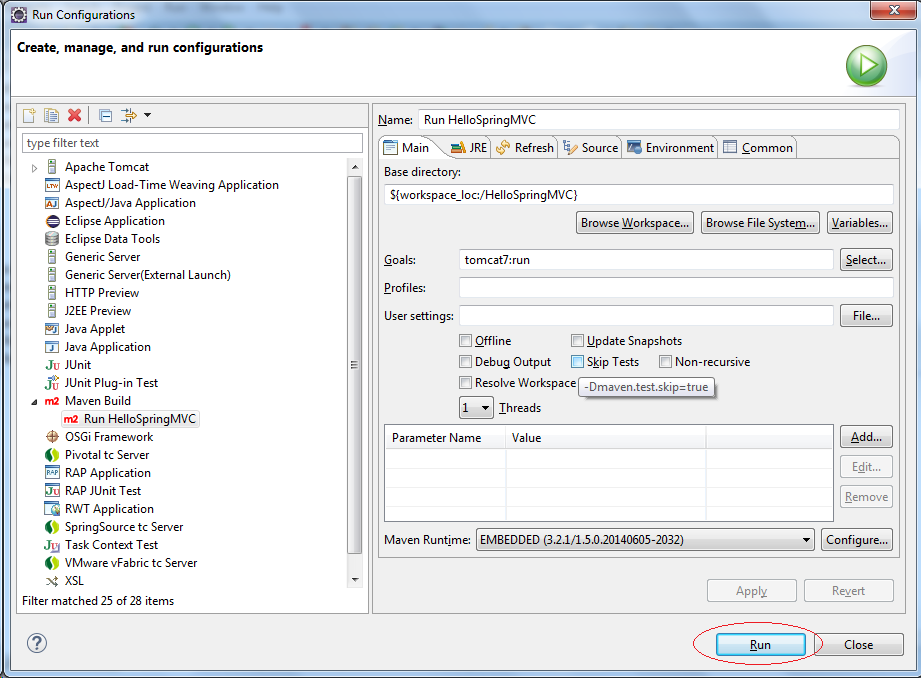
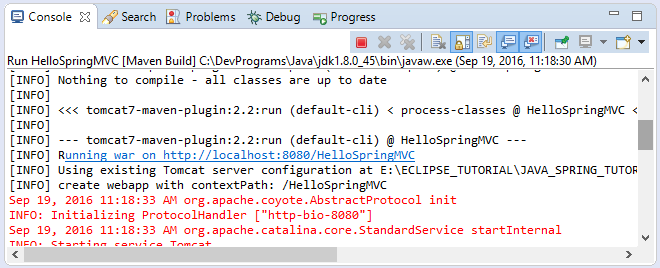
Нажать Run для запуска:
Первый запуск будет дольше, так как программа скачивает библиотеки tomcat plugin для запуска.
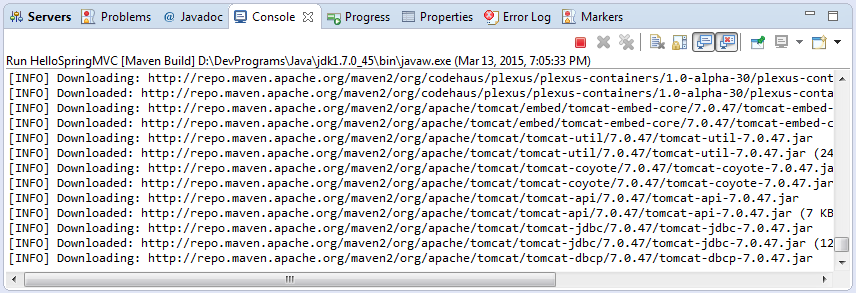
Все завершено:
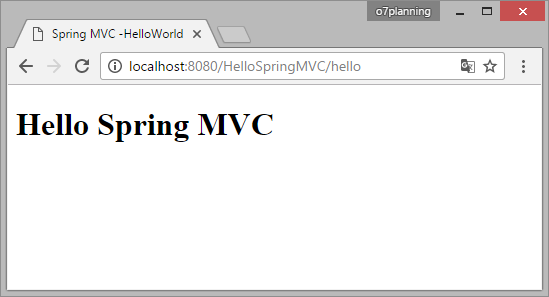
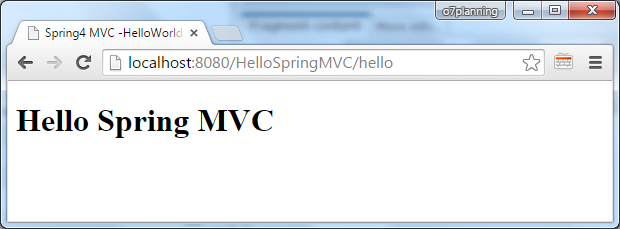
Запуск URL:
7. Поток приложения
Вы завершили project и успешно запустили в предыдущем шаге. Сейчас, посмотрим как работает программа.
8. Controller и методы
HttpServletRequest & HttpServletResponse
Вы можете использовать HttpServletRequest, HttpServletResponse в методах Controller.
OtherExampleController.java
package org.o7planning.tutorial.springmvc;

import javax.servlet.http.HttpServletRequest;
import javax.servlet.http.HttpServletResponse;

import org.springframework.stereotype.Controller;
import org.springframework.ui.Model;
import org.springframework.web.bind.annotation.PathVariable;
import org.springframework.web.bind.annotation.RequestMapping;
import org.springframework.web.bind.annotation.RequestParam;

@Controller
public class OtherExampleController {

  ......

  @RequestMapping("/somePath")
  public String requestResponseExample(HttpServletRequest request,
          HttpServletResponse reponses, Model model) {

      // Todo something here

      return "someView";
  }

  ......
}
Redirect in Controller
Использование приставки "redirect:" в String возвращается методом, вы можете redirect на другую странцу. Смотрите изображенный пример:
RedirectExampleController.java
package org.o7planning.hellospringmvc.controller;

import org.springframework.stereotype.Controller;
import org.springframework.ui.Model;
import org.springframework.web.bind.annotation.RequestMapping;
import org.springframework.web.bind.annotation.RequestMethod;

@Controller
public class RedirectExampleController {

   @RequestMapping(value = "/redirect", method = RequestMethod.GET)
   public String authorInfo(Model model) {

      // Do somethong here

       return "redirect:/hello";
   }
}
Запуск URL:
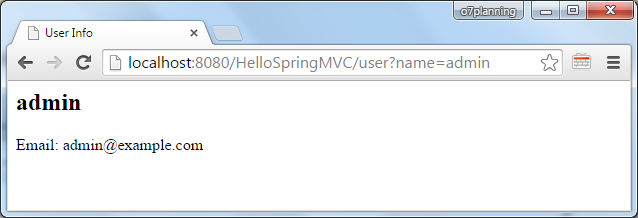
@RequestParam Example
Использовать @RequestParam чтобы связать (bind) параметр request в параметр метода в вашем Controller.
Ниже является используемый код:
RequestParamExampleController.java
package org.o7planning.hellospringmvc.controller;

import org.springframework.stereotype.Controller;
import org.springframework.ui.Model;
import org.springframework.web.bind.annotation.RequestMapping;
import org.springframework.web.bind.annotation.RequestParam;

@Controller
public class RequestParamExampleController {

  @RequestMapping("/user")
  public String userInfo(Model model,
          @RequestParam(value = "name", defaultValue = "Guest") String name) {

      model.addAttribute("name", name);

      if ("admin".equals(name)) {
          model.addAttribute("email", "admin@example.com");
      } else {
          model.addAttribute("email", "Not set");
      }
      return "userInfo";
  }

}
/WEB-INF/pages/userInfo.jsp
<html>
<head>
<meta http-equiv="Content-Type" content="text/html; charset=ISO-8859-1">
<title>User Info</title>
</head>
<body>

  <h2>${name}</h2>

  Email: ${email}
  <br>


</body>
</html>
Запуск URL:
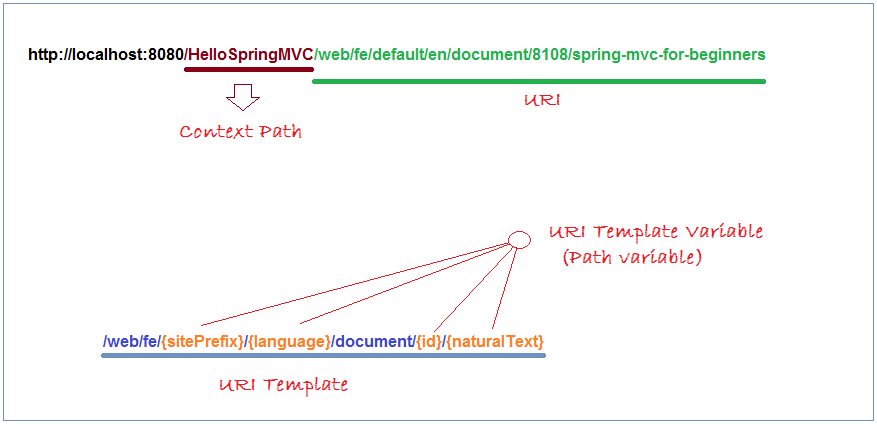
Пример @PathVariable
В Spring MVC вы можете использовать @PathVariable чтобы закрепить параметр метода с переменной Template URI (URI Template variable).
Например, это шаблон URI:
- /web/fe/{sitePrefix}/{language}/document/{id}/{naturalText}
И следующие URI соответствуют шаблону выше:
- /web/fe/default/en/document/8108/spring-mvc-for-beginners
- /web/fe/default/vi/document/8108/spring-mvc-cho-nguoi-moi-bat-dau
- .....
Следующий код показывает способ использования:
PathVariableExampleController.java
package org.o7planning.hellospringmvc.controller;
import org.springframework.stereotype.Controller;
import org.springframework.ui.Model;
import org.springframework.web.bind.annotation.PathVariable;
import org.springframework.web.bind.annotation.RequestMapping;
@Controller
public class PathVariableExampleController {
/**
* @PathVariable Example:
*
* <pre>
*
* http://o7planning.org/web/fe/default/en/document/8108/spring-mvc-for-beginners
*
* or
*
* http://localhost:8080/HelloSpringMVC/web/fe/default/en/document/8108/spring-mvc-for-beginners
*
* </pre>
*/
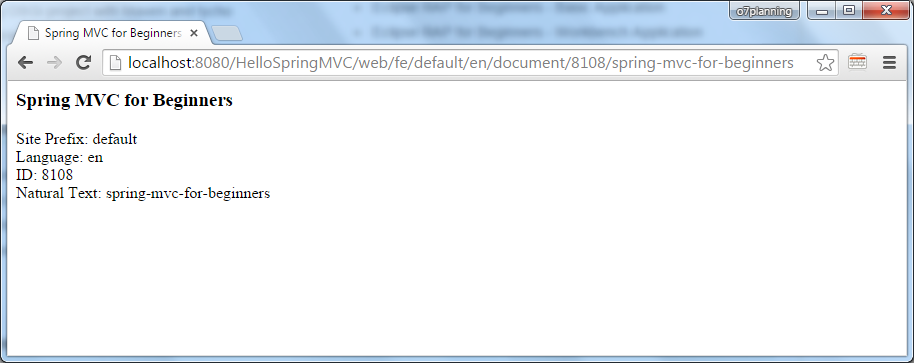
@RequestMapping("/web/fe/{sitePrefix}/{language}/document/{id}/{naturalText}")
public String documentView(Model model,
@PathVariable(value = "sitePrefix") String sitePrefix,
@PathVariable(value = "language") String language,
@PathVariable(value = "id") Long id,
@PathVariable(value = "naturalText") String naturalText) {
model.addAttribute("sitePrefix", sitePrefix);
model.addAttribute("language", language);
model.addAttribute("id", id);
model.addAttribute("naturalText", naturalText);
String documentName = "Java tutorial for Beginners";
if (id == 8108) {
documentName = "Spring MVC for Beginners";
}
model.addAttribute("documentName", documentName);
return "documentView";
}
}/WEB-INF/pages/documentView.jsp
<html>
<head>
<meta http-equiv="Content-Type" content="text/html; charset=ISO-8859-1">
<title>${documentName}</title>
</head>
<body>

   <h3>${documentName}</h3>

   Site Prefix: ${sitePrefix}
   <br> Language: ${language}
   <br> ID: ${id}
   <br> Natural Text: ${naturalText}
   <br>

</body>
</html>
Запуск URL:
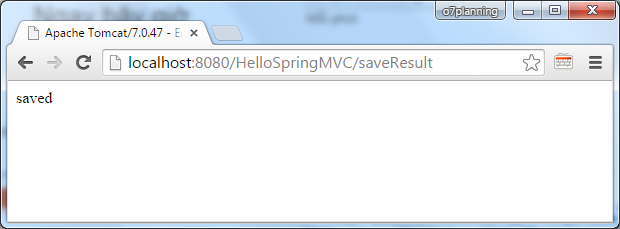
Пример @ResponseBody
If you annotate a method with @ResponseBody, spring will try to convert its return value to a String and write it to the http response automatically. In this case, you do not need a specific View.
Note: Method not necessarily return type of String.
Simple example with @ResponseBody, and method returns String.
ResponseBodyExample1Controller.java
package org.o7planning.hellospringmvc.controller;

import org.springframework.stereotype.Controller;
import org.springframework.ui.Model;
import org.springframework.web.bind.annotation.RequestMapping;
import org.springframework.web.bind.annotation.ResponseBody;

@Controller
public class ResponseBodyExample1Controller {

   // Simple example, method returns String.
   @RequestMapping(value = "/saveResult")
   @ResponseBody
   public String authorInfo(Model model) {
       return "saved";
   }


}
Results of running the example:
An Example with @ResponseBody, method returns an Object.
- TODO
Руководства Spring MVC
- Руководство Spring для начинающих
- Установите Spring Tool Suite для Eclipse
- Руководство Spring MVC для начинающих
- Настроить статические ресурсы в Spring MVC
- Руководство Spring MVC Interceptor
- Создание многоязычного веб-приложения с использованием Spring MVC
- Руководство Spring MVC File Upload/Download
- Простой веб-приложение Java с использованием Spring MVC, Spring Security и Spring JDBC
- Социальный вход в Spring MVC с Spring Social Security
- Руководство Spring MVC и FreeMarker
- Используйте Template в Spring MVC с Apache Tiles
- Используйте несколько DataSources в Spring MVC
- Руководство Spring MVC Form и Hibernate
- Запускать фоновые запланированные задачи в Spring
- Создание Java Корзина веб-приложения с использованием Spring MVC и Hibernate
- Простой пример CRUD с Spring MVC RESTful Web Service
- Развертывание Spring MVC на сервере Oracle WebLogic Server
Show More