Руководство Spring Boot и Thymeleaf
1. Что такое Thymeleaf?
Thymeleaf является Java XML/XHTML/HTML5 Template Engine который может работать с обемим, средой Web и не Web средой. Он больше подходит больше при использовании для сервиса XHTML/HTML5 на уровне View (View Layer) приложения Web основываясь на структуре MVC. Он может обрабатывать любой файл XML, даже среды offline (оффлайн). Он поддерживает полностью для интеракции с Spring Framework.
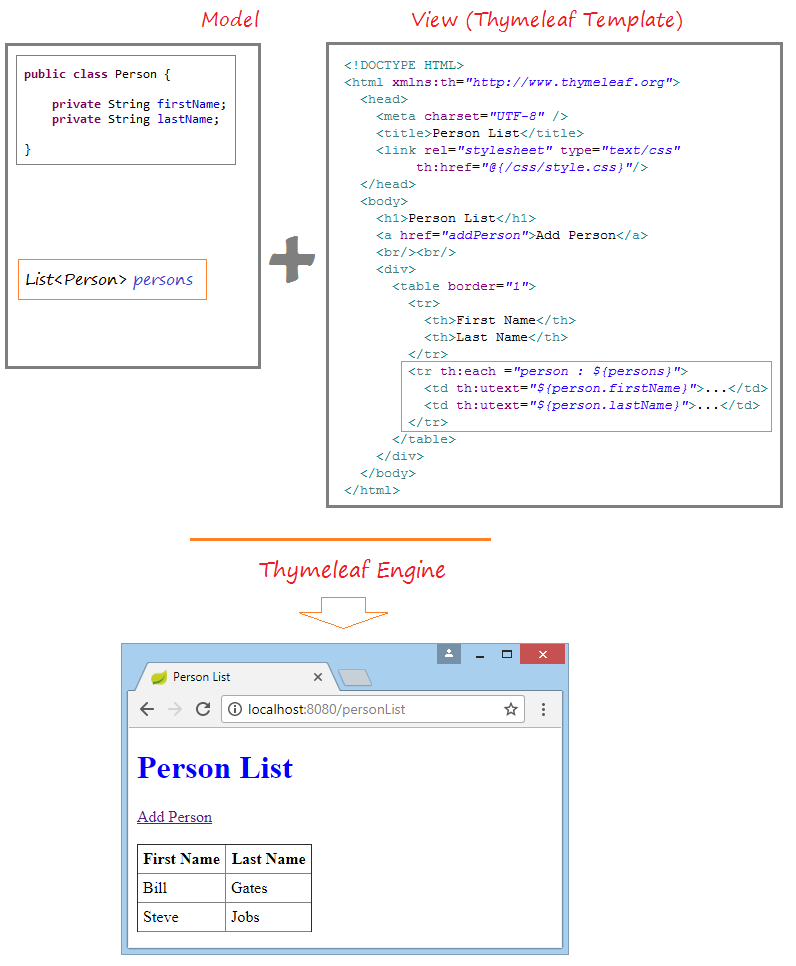
Шаблонные файлы (Template file) Thymeleaf на самом деле является обычными текстовым файлом, имеющим формат XML/XHTML/HTML5. Thymeleaf Engine (Машина Thymeleaf) прочитает шаблонный файл (template file) и комбинирует с объектами Java, чтобы генерировать (generate) другой документ.
Thymeleaf можно использовать, чтобы заменить JSP на уровне View (View Layer) приложения Web MVC. Thymeleaf является программным обеспечением с открытым исходным кодом, с лицензией Apache 2.0.
Ниже является изображение приложения, который мы выполним в данной инструкции:

See Also:
2. Создать приложение
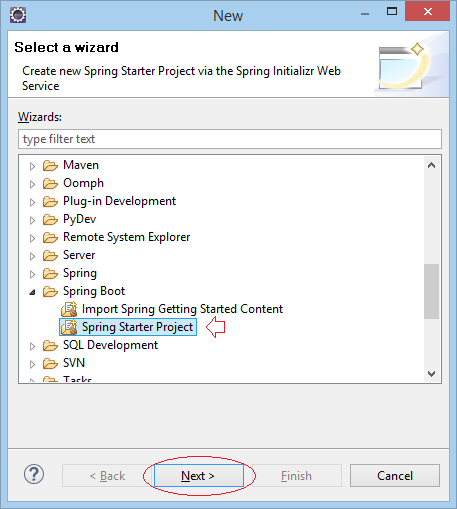
На Eclipse выберите:
- File/New/Other...
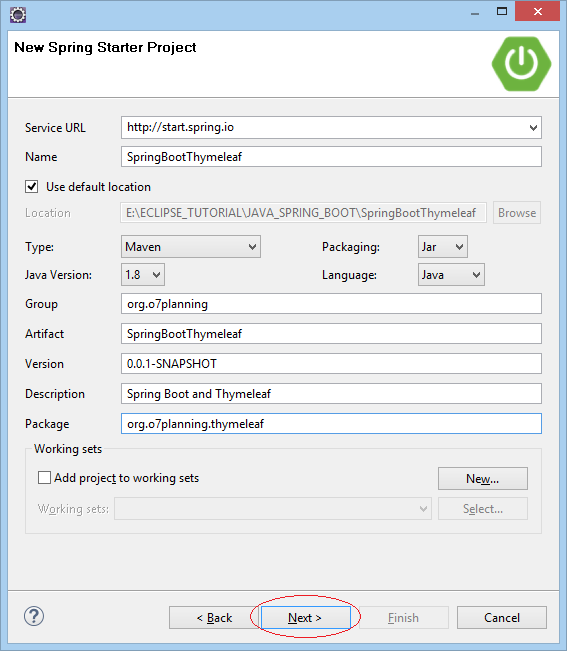
Введите:
- Name: SpringBootThymeleaf
- Group: org.o7planning
- Artifact: SpringBootThymeleaf
- Description: Spring Boot and Thymeleaf
- Package: org.o7planning.thymeleaf
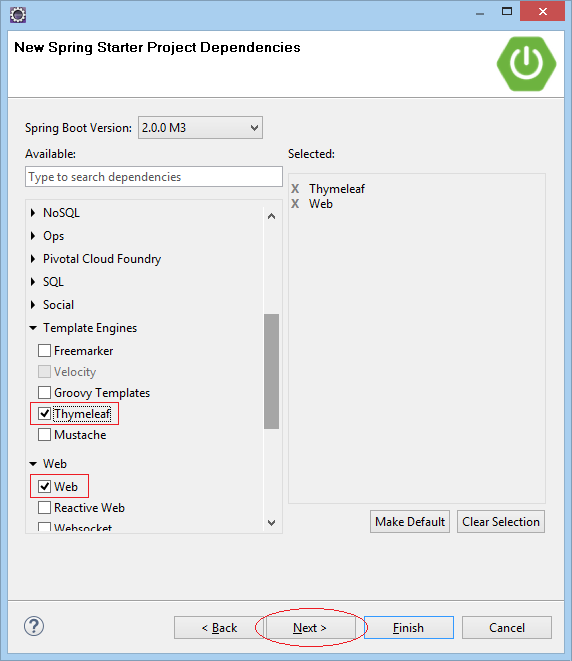
Выбрать 2 технологии Web и Thymeleaf.
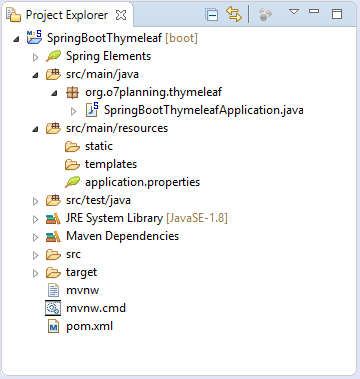
Ваш Project создан:
pom.xml
<?xml version="1.0" encoding="UTF-8"?>
<project xmlns="http://maven.apache.org/POM/4.0.0"
    xmlns:xsi="http://www.w3.org/2001/XMLSchema-instance"
    xsi:schemaLocation="http://maven.apache.org/POM/4.0.0
         http://maven.apache.org/xsd/maven-4.0.0.xsd">
    <modelVersion>4.0.0</modelVersion>

    <groupId>org.o7planning</groupId>
    <artifactId>SpringBootThymeleaf</artifactId>
    <version>0.0.1-SNAPSHOT</version>
    <packaging>jar</packaging>

    <name>SpringBootThymeleaf</name>
    <description>Spring Boot and Thymeleaf</description>

    <parent>
        <groupId>org.springframework.boot</groupId>
        <artifactId>spring-boot-starter-parent</artifactId>
        <version>2.0.0.RELEASE</version>
        <relativePath/> <!-- lookup parent from repository -->
    </parent>

    <properties>
        <project.build.sourceEncoding>UTF-8</project.build.sourceEncoding>
        <project.reporting.outputEncoding>UTF-8</project.reporting.outputEncoding>
        <java.version>1.8</java.version>
    </properties>

    <dependencies>
        <dependency>
            <groupId>org.springframework.boot</groupId>
            <artifactId>spring-boot-starter-thymeleaf</artifactId>
        </dependency>
        <dependency>
            <groupId>org.springframework.boot</groupId>
            <artifactId>spring-boot-starter-web</artifactId>
        </dependency>

        <dependency>
            <groupId>org.springframework.boot</groupId>
            <artifactId>spring-boot-starter-test</artifactId>
            <scope>test</scope>
        </dependency>
    </dependencies>

    <build>
        <plugins>
            <plugin>
                <groupId>org.springframework.boot</groupId>
                <artifactId>spring-boot-maven-plugin</artifactId>
            </plugin>
        </plugins>
    </build>

</project>
3. Thymeleaf Template
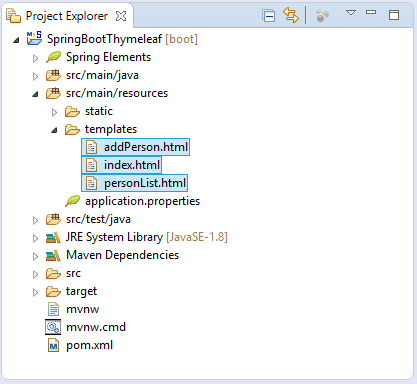
Thymeleaf Template является шаблонным файлом. Его содержание следует формату XML/XHTML/HTML5. Мы создадим 3 файла и расположим в папке src/main/resources/templates:
index.html
<!DOCTYPE HTML>
<html xmlns:th="http://www.thymeleaf.org">
   <head>
      <meta charset="UTF-8" />
      <title>Welcome</title>
      <link rel="stylesheet" type="text/css" th:href="@{/css/style.css}"/>
   </head>
   <body>
      <h1>Welcome</h1>
      <h2 th:utext="${message}">..!..</h2>

      <!--

         In Thymeleaf the equivalent of
         JSP's ${pageContext.request.contextPath}/edit.html
         would be @{/edit.html}

         -->

      <a th:href="@{/personList}">Person List</a>

   </body>

</html>
personList.html
<!DOCTYPE HTML>
<html xmlns:th="http://www.thymeleaf.org">
<head>
<meta charset="UTF-8" />
<title>Person List</title>
<link rel="stylesheet" type="text/css" th:href="@{/css/style.css}"/>
</head>
<body>
<h1>Person List</h1>
<a href="addPerson">Add Person</a>
<br/><br/>
<div>
<table border="1">
<tr>
<th>First Name</th>
<th>Last Name</th>
</tr>
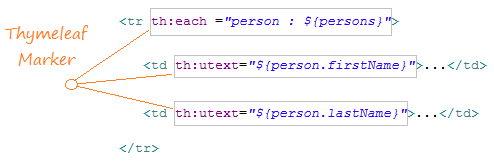
<tr th:each ="person : ${persons}">
<td th:utext="${person.firstName}">...</td>
<td th:utext="${person.lastName}">...</td>
</tr>
</table>
</div>
</body>
</html>addPerson.html
<!DOCTYPE HTML>
<html xmlns:th="http://www.thymeleaf.org">
   <head>
      <meta charset="UTF-8" />
      <title>Add Person</title>
      <link rel="stylesheet" type="text/css" th:href="@{/css/style.css}"/>
   </head>
   <body>
      <h1>Create a Person:</h1>

      <!--
         In Thymeleaf the equivalent of
         JSP's ${pageContext.request.contextPath}/edit.html
         would be @{/edit.html}
         -->

      <form th:action="@{/addPerson}"
         th:object="${personForm}" method="POST">
         First Name:
         <input type="text" th:field="*{firstName}" />
         <br/>
         Last Name:
         <input type="text" th:field="*{lastName}" />
         <br/>
         <input type="submit" value="Create" />
      </form>

      <br/>

      <!-- Check if errorMessage is not null and not empty -->

      <div th:if="${errorMessage}" th:utext="${errorMessage}"
         style="color:red;font-style:italic;">
         ...
      </div>

   </body>
</html>
Выше я создал 3 файла HTML. Файлы HTML выше должны подходить по стандартам XML, все теги (tag) должны быть открытыми или закрытыми. Например:
<div>A div tag</div>

<br />

<meta charset="UTF-8" />
Все файлы HTML должны объявить использование Thymeleaf Namespace:
<!-- Thymeleaf Namespace -->

<html xmlns:th="http://www.thymeleaf.org">
В шаблонных файлах (Template file)имеются Thymeleaf Marker (Отметки Thymeleaf), они являются инструкциями помогающими Thymeleaf Engine обрабатывать данные.
Thymeleaf Engine анализирует шаблонный файл (Template file), и сочетается с данными Java, чтобы генерировать (generate) новый документ.
Thymeleaf Engine анализирует шаблонный файл (Template file), и сочетается с данными Java, чтобы генерировать (generate) новый документ.
Ниже являются примеры для использования Context-Path в Thymeleaf:<!-- Example 1: --> <a th:href="@{/mypath/abc.html}">A Link</a> Output: ==> <a href="/my-context-path/mypath/abc.html">A Link</a> <!-- Example 2: --> <form th:action="@{/mypath/abc.html}" th:object="${personForm}" method="POST"> Output: ==> <form action="/my-context-path/mypath/abc.html" method="POST">
4. Static Resource & Properties File
Для статических ресурсов (Static Resource), например файлов css, javascript, image,.. вам нужно расположить их в папке src/main/resources/static или в их подпапки.
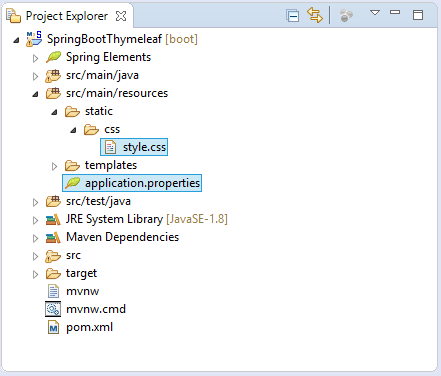
style.css
h1 {
    color:#0000FF;
}

h2 {
    color:#FF0000;
}

table {
    border-collapse: collapse;
}

table th, table td {
    padding: 5px;
}
application.properties
spring.thymeleaf.cache=false

welcome.message=Hello Thymeleaf
error.message=First Name & Last Name is required!
5. Model, Form, Controller classes
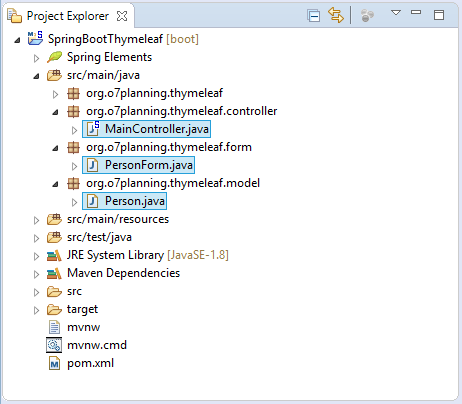
Person.java
package org.o7planning.thymeleaf.model;

public class Person {

    private String firstName;
    private String lastName;

    public Person() {

    }

    public Person(String firstName, String lastName) {
        this.firstName = firstName;
        this.lastName = lastName;
    }

    public String getFirstName() {
        return firstName;
    }

    public void setFirstName(String firstName) {
        this.firstName = firstName;
    }

    public String getLastName() {
        return lastName;
    }

    public void setLastName(String lastName) {
        this.lastName = lastName;
    }

}
Класс PersonForm представляет данные FORM когда вы создаете новый Person на странице addPerson.
PersonForm.java
package org.o7planning.thymeleaf.form;


public class PersonForm {

    private String firstName;
    private String lastName;

    public String getFirstName() {
        return firstName;
    }

    public void setFirstName(String firstName) {
        this.firstName = firstName;
    }

    public String getLastName() {
        return lastName;
    }

    public void setLastName(String lastName) {
        this.lastName = lastName;
    }

}
MainController является классом Controller, который обрабатывает запрос пользователя и управляет потоком (flow) приложения.
MainController.java
package org.o7planning.thymeleaf.controller;
import java.util.ArrayList;
import java.util.List;
import org.o7planning.thymeleaf.form.PersonForm;
import org.o7planning.thymeleaf.model.Person;
import org.springframework.beans.factory.annotation.Value;
import org.springframework.stereotype.Controller;
import org.springframework.ui.Model;
import org.springframework.web.bind.annotation.ModelAttribute;
import org.springframework.web.bind.annotation.RequestMapping;
import org.springframework.web.bind.annotation.RequestMethod;
@Controller
public class MainController {
private static List<Person> persons = new ArrayList<Person>();
static {
persons.add(new Person("Bill", "Gates"));
persons.add(new Person("Steve", "Jobs"));
}
//
// Вводится (inject) из application.properties.
@Value("${welcome.message}")
private String message;
@Value("${error.message}")
private String errorMessage;
@RequestMapping(value = { "/", "/index" }, method = RequestMethod.GET)
public String index(Model model) {
model.addAttribute("message", message);
return "index";
}
@RequestMapping(value = { "/personList" }, method = RequestMethod.GET)
public String personList(Model model) {
model.addAttribute("persons", persons);
return "personList";
}
@RequestMapping(value = { "/addPerson" }, method = RequestMethod.GET)
public String showAddPersonPage(Model model) {
PersonForm personForm = new PersonForm();
model.addAttribute("personForm", personForm);
return "addPerson";
}
@RequestMapping(value = { "/addPerson" }, method = RequestMethod.POST)
public String savePerson(Model model, //
@ModelAttribute("personForm") PersonForm personForm) {
String firstName = personForm.getFirstName();
String lastName = personForm.getLastName();
if (firstName != null && firstName.length() > 0 //
&& lastName != null && lastName.length() > 0) {
Person newPerson = new Person(firstName, lastName);
persons.add(newPerson);
return "redirect:/personList";
}
model.addAttribute("errorMessage", errorMessage);
return "addPerson";
}
}
Руководства Spring Boot
- Установите Spring Tool Suite для Eclipse
- Руководство Spring для начинающих
- Руководство Spring Boot для начинающих
- Общие свойства Spring Boot
- Руководство Spring Boot и Thymeleaf
- Руководство Spring Boot и FreeMarker
- Руководство Spring Boot и Groovy
- Руководство Spring Boot и Mustache
- Руководство Spring Boot и JSP
- Руководство Spring Boot, Apache Tiles, JSP
- Используйте Logging в Spring Boot
- Мониторинг приложений с помощью Spring Boot Actuator
- Создание веб-приложения с несколькими языками с помощью Spring Boot
- Используйте несколько ViewResolver в Spring Boot
- Используйте Twitter Bootstrap в Spring Boot
- Руководство Spring Boot Interceptor
- Руководство Spring Boot, Spring JDBC и Spring Transaction
- Руководство Spring JDBC
- Руководство Spring Boot, JPA и Spring Transaction
- Руководство Spring Boot и Spring Data JPA
- Руководство Spring Boot, Hibernate и Spring Transaction
- Интеграция Spring Boot, JPA и H2 Database
- Руководство Spring Boot и MongoDB
- Используйте несколько DataSources с Spring Boot и JPA
- Используйте несколько DataSource с Spring Boot и RoutingDataSource
- Создайте приложение для входа с Spring Boot, Spring Security, Spring JDBC
- Создайте приложение для входа с Spring Boot, Spring Security, JPA
- Создайте приложение регистрации пользователей с помощью Spring Boot, Spring Form Validation
- Пример OAuth2 Social Login в Spring Boot.
- Запускать фоновые запланированные задачи в Spring
- Пример CRUD Restful Web Service c Spring Boot
- Пример Spring Boot Restful Client c RestTemplate
- Пример CRUD с Spring Boot, REST и AngularJS
- Защита Spring Boot RESTful Service используя Basic Authentication
- Защита Spring Boot RESTful Service используя Auth0 JWT
- Пример Upload file c Spring Boot
- Пример Download file c Spring Boot
- Пример Upload file c Spring Boot и jQuery Ajax
- Пример Upload file c Spring Boot и AngularJS
- Создание веб-приложения для корзины покупок с помощью Spring Boot, Hibernate
- Руководство Spring Email
- Создайте простое приложение Chat с Spring Boot и Websocket
- Разверните приложение Spring Boot на Tomcat Server
- Развертывание приложения Spring Boot на Oracle WebLogic Server
- Установите бесплатный сертификат Let's Encrypt SSL для Spring Boot
- Настройте Spring Boot для перенаправления HTTP на HTTPS
Show More