Защита Spring Boot RESTful Service используя Basic Authentication
1. Цель примера
Статья основана на:
Spring Boot 2.x (Or >= 1.5.9)
Eclipse 4.7 Oxygen
Смотрите также:
В данной статье я покажу вам как создать приложение RESTful Web Service и защитить его с помощью Basic Authentication. Это значит ваше приложение будет предоставлять ресурсы данных (Resource), но пользователь, который захочет использовать данный ресурс данных должен аутентифицироваться (authenticate) с методом базовой аутентификации (Basic Authentication).
Basic Authentication (Базовая аутентификация)
Чтобы получить доступ к ресурсам (Resource) защищенные Basic Authentication, пользователь должен отправить request и в том request должна содержаться информация username/password прикрепленная на Header.
Вы можете использовать браузер для доступа в ресурс данных, защищенный Basic Authentication, в данном случае отображается диалог (dialog), который позволит вам ввести username/password, данная информация прикрепляется в request чтобы отправить на REST Server.
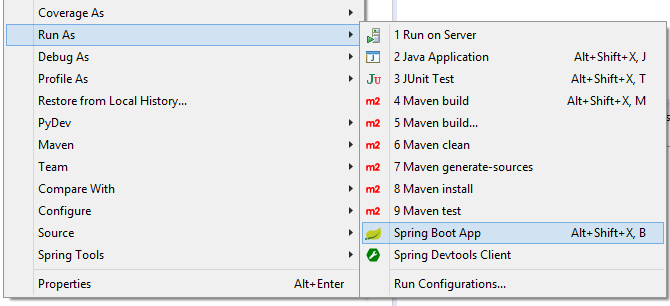
2. Создать Spring Boot project
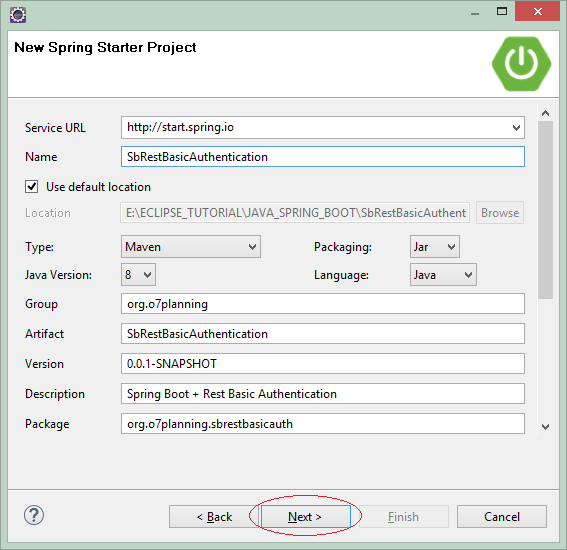
На Eclipse создать проект Spring Boot.
Ввести:
- Name: SbRestBasicAuthentication
- Group: org.o7planning
- Package: org.o7planning.sbrestbasicauth
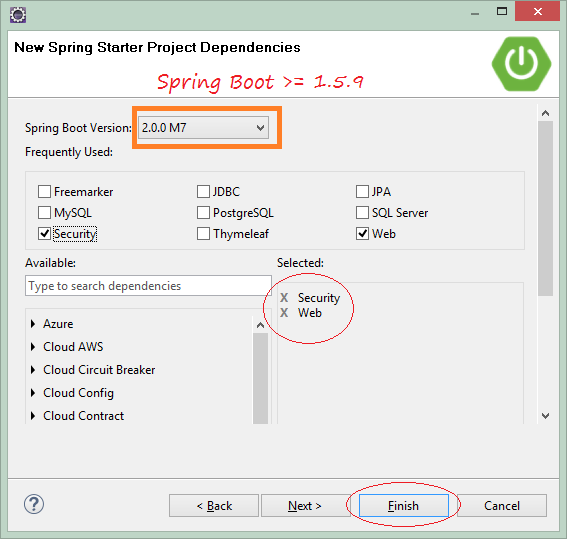
Следующий шаг, вам нужно выбрать технологии использования.
SbRestBasicAuthenticationApplication.java
package org.o7planning.sbrestbasicauth;

import org.springframework.boot.SpringApplication;
import org.springframework.boot.autoconfigure.SpringBootApplication;

@SpringBootApplication
public class SbRestBasicAuthenticationApplication {

    public static void main(String[] args) {
        SpringApplication.run(SbRestBasicAuthenticationApplication.class, args);
    }
}
3. Конфигурация pom.xml
В данном примере нам нужна библиотека для конвертирования (convert) XML в объект Java и обратно. И другая библиотека для конвертирования JSON в Java и обратно.
JSON <==> Java
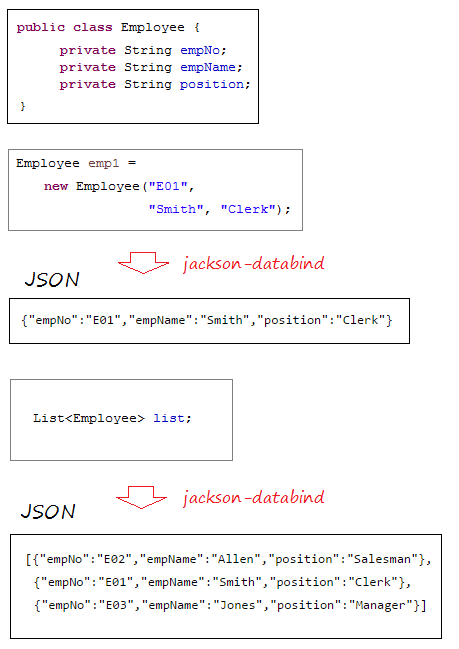
spring-boot-starter-web имеет готовую библиотеку jackson-databind, данная библиотека помогает конвертировать JSON в объект Java и обратно.
XML <==> Java
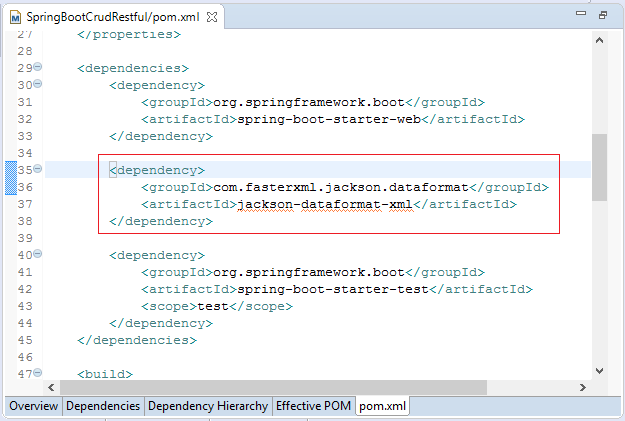
Spring Boot использует JAXB (Готовый в JDK) как библиотеку по умолчанию для конвертирования XML и Java. Но ваши классы Java должны быть аннотированы (annotated) с помощью @XmlRootElement,... Поэтому мой совет вам стоит использовать jackson-dataformat-xml как библиотеку для конвертирования XML и Java. Чтобы использовать jackson-dataformat-xml вам нужно объявить его в файле pom.xml:
** pom.xml **
...

<dependencies>

        ...

    <dependency>
        <groupId>com.fasterxml.jackson.dataformat</groupId>
        <artifactId>jackson-dataformat-xml</artifactId>
    </dependency>

    ...

</dependencies>

...

pom.xml
<?xml version="1.0" encoding="UTF-8"?>
<project xmlns="http://maven.apache.org/POM/4.0.0"
    xmlns:xsi="http://www.w3.org/2001/XMLSchema-instance"
    xsi:schemaLocation="http://maven.apache.org/POM/4.0.0
        http://maven.apache.org/xsd/maven-4.0.0.xsd">

    <modelVersion>4.0.0</modelVersion>

    <groupId>org.o7planning</groupId>
    <artifactId>SbRestBasicAuthentication</artifactId>
    <version>0.0.1-SNAPSHOT</version>
    <packaging>jar</packaging>

    <name>SbRestBasicAuthentication</name>
    <description>Spring Boot +Rest + Basic Authentication</description>

    <parent>
        <groupId>org.springframework.boot</groupId>
        <artifactId>spring-boot-starter-parent</artifactId>
        <version>2.0.0.RELEASE</version>
        <relativePath/> <!-- lookup parent from repository -->
    </parent>

    <properties>
        <project.build.sourceEncoding>UTF-8</project.build.sourceEncoding>
        <project.reporting.outputEncoding>UTF-8</project.reporting.outputEncoding>
        <java.version>1.8</java.version>
    </properties>

    <dependencies>
        <dependency>
            <groupId>org.springframework.boot</groupId>
            <artifactId>spring-boot-starter-security</artifactId>
        </dependency>
        <dependency>
            <groupId>org.springframework.boot</groupId>
            <artifactId>spring-boot-starter-web</artifactId>
        </dependency>


        <dependency>
            <groupId>com.fasterxml.jackson.dataformat</groupId>
            <artifactId>jackson-dataformat-xml</artifactId>
        </dependency>


        <dependency>
            <groupId>org.springframework.boot</groupId>
            <artifactId>spring-boot-starter-test</artifactId>
            <scope>test</scope>
        </dependency>
        <dependency>
            <groupId>org.springframework.security</groupId>
            <artifactId>spring-security-test</artifactId>
            <scope>test</scope>
        </dependency>
    </dependencies>

    <build>
        <plugins>
            <plugin>
                <groupId>org.springframework.boot</groupId>
                <artifactId>spring-boot-maven-plugin</artifactId>
            </plugin>
        </plugins>
    </build>

</project>
4. Security & AuthenticationEntryPoint
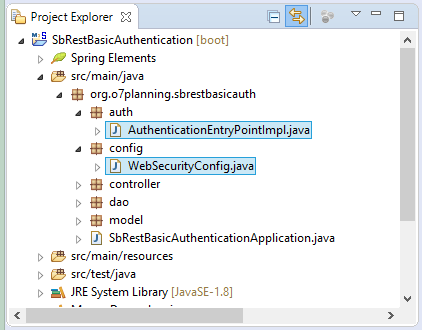
Конфигурации безопасности будут написаны в классе WebSecurityConfig. В данной статье я не фокусируюсь на тему "Как получить username в базе данных", поэтому мы создаем 2 фиксированных UserName и сохраняем в памяти. Пользователь получает доступ в ресурс данных REST Service входит в систему с 1 из этих 2 username.
WebSecurityConfig.java
package org.o7planning.sbrestbasicauth.config;

import org.springframework.beans.factory.annotation.Autowired;
import org.springframework.context.annotation.Bean;
import org.springframework.context.annotation.Configuration;
import org.springframework.security.config.annotation.authentication.builders.AuthenticationManagerBuilder;
import org.springframework.security.config.annotation.authentication.configurers.provisioning.InMemoryUserDetailsManagerConfigurer;
import org.springframework.security.config.annotation.web.builders.HttpSecurity;
import org.springframework.security.config.annotation.web.configuration.EnableWebSecurity;
import org.springframework.security.config.annotation.web.configuration.WebSecurityConfigurerAdapter;
import org.springframework.security.core.userdetails.User;
import org.springframework.security.core.userdetails.UserDetails;
import org.springframework.security.crypto.bcrypt.BCryptPasswordEncoder;
import org.springframework.security.web.AuthenticationEntryPoint;

@Configuration
@EnableWebSecurity
public class WebSecurityConfig extends WebSecurityConfigurerAdapter {

	@Autowired
	private AuthenticationEntryPoint authEntryPoint;

	@Override
	protected void configure(HttpSecurity http) throws Exception {
		http.csrf().disable();

		// All requests send to the Web Server request must be authenticated
		http.authorizeRequests().anyRequest().authenticated();

		// Use AuthenticationEntryPoint to authenticate user/password
		http.httpBasic().authenticationEntryPoint(authEntryPoint);
	}

	@Bean
	public BCryptPasswordEncoder passwordEncoder() {
		BCryptPasswordEncoder bCryptPasswordEncoder = new BCryptPasswordEncoder();
		return bCryptPasswordEncoder;
	}

	@Autowired
	public void configureGlobal(AuthenticationManagerBuilder auth) throws Exception {

		String password = "123";

		String encrytedPassword = this.passwordEncoder().encode(password);
		System.out.println("Encoded password of 123=" + encrytedPassword);


		InMemoryUserDetailsManagerConfigurer<AuthenticationManagerBuilder> //
		mngConfig = auth.inMemoryAuthentication();

		// Defines 2 users, stored in memory.
		// ** Spring BOOT >= 2.x (Spring Security 5.x)
		// Spring auto add ROLE_
		UserDetails u1 = User.withUsername("tom").password(encrytedPassword).roles("USER").build();
		UserDetails u2 = User.withUsername("jerry").password(encrytedPassword).roles("USER").build();

		mngConfig.withUser(u1);
		mngConfig.withUser(u2);

		// If Spring BOOT < 2.x (Spring Security 4.x)):
		// Spring auto add ROLE_
		// mngConfig.withUser("tom").password("123").roles("USER");
		// mngConfig.withUser("jerry").password("123").roles("USER");
	}

}
Класс AuthenticationEntryPointImpl расширен (extends) из класса BasicAuthenticationEntryPoint, он используется для проверки username/password прикрепленный к request действительный или нет.о
AuthenticationEntryPointImpl.java
package org.o7planning.sbrestbasicauth.auth;

import java.io.IOException;
import java.io.PrintWriter;

import javax.servlet.ServletException;
import javax.servlet.http.HttpServletRequest;
import javax.servlet.http.HttpServletResponse;

import org.springframework.security.core.AuthenticationException;
import org.springframework.security.web.authentication.www.BasicAuthenticationEntryPoint;
import org.springframework.stereotype.Component;

@Component
public class AuthenticationEntryPointImpl extends BasicAuthenticationEntryPoint {

	@Override
	public void commence(HttpServletRequest request, HttpServletResponse response, AuthenticationException authEx)
			throws IOException, ServletException {
		response.addHeader("WWW-Authenticate", "Basic realm=" + getRealmName());
		response.setStatus(HttpServletResponse.SC_UNAUTHORIZED);
		PrintWriter writer = response.getWriter();
		writer.println("HTTP Status 401 - " + authEx.getMessage());
	}

	@Override
	public void afterPropertiesSet() throws Exception {
		// RealmName appears in the login window (Firefox).
		setRealmName("o7planning");
		super.afterPropertiesSet();
	}

}
5. Model, DAO, Controller
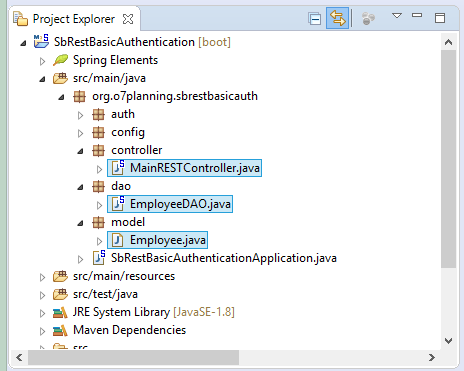
Класс Employee представляет сотрудника.
Employee.java
package org.o7planning.sbrestbasicauth.model;

public class Employee {

    private String empNo;
    private String empName;
    private String position;

    public Employee() {

    }

    public Employee(String empNo, String empName, String position) {
        this.empNo = empNo;
        this.empName = empName;
        this.position = position;
    }

    public String getEmpNo() {
        return empNo;
    }

    public void setEmpNo(String empNo) {
        this.empNo = empNo;
    }

    public String getEmpName() {
        return empName;
    }

    public void setEmpName(String empName) {
        this.empName = empName;
    }

    public String getPosition() {
        return position;
    }

    public void setPosition(String position) {
        this.position = position;
    }

}
Класс EmployeeDAO аннотирован (annotate) с помощью @Repository, чтобы оповестить Spring, что он является Spring BEAN. Данный класс включает методы, помогающие дать запрос на список сотрудников (employee), создать сотрудника, изменить информацию сотрудника, и удалить сотрудника.
EmployeeDAO.java
package org.o7planning.sbrestbasicauth.dao;


import java.util.ArrayList;
import java.util.Collection;
import java.util.HashMap;
import java.util.List;
import java.util.Map;

import org.o7planning.sbrestbasicauth.model.Employee;
import org.springframework.stereotype.Repository;

@Repository
public class EmployeeDAO {

    private static final Map<String, Employee> empMap = new HashMap<String, Employee>();

    static {
        initEmps();
    }

    private static void initEmps() {
        Employee emp1 = new Employee("E01", "Smith", "Clerk");
        Employee emp2 = new Employee("E02", "Allen", "Salesman");
        Employee emp3 = new Employee("E03", "Jones", "Manager");

        empMap.put(emp1.getEmpNo(), emp1);
        empMap.put(emp2.getEmpNo(), emp2);
        empMap.put(emp3.getEmpNo(), emp3);
    }

    public Employee getEmployee(String empNo) {
        return empMap.get(empNo);
    }

    public Employee addEmployee(Employee emp) {
        empMap.put(emp.getEmpNo(), emp);
        return emp;
    }

    public Employee updateEmployee(Employee emp) {
        empMap.put(emp.getEmpNo(), emp);
        return emp;
    }

    public void deleteEmployee(String empNo) {
        empMap.remove(empNo);
    }

    public List<Employee> getAllEmployees() {
        Collection<Employee> c = empMap.values();
        List<Employee> list = new ArrayList<Employee>();
        list.addAll(c);
        return list;
    }

}
Класс MainRESTController аннотирован (annotate) с помощью @RestController, чтобы оповестить Spring, что он является Spring Restful Controller,
MainRESTController.java
package org.o7planning.sbcrudrestful.controller;

import java.util.List;

import org.o7planning.sbcrudrestful.dao.EmployeeDAO;
import org.o7planning.sbcrudrestful.model.Employee;
import org.springframework.beans.factory.annotation.Autowired;
import org.springframework.http.MediaType;
import org.springframework.web.bind.annotation.PathVariable;
import org.springframework.web.bind.annotation.RequestBody;
import org.springframework.web.bind.annotation.RequestMapping;
import org.springframework.web.bind.annotation.RequestMethod;
import org.springframework.web.bind.annotation.ResponseBody;
import org.springframework.web.bind.annotation.RestController;

@RestController

public class MainRESTController {

    @Autowired
    private EmployeeDAO employeeDAO;

    @RequestMapping("/")
    @ResponseBody
    public String welcome() {
        return "Welcome to RestTemplate Example.";
    }

    // URL:
    // http://localhost:8080/SomeContextPath/employees
    // http://localhost:8080/SomeContextPath/employees.xml
    // http://localhost:8080/SomeContextPath/employees.json
    @RequestMapping(value = "/employees", //
            method = RequestMethod.GET, //
            produces = { MediaType.APPLICATION_JSON_VALUE, //
                    MediaType.APPLICATION_XML_VALUE })
    @ResponseBody
    public List<Employee> getEmployees() {
        List<Employee> list = employeeDAO.getAllEmployees();
        return list;
    }

    // URL:
    // http://localhost:8080/SomeContextPath/employee/{empNo}
    // http://localhost:8080/SomeContextPath/employee/{empNo}.xml
    // http://localhost:8080/SomeContextPath/employee/{empNo}.json
    @RequestMapping(value = "/employee/{empNo}", //
            method = RequestMethod.GET, //
            produces = { MediaType.APPLICATION_JSON_VALUE, //
                    MediaType.APPLICATION_XML_VALUE })
    @ResponseBody
    public Employee getEmployee(@PathVariable("empNo") String empNo) {
        return employeeDAO.getEmployee(empNo);
    }

    // URL:
    // http://localhost:8080/SomeContextPath/employee
    // http://localhost:8080/SomeContextPath/employee.xml
    // http://localhost:8080/SomeContextPath/employee.json

    @RequestMapping(value = "/employee", //
            method = RequestMethod.POST, //
            produces = { MediaType.APPLICATION_JSON_VALUE, //
                    MediaType.APPLICATION_XML_VALUE })
    @ResponseBody
    public Employee addEmployee(@RequestBody Employee emp) {

        System.out.println("(Service Side) Creating employee: " + emp.getEmpNo());

        return employeeDAO.addEmployee(emp);
    }

    // URL:
    // http://localhost:8080/SomeContextPath/employee
    // http://localhost:8080/SomeContextPath/employee.xml
    // http://localhost:8080/SomeContextPath/employee.json
    @RequestMapping(value = "/employee", //
            method = RequestMethod.PUT, //
            produces = { MediaType.APPLICATION_JSON_VALUE, //
                    MediaType.APPLICATION_XML_VALUE })
    @ResponseBody
    public Employee updateEmployee(@RequestBody Employee emp) {

        System.out.println("(Service Side) Editing employee: " + emp.getEmpNo());

        return employeeDAO.updateEmployee(emp);
    }

    // URL:
    // http://localhost:8080/SomeContextPath/employee/{empNo}
    @RequestMapping(value = "/employee/{empNo}", //
            method = RequestMethod.DELETE, //
            produces = { MediaType.APPLICATION_JSON_VALUE, MediaType.APPLICATION_XML_VALUE })
    @ResponseBody
    public void deleteEmployee(@PathVariable("empNo") String empNo) {

        System.out.println("(Service Side) Deleting employee: " + empNo);

        employeeDAO.deleteEmployee(empNo);
    }

}
Объяснение:
- produces = { MediaType.APPLICATION_JSON_VALUE, MediaType.APPLICATION_XML_VALUE }
- produces = { "application/json" , "application/xml" }
Атрибут produces используется, чтобы определить URL который будет создавать только (возвращать пользователю) данные с какими форматами. Например "application/json", "application/xml".


Руководства Java Web Services
- Что такое RESTful Web Service?
- Руководство Java RESTful Web Services для начинающих
- Простой пример CRUD с Java RESTful Web Service
- Создайте Java RESTful Client с помощью Jersey Client
- Отладчик RESTClient для RESTful WebServices
- Простой пример CRUD с Spring MVC RESTful Web Service
- Пример CRUD Restful Web Service c Spring Boot
- Пример Spring Boot Restful Client c RestTemplate
- Защита Spring Boot RESTful Service используя Basic Authentication
Show More
Руководства Spring Boot
- Установите Spring Tool Suite для Eclipse
- Руководство Spring для начинающих
- Руководство Spring Boot для начинающих
- Общие свойства Spring Boot
- Руководство Spring Boot и Thymeleaf
- Руководство Spring Boot и FreeMarker
- Руководство Spring Boot и Groovy
- Руководство Spring Boot и Mustache
- Руководство Spring Boot и JSP
- Руководство Spring Boot, Apache Tiles, JSP
- Используйте Logging в Spring Boot
- Мониторинг приложений с помощью Spring Boot Actuator
- Создание веб-приложения с несколькими языками с помощью Spring Boot
- Используйте несколько ViewResolver в Spring Boot
- Используйте Twitter Bootstrap в Spring Boot
- Руководство Spring Boot Interceptor
- Руководство Spring Boot, Spring JDBC и Spring Transaction
- Руководство Spring JDBC
- Руководство Spring Boot, JPA и Spring Transaction
- Руководство Spring Boot и Spring Data JPA
- Руководство Spring Boot, Hibernate и Spring Transaction
- Интеграция Spring Boot, JPA и H2 Database
- Руководство Spring Boot и MongoDB
- Используйте несколько DataSources с Spring Boot и JPA
- Используйте несколько DataSource с Spring Boot и RoutingDataSource
- Создайте приложение для входа с Spring Boot, Spring Security, Spring JDBC
- Создайте приложение для входа с Spring Boot, Spring Security, JPA
- Создайте приложение регистрации пользователей с помощью Spring Boot, Spring Form Validation
- Пример OAuth2 Social Login в Spring Boot.
- Запускать фоновые запланированные задачи в Spring
- Пример CRUD Restful Web Service c Spring Boot
- Пример Spring Boot Restful Client c RestTemplate
- Пример CRUD с Spring Boot, REST и AngularJS
- Защита Spring Boot RESTful Service используя Basic Authentication
- Защита Spring Boot RESTful Service используя Auth0 JWT
- Пример Upload file c Spring Boot
- Пример Download file c Spring Boot
- Пример Upload file c Spring Boot и jQuery Ajax
- Пример Upload file c Spring Boot и AngularJS
- Создание веб-приложения для корзины покупок с помощью Spring Boot, Hibernate
- Руководство Spring Email
- Создайте простое приложение Chat с Spring Boot и Websocket
- Разверните приложение Spring Boot на Tomcat Server
- Развертывание приложения Spring Boot на Oracle WebLogic Server
- Установите бесплатный сертификат Let's Encrypt SSL для Spring Boot
- Настройте Spring Boot для перенаправления HTTP на HTTPS
Show More