Циклы в TypeScript
1. Что такое loop?
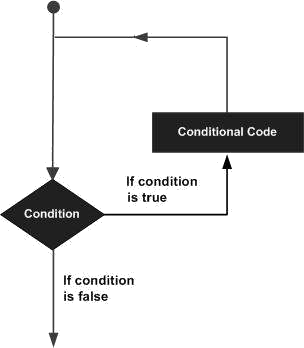
В TypeScript код выполняется последовательно сверху вниз. Однако, если вы хотите выполнить блок кода более одного раза, давайте использовать цикл (loop).

TypeScript предоставляет следующие типы циклов:
- while
- for
- for..of
- for..in
- do..while
Следующие операторы (statement) также могут появляться внутри цикла:
- break
- continue
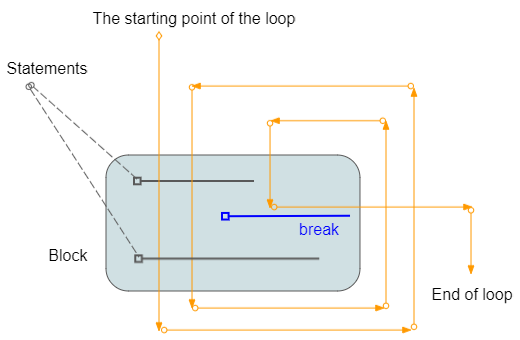
break
При обнаружении инструкции break программа немедленно завершит цикл.
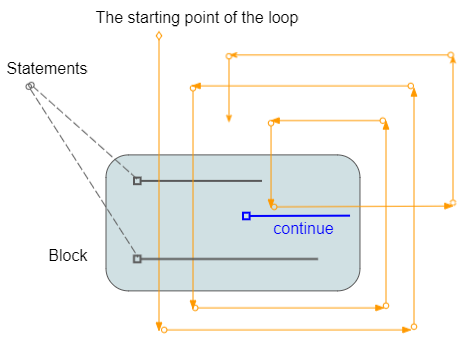
continue
При обнаружении инструкции continue программа пропустит строки ниже инструкции continue и выполнит следующую итерацию (если условие цикла все еще верно).
2. Цикл while
Синтаксис цикла while:
while (condition)  {
    // Do something here..
}
Например:
loop_while_ex1.ts
console.log("While loop example");
let x = 2;
while (x < 10) {
    console.log("Value of x = ", x);
    x = x + 3;
}
console.log("Done!");
Output:
While loop example
Value of x =  2
Value of x =  5
Value of x =  8
Done!
3. Цикл for
Синтаксис цикла for:
for (initialValues; condition; updateValues) {
    // Statements to be executed repeatedly
}- InitialValues:Инициализируйте значения для связанных переменных в цикле.
- condition: Условие для выполнения блока кода.
- updateValues: Обновите новые значения переменных.
Например:
loop_for_ex1.ts
console.log("For loop example");
for (let i = 0; i < 10; i = i + 3) {
    console.log("i= " + i);
}
Output:
For loop example
i= 0
i= 3
i= 6
i= 9
Например: Две переменные участвуют в условии цикла for:
loop_for_ex2.ts
console.log("For loop example");
for (let i = 0, j = 0; i + j < 10; i = i + 1, j = j + 2) {
    console.log("i = " + i + ", j = " + j);
}
Output:
For loop example
i = 0, j = 0
i = 1, j = 2
i = 2, j = 4
i = 3, j = 6
Использование цикла for может помочь вам выполнить итерацию по элементам массива.
loop_for_ex3.ts
console.log("For loop example");
// Array
let names =["Tom","Jerry", "Donald"];

for (let i = 0; i < names.length; i++ ) {
   console.log("Name = ", names[i]);
}
console.log("Done!");
Output:
For loop example
Name =  Tom
Name =  Jerry
Name =  Donald
Done!4. Цикла for..in
Цикла for..in используется для:
- Выполните итерацию по именам полей (field) или именам свойств объекта.
- Выполните итерацию по индексам массива, списка или tuple.
Синтаксис:
for (propName in object) {
   // Do something
}

for (index in array) {  // array, tuple, list
   // Do something
}
Например: Используйте цикл for..in для доступа к полям (field) и свойствам объекта.
loop_for_in_object_ex1.ts
// An object has 4 properties (name, age, gender,greeing)
var myObject = {
    name: "Tom",
    age: 25,
    gender: "Male",
    greeting: function () {
        return "Hello";
    }
};
for (let myProp in myObject) {
    console.log(`prop: ${myProp}`);
    let key = myProp as keyof typeof myObject; // Define a key of an Object
    let value = myObject[key];
    console.log(`value: ${value}`);
    console.log(' --------- ');
}
Output:
prop: name
value: Tom
 ---------
prop: age
value: 25
 ---------
prop: gender
value: Male
 ---------
prop: greeting
value: function () {
        return "Hello";
    }
 ---------
Тот цикл for..in также используется для перебора индексов массива, включая отрицательные или нецелочисленные индексы.
loop_for_in_array_ex1.ts
let fruits = ["Acerola", "Apple", "Banana" ];
console.log(`Array length is ${fruits.length}`); // 3 indexes [0,1,2]

console.log(" --- Set the value for the elements at indexes 6, 10.5 and -100 ---");
// Add more elements to the array.
fruits[6] = "Breadfruit";
fruits[10.5] = "Carambola"; // !!!!!!!!!!
fruits[-100] = "Grapefruit"; // !!!!!!!!!!
console.log(`Array length is ${fruits.length}`); // 7 indexes [0,1,2,3,4,5,6]

for(let idx in fruits) {
    console.log(`Element at index ${idx} is ${fruits[idx]}`);
}
Output:
Array length is 3
 --- Set the value for the elements at indexes 6, 10.5 and -100 ---
Array length is 7
Element at index 0 is Acerola
Element at index 1 is Apple
Element at index 2 is Banana
Element at index 6 is Breadfruit
Element at index 10.5 is Carambola
Element at index -100 is Grapefruit
Примечание: Массивы в TypeScript принимают отрицательные или нецелочисленные индексы. В длину массива учитываются только целочисленные индексы, которые больше или равны 0. Смотрите статью о массивах для более подробного объяснения:
Например: Используйте цикл for..in с Tuple:
loop_for_in_tuple_ex1.ts
// Create a Tuple:
let myFruits: [string,string, string]  = ["Acerola", "Apple", "Banana"];

for(let idx in myFruits) {
    console.log(`Element at index ${idx}: ${myFruits[idx]}`);
}
Output:
Element at index 0: Acerola
Element at index 1: Apple
Element at index 2: Banana5. Цикл for..of
Цикл for..of используется для того, чтобы: помочь вам выполнить итерацию по полям (field) и свойствам объекта или выполнить итерацию по индексам массива. Он часто используется с объектом, массивом, списком или tuple.
- Выполните итерацию по элементам массива, списка или tuple.
Синтаксис:
for (propValue of object) {
   // Do something
}

for (element of array) {  // array, tuple, list
   // Do something
}
Например: Используйте цикл for..of для перебора элементов массива. Примечание: Цикл for..of повторяется только для элементов с целочисленным индексом и большим или равным 0.
loop_for_of_array_ex1.ts
let fruitArray = ["Acerola", "Apple", "Banana" ];
console.log(`Array length is ${fruitArray.length}`); // 3 indexes [0,1,2]

console.log(" --- Set the value for the elements at indexes 6, 10.5 and -100 ---");
// Add more elements to the array.
fruitArray[6] = "Breadfruit";
fruitArray[10.5] = "Carambola"; // !!!!!!!!!!
fruitArray[-100] = "Grapefruit"; // !!!!!!!!!!
console.log(`Array length is ${fruitArray.length}`); // 7 indexes [0,1,2,3,4,5,6]

for(let fruit of fruitArray) {
    console.log(`Element: ${fruit}`);
}
Output:
Array length is 3
 --- Set the value for the elements at indexes 6, 10.5 and -100 ---
Array length is 7
Element: Acerola
Element: Apple
Element: Banana
Element: undefined
Element: undefined
Element: undefined
Element: Breadfruit
Например: Используйте цикл for..of с Tuple:
loop_for_of_tuple_ex1.ts
// Create a Tuple:
let myFruitTuple: [string,string, string]  = ["Acerola", "Apple", "Banana"];

for(let fruit of myFruitTuple) {
    console.log(`Element: ${fruit}`);
}
Output:
Element: Acerola
Element: Apple
Element: Banana
6. Цикл do..while
Цикл do..while используется для многократного выполнения сегмента программы. Характеристики do..while - это блок кода, который всегда выполняется хотя бы один раз. После каждой итерации программа снова проверяет условие, если условие по-прежнему верно, будет выполнена следующая итерация.
do {
   // Do something
}
while(condition);
Например:
let value = 3;
do {
  console.log(`Value = ${value}`);
  value = value + 3;
} while (value < 10);
Output:
Value = 3
Value = 6
Value = 9
7. Инструкция break в цикле:
break - это оператор, который может появляться в блоке цикла. Это инструкция для безусловного завершения цикла.

Например:
loop_break_ex1.ts
console.log("Break example");

let y = 2;
while (y < 15) {
    console.log('----------------------');
    console.log(`y = ${y}`);
    // If y = 5 then exit the loop.
    if (y == 5) {
        break;
    }
    // Increase value of x by 1
    y = y + 1;
    console.log(`y after + 1 = ${y}`);
}
console.log("Done!");
Output:
Break example
----------------------
y = 2
y after + 1 = 3
----------------------
y = 3
y after + 1 = 4
----------------------
y = 4
y after + 1 = 5
----------------------
y = 5
Done!
8. Инструкция continue в цикле
continue - это оператор, который может появляться в цикле. При обнаружении инструкции continue программа пропустит строки ниже инструкции continue и выполнит следующую итерацию (если условие все еще выполняется).

Например:
console.log('Continue example');
let z = 2
while (z < 7) {
    console.log('----------------------')
    console.log(`z = ${z}`);

    if (z % 2 == 0) {
        z = z + 1;
        continue;
    }
    else {
        z = z + 1;
        console.log(`z after + 1 = ${z}`);
    }
}
console.log('Done!');
Output:
Continue example
----------------------
z = 2
----------------------
z = 3
z after + 1 = 4
----------------------
z = 4
----------------------
z = 5
z after + 1 = 6
----------------------
z = 6
Done!
9. Помеченные циклы
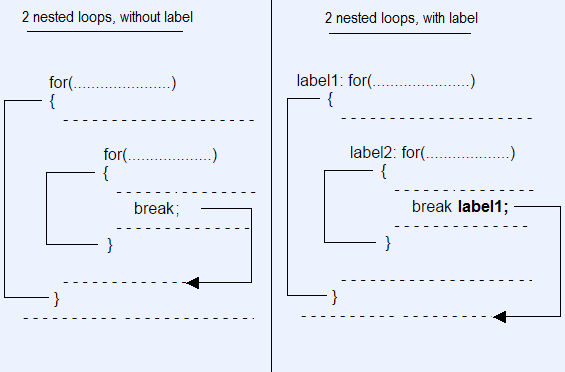
TypeScript позволяет вам поставить метку (Label) для цикла. Это способ назвать цикл, и он пригодится, когда вы используете несколько вложенных циклов в программе.
- Вы можете использовать инструкцию "break labelX", чтобы break цикл с labelX.
- Вы можете использовать инструкцию "continue labelX", чтобы continue цикл с меткой labelX.

Синтаксис:
// for loop with Label.
label1: for( ... )  {

}
// while loop with Label.
label2: while ( ... )  {

}
// do-while loop with Label.
label3: do  {

} while ( ... );
Например: Используйте помеченные циклы и оператор break.
loop_break_labelled_ex1.ts
console.log('Labelled Loop Break example');
let i = 0;
label1: while (i < 5) {
    console.log('----------------------');
    console.log(`i = ${i}`);
    i++;
    label2: for (let j = 0; j < 3; j++) {
        console.log(`  --> ${j}`);
        if (j > 0) {
            // Exit the loop with label1.
            break label1;
        }
    }
}
console.log('Done!');
Output:
Labelled Loop Break example
----------------------
i = 0
  --> 0
  --> 1
Done!
Например: Используйте помеченные циклы и оператор continue.
loop_continue_labelled_ex1.ts
let j = 0;
label1: while (j < 5) {
    console.log(`outer j= ${j}`);
    j++;
    label2: for (let k = 0; k < 3; k++) {
        if (k > 0) {
            continue label2;
        }
        if (j > 1) {
            continue label1;
        }
        console.log(`inner j= ${j} , k= ${k}`);
    }
}
Output:
outer j= 0
inner j= 1 , k= 0
outer j= 1
outer j= 2
outer j= 3
outer j= 4
Pуководства TypeScript
- Запустите свой первый пример TypeScript в Visual Studio Code
- Оператор typeof в TypeScript
- Циклы в TypeScript
- Установите TypeScript в Windows
- Функции в TypeScript
- Кортежи (Tuple) в TypeScript
- Интерфейсы в TypeScript
- Массивы в TypeScript
- Оператор instanceof в TypeScript
- Методы в TypeScript
- Замыкания (Closure) в TypeScript
- Конструкторы в TypeScript
- Свойства в TypeScript
Show More