Конструкторы в TypeScript
1. Что такое Constructor?
Constructor (метод инициализации) - это специальный метод класса, используемый для создания объектов и инициализации значений полей (field).
Для облегчения понимания разберем следующую ситуацию:
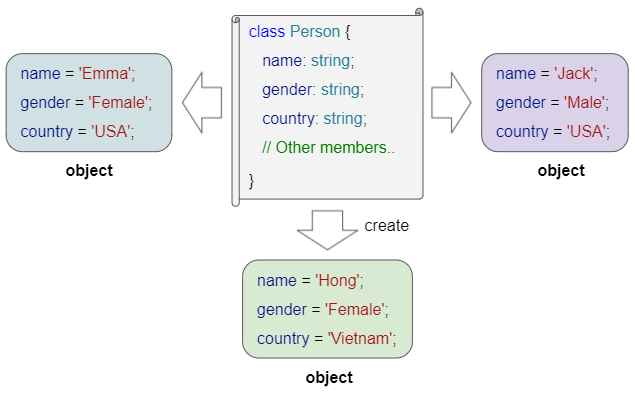
Класс Person считается основой для создания конкретных людей, который включает следующую информацию: Имя, пол и страна. Эта информация также известна как поля (field).
Характеристики of Constructor:
- Constructor - это специальный метод класса. Ключевое слово constructor также является именем этого специального метода.
- Каждый класс имеет только один constructor.
- В теле (body) конструктора вы должны присвоить значения всем полям (field) класса. Оциональным полям, возможно, не нужно присваивать значения.
- Если все поля (field) в классе являются опциональными, и вы не определяете никаких конструкторов для класса, TypeScript автоматически предположит, что класс имеет конструктор по умолчанию без параметров и содержимого в теле.
Язык TypeScript разработан таким образом, чтобы быть строгим и безопасным, это требует, чтобы для всех полей класса было установлено не значение null. Если поле допускает значение null, вы должны явно указать это в дизайне класса.
2. Constructor
В большинстве случаев здесь приведен общий синтаксис для определения конструктора:
class Class_Name  {
   field_1 : data_type_f1;
   field_2 : data_type_f2;
   field_N : data_type_fN;

   constructor(arg_1 : data_type_a1, arg_2 : data_type_a2, arg_M : data_type_aM)  {
      // Codes..
   }
}
В приведенном ниже примере класс Person содержит 3 поля, ни одно из которых не является опциональным. Поэтому в теле конструктора вы должны присвоить не значения null всем этим полям.
constructor_ex1.ts
class Person {
    name: string;
    gender: string;
    country: string;

    constructor(n: string, g: string, c: string) {
        this.name = n;
        this.gender = g;
        this.country = c;
    }
    // A Method
    selfIntroduce(): void {
        console.log(`Hi, My name is ${this.name}, from ${this.country}`);
    }
}
function constructor_ex1_test() {
    var tom: Person = new Person("Tom", "Male", "USA");

    tom.selfIntroduce();
    console.log(`tom.name = ${tom.name}`);
}
constructor_ex1_test(); // Call the function.
Output:
Hi, My name is Tom, from USA
tom.name = Tom
Например:
constructor_ex2.ts
interface IDimension {
    width: number;
    height: number;
}
class Rectangle {
    width: number;
    height: number;
    color: string;

    constructor(dimension: IDimension, color: string) {
        this.width = dimension.width;
        this.height = dimension.height;
        this.color = color;
    }
    // A Method
    getArea(): number {
        return this.width * this.height;
    }
}
function constructor_ex2_test() {
    var dim: IDimension = { width: 10, height: 20 };
    var rec: Rectangle = new Rectangle(dim, "blue");

    console.log(`rec.getArea() = ${rec.getArea()}`);
    console.log(`rec.color = ${rec.color}`);
}
constructor_ex2_test(); // Call the function3. Optional parameters
Использование опциональных параметров в конструкторе - это способ, которым вы можете использовать этот конструктор по-разному. Примечание: Опциональные параметры должны быть последними в списке параметров.
constructor(arg1 : data_type1, arg2 data_type2, arg3?: data_type3, arg4?: data_type4) {
   // code..
}
Например:
constructor_optional_args_ex1_test.ts
class Circle {
    radius: number;
    color: string;

    constructor(radius: number, color?: string) {
        this.radius = radius;
        this.color = color ?? "blue"; // Default value
    }
}
function constructor_optional_args_ex1_test() {
    var circle1 = new Circle(100);
    var circle2 = new Circle(100, "red");

    console.log(`circle1.color = ${circle1.color}`); // blue
    console.log(`circle2.color = ${circle2.color}`); // red
}
constructor_optional_args_ex1_test(); // Call the function.
Output:
circle1.color = blue
circle2.color = red
4. Default Parameter values
Использование параметров со значениями по умолчанию в конструкторе - это способ, которым вы можете использовать этот конструктор по-разному. Примечание: Эти параметры должны быть последними в списке параметров.
constructor(arg1 : data_type1, arg2 : data_type2,
             arg3 : data_type3 = defaultValue3,
             arg4 : data_type4 = defaultValue4) {
   // code..
}
Например:
constructor_default_args_ex1.ts
class Square {
    width: number;
    color: string;
    shadows: boolean;

    constructor(width: number, color: string = "blue", shadows: boolean = true) {
        this.width = width;
        this.color = color;
        this.shadows = shadows;
    }
}
function constructor_default_args_ex1_test() {
    var square1 = new Square(100);
    var square2 = new Square(100, "red");
    var square3 = new Square(100, "red", false);

    console.log(`square1.color = ${square1.color}`); // blue
    console.log(`square1.shadows = ${square1.shadows}`); // true

    console.log(`square2.color = ${square2.color}`); // red
    console.log(`square2.shadows = ${square2.shadows}`); // true

    console.log(`square3.color = ${square3.color}`); // red
    console.log(`square3.shadows = ${square3.shadows}`); // false
}
constructor_default_args_ex1_test(); // Call the function.
Output:
square1.color = blue
square1.shadows = true
square2.color = red
square2.shadows = true
square3.color = red
square3.shadows = false
5. Parameter with Union Types
Параметры в Typescript могут быть объявлены с составным типом данных (union data type). Это также метод, позволяющий вам использовать конструктор по-разному.
constructor(arg1 : data_type1,
             arg2 : data_type21 | data_type22 | data_type23,
             arg3 : data_type3,
             arg4 : data_type4) {
   // code..
}
Например:
constructor_union_type_args_ex1.ts
class Employee {
    name: string;
    hireDate: Date;
    department: string;

    constructor(name: string, hireDate: Date | string, department: string) {
        this.name = name;
        this.department = department;
        if(hireDate instanceof Date)  {
            this.hireDate = hireDate;
        } else {
            this.hireDate = new Date(hireDate);
        }
    }
}
function constructor_union_type_args_ex1_test() {
    var tom = new Employee("Tom", new Date("1995-05-01"), "IT");
    var jerry = new Employee("Jerry", "2001-05-01", "Operations");

    console.log(`tom.hireDate = ${tom.hireDate}`);
    console.log(`jerry.hireDate = ${jerry.hireDate}`);
}
constructor_union_type_args_ex1_test(); // Call the function.
Output:
tom.hireDate = Mon May 01 1995 06:00:00 GMT+0600 (GMT+06:00)
jerry.hireDate = Tue May 01 2001 06:00:00 GMT+0600 (GMT+06:00)6. Constructor Overloading
Как упоминалось выше, TypeScript допускает только один конструктор в классе. Constructor Overloading (перегрузка конструктора) - это способ "обойти закон", описанный выше, что означает, что у вас все еще есть только один конструктор в классе, но вы можете использовать его со многими различными типами параметров.
В TypeScript, Constructor Overloading выглядит иначе, чем в C++, Java или C#. Основная идея перегрузки (overload) конструктора состоит в том, чтобы создать общий конструктор, который проверяет, какие параметры были переданы для создания объекта, а затем выполняет некоторую логику для соответствующего случая. Полезно добавлять определения для конструкторов, чтобы помочь другим программистам узнать, как правильно использовать класс.
Синтаксис:
constructor(arg_11 : data_type_11, arg_1N : data_type_1N); // Definition 1
constructor(arg_21 : data_type_21, arg_22 : data_type_22, arg_2M : data_type_2M); // Definition 2
constructor(... args : any[]) {
   // Constructor body.
}- TypeScript any data type
В принципе, существует множество способов определения перегруженного конструктора. Рекомендуется использовать приведенный выше синтаксис, который поможет вам избежать сообщения об ошибке, как показано ниже, от компилятора:
This overload signature is not compatible with its implementation signature.Constructor overloading example 1:
constructor_overload_ex1.js
interface IDimension3D {
    width: number;
    height: number;
    depth: number;
}
class Box {
    width: number;
    height: number;
    depth: number;
    color: string;

    constructor(dimension: IDimension3D, color?: string); // definition 1
    constructor(width: number, height: number, depth: number, color?: string); // definition 2
    constructor(...args: any[]) {
        if (args.length == 1 || args.length == 2) {  // Use definition 1
            this.width = args[0].width;
            this.height = args[0].height;
            this.depth = args[0].depth;
            this.color = args.length == 1? "blue" : args[1];
        } else if (args.length == 3 || args.length == 4) { // Use definition 2
            this.width = args[0];
            this.height = args[1];
            this.depth = args[2];
            this.color = args.length == 3? "blue" : args[3];
        } else {
            this.width = this.height = this.depth = 0;
            this.color = "blue";
        }
    }
}
function constructor_overload_ex1_test() {
    var dim: IDimension3D = { width: 10, height: 20, depth: 30};
    var box1: Box = new Box(dim);
    var box2: Box = new Box(dim, "red");
    var box3: Box = new Box(100, 200, 300);
    var box4: Box = new Box(100, 200, 300, "green");

    console.log(`box1.width = ${box1.width}, box1.color = ${box1.color}`); // 10 , blue
    console.log(`box2.width = ${box2.width}, box2.color = ${box2.color}`); // 10 , red
    console.log(`box3.width = ${box3.width}, box3.color = ${box3.color}`); // 100 , blue
    console.log(`box4.width = ${box4.width}, box4.color = ${box4.color}`); // 100 , green
}
constructor_overload_ex1_test(); // Call the function.
Output:
box1.width = 10, box1.color = blue
box2.width = 10, box2.color = red
box3.width = 100, box3.color = blue
box4.width = 100, box4.color = green
Constructor overloading example 2:
constructor_overload_ex2.ts
interface IPoint {
    x: number;
    y: number;
}
class Line {
    x1: number; y1: number; x2: number; y2: number;
    color: string;

    constructor(point: IPoint, color?: string); // definition 1
    constructor(point1: IPoint, point2: IPoint, color?: string); // definition 2
    constructor(...args: any[]) {
        if (args.length == 1) { // Use definition 1
            this.x1 = this.y1 = 0;
            this.x2 = args[0].x;
            this.y2 = args[0].y;
            this.color = "blue";
        } else if (args.length == 2) {
            if (typeof args[1] == "string") { // Use definition 1
                this.x1 = this.y1 = 0;
                this.x2 = args[0].x;
                this.y2 = args[0].y;
                this.color = args[1]
            } else { // Use definition 2
                this.x1 = args[0].x;
                this.y1 = args[0].y;
                this.x2 = args[1].x;
                this.y2 = args[1].y;
                this.color = "blue";
            }
        } else if (args.length >= 2) { // Use definition 3
            this.x1 = args[0].x;
            this.y1 = args[0].y;
            this.x2 = args[1].x;
            this.y2 = args[1].y;
            this.color = args[2];
        } else {
            this.x1 = this.y1 = this.x2 = this.y2 = 0;
            this.color = "blue";
        }
    }
}
function constructor_overload_ex2_test() {
    var point1: IPoint = { x: 10, y: 20 };
    var point2: IPoint = { x: 10, y: 20 };
    var line1: Line = new Line(point1, point2);
    var line2: Line = new Line(point2, "green");

    console.log(`line1.color = ${line1.color}`); // blue
    console.log(`line2.color = ${line2.color}`); // green
}
constructor_overload_ex2_test(); // Call the function.7. Static factory method
Иногда использование техники "Constructor Overloading", как упоминалось выше, приведет к усложнению и путанице в процессе использования. Вам следует рассмотреть возможность использования статических заводских методов (static factory method) в качестве эффективной альтернативы. Помимо конструктора, вы можете создать один или несколько статических заводских методов.
static_factory_method_ex1.ts
interface IDimension3D {
    width: number;
    height: number;
    depth: number;
}
class Box3D {
    width: number;
    height: number;
    depth: number;
    color: string;

    constructor(width: number, height: number, depth: number, color: string) {
        this.width = width;
        this.height = height;
        this.depth = depth;
        this.color = color;
    }
    // Static factory method (To create Box3D object)
    static fromDimension3D(dimension: IDimension3D, color: string): Box3D {
        return new Box3D(dimension.width, dimension.height, dimension.depth, color);
    }
}
function static_factory_method_ex1_test() {
    var box1: Box3D = new Box3D(100, 200, 300, "red");

    var dim: IDimension3D = { width: 10, height: 20, depth: 30 };
    var box2: Box3D = Box3D.fromDimension3D(dim, "green"); // Call static method.

    console.log(`box1.width = ${box1.width}, box1.color = ${box1.color}`); // 100 , red
    console.log(`box2.width = ${box2.width}, box2.color = ${box2.color}`); // 10 , green
}
static_factory_method_ex1_test(); // Call the function.
Output:
box1.width = 100, box1.color = red
box2.width = 10, box2.color = green
Pуководства TypeScript
- Запустите свой первый пример TypeScript в Visual Studio Code
- Оператор typeof в TypeScript
- Циклы в TypeScript
- Установите TypeScript в Windows
- Функции в TypeScript
- Кортежи (Tuple) в TypeScript
- Интерфейсы в TypeScript
- Массивы в TypeScript
- Оператор instanceof в TypeScript
- Методы в TypeScript
- Замыкания (Closure) в TypeScript
- Конструкторы в TypeScript
- Свойства в TypeScript
Show More