Руководство Java SWT FillLayout
1. FillLayout
FillLayout это самый простой класс layout. Он ставит управление (controls) в единственную строку или столбец, и заставляет их иметь одинаковый размер.
Горизонтальный FillLayout:

Вертикальный FillLayout:
// Create a Horizontal FillLayout.
FillLayout fillLayout= new FillLayout(SWT.HORIZONTAL);
// Set Layout for component
component.setLayout(fillLayout);
// Create a Vertical FillLayout.
FillLayout fillLayout= new FillLayout(SWT.VERTICAL);
// Set Layout for component
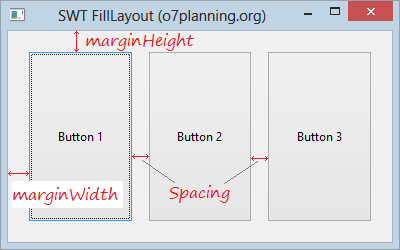
component.setLayout(fillLayout);margin & spacing

FillLayout fillLayout= new FillLayout(SWT.HORIZONTAL);
fillLayout.marginHeight= 20;
fillLayout.marginWidth= 20;
fillLayout.spacing=15;
2. Пример с FillLayout
Пример горизонтального FillLayout:
HorizontalFillLayoutDemo.java
package org.o7planning.swt.filllayout;

import org.eclipse.swt.SWT;
import org.eclipse.swt.layout.FillLayout;
import org.eclipse.swt.widgets.Button;
import org.eclipse.swt.widgets.Display;
import org.eclipse.swt.widgets.Shell;

public class HorizontalFillLayoutDemo {

  public static void main(String[] args) {
      Display display = new Display();
      Shell shell = new Shell(display);
      shell.setText("SWT FillLayout (o7planning.org)");

      //  Create a Horizontal FillLayout.
      FillLayout fillLayout= new FillLayout(SWT.HORIZONTAL);
      shell.setLayout(fillLayout);

      Button button1=  new Button(shell, SWT.NONE);
      button1.setText("Button 1");

      Button button2=  new Button(shell, SWT.NONE);
      button2.setText("Button 2");

      Button button3=  new Button(shell, SWT.NONE);
      button3.setText("Button 3");

      shell.setSize(400, 250);
      shell.open();
      while (!shell.isDisposed()) {
          if (!display.readAndDispatch())
              display.sleep();
      }
      display.dispose();
  }
}
Например горизонтальный FillLayout с margin & spacing:
HorizontalFillLayoutDemo2.java
package org.o7planning.swt.filllayout;

import org.eclipse.swt.SWT;
import org.eclipse.swt.layout.FillLayout;
import org.eclipse.swt.widgets.Button;
import org.eclipse.swt.widgets.Display;
import org.eclipse.swt.widgets.Shell;

public class HorizontalFillLayoutDemo2 {

    public static void main(String[] args) {
        Display display = new Display();
        Shell shell = new Shell(display);
        shell.setText("SWT FillLayout (o7planning.org)");

        FillLayout fillLayout= new FillLayout(SWT.HORIZONTAL);
        fillLayout.marginHeight= 20;
        fillLayout.marginWidth= 20;
        fillLayout.spacing=15;
        shell.setLayout(fillLayout);
        Button button1=  new Button(shell, SWT.NONE);
        button1.setText("Button 1");

        Button button2=  new Button(shell, SWT.NONE);
        button2.setText("Button 2");

        Button button3=  new Button(shell, SWT.NONE);
        button3.setText("Button 3");

        shell.setSize(400, 250);
        shell.open();
        while (!shell.isDisposed()) {
            if (!display.readAndDispatch())
                display.sleep();
        }
        display.dispose();
    }
}
Руководства Java SWT
- Руководство Java SWT FillLayout
- Руководство Java SWT RowLayout
- Руководство Java SWT SashForm
- Руководство Java SWT Label
- Руководство Java SWT Button
- Руководство Java SWT Toggle Button
- Руководство Java SWT Radio Button
- Руководство Java SWT Text
- Руководство Java SWT Password Field
- Руководство Java SWT Link
- Программирование приложения Java Desktop с использованием SWT
- Руководство Java SWT Combo
- Руководство Java SWT Spinner
- Руководство Java SWT Slider
- Руководство Java SWT Scale
- Руководство Java SWT ProgressBar
- Руководство Java SWT TabFolder и CTabFolder
- Руководство Java SWT List
Show More