Руководство Java Multithreading Programming
2. Пример начала с Thread
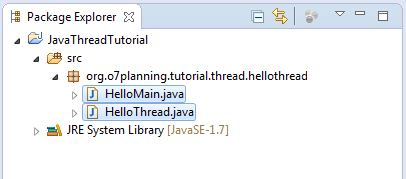
Нам нужны 2 класса, которые будут участвовать в данном примере.
- HelloMain это обычный класс с функцией main, являющийся главным потоком (main thread).
- HelloThread это расширенный класс из класса Thread. Создан и работает внутри главного потока и будет работать параллельно с главным потоком.
package org.o7planning.tutorial.thread.hellothread;
public class HelloMain {
public static void main(String[] args) throws InterruptedException {
int idx = 1;
for (int i = 0; i < 2; i++) {
System.out.println("Main thread running " + idx++);
// Sleep 2101 miliseconds.
Thread.sleep(2101);
}
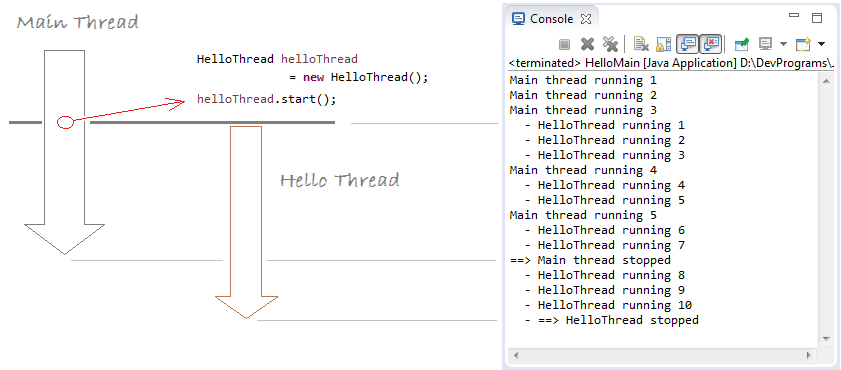
HelloThread helloThread = new HelloThread();
// Run thread
helloThread.start();
for (int i = 0; i < 3; i++) {
System.out.println("Main thread running " + idx++);
// Sleep 2101 miliseconds.
Thread.sleep(2101);
}
System.out.println("==> Main thread stopped");
}
}HelloThread.java
package org.o7planning.tutorial.thread.hellothread;

public class HelloThread extends Thread {


   // Code of method run() will be executed when
   // thread call start()
   @Override
   public void run() {
       int index = 1;

       for (int i = 0; i < 10; i++) {
           System.out.println("  - HelloThread running " + index++);

           try {
               // Sleep 1030 miliseconds.
               Thread.sleep(1030);
           } catch (InterruptedException e) {
           }

       }
       System.out.println("  - ==> HelloThread stopped");
   }
}
Результат запуска класса HelloMain:
3. Runnable Interface
Вы так же можете создать thread из класса выполняющего интерфейсt Runnable. Смотрите иллюстрированный пример:
RunnableDemo.java
package org.o7planning.tutorial.thread.runnable;

public class RunnableDemo implements Runnable {

   @Override
   public void run() {
       int idx = 1;
       for (int i = 0; i < 5; i++) {
           System.out.println("Hello from RunnableDemo " + idx++);

           // Sleep 2 second.
           try {
               Thread.sleep(2000);
           } catch (InterruptedException e) {
           }
       }
   }

}
RunnableTest.java
package org.o7planning.tutorial.thread.runnable;

public class RunnableTest {

   public static void main(String[] args) throws InterruptedException {

       System.out.println("Main thread running..");

       // Create a thread from Runnable.
       Thread thread = new Thread(new RunnableDemo());

       thread.start();

       // Sleep 5 seconds.
       Thread.sleep(5000);
       System.out.println("Main thread stopped");
   }
}
Запуск класса RunnableTest:
Main thread running..
Hello from RunnableDemo 1
Hello from RunnableDemo 2
Hello from RunnableDemo 3
Main thread stopped
Hello from RunnableDemo 4
Hello from RunnableDemo 5
4. Поток Deamon (Deamon Thread)
Java делит thread на 2 вида: обычный и Deamon Thread. Они отличаются только тем, как останавливают работу. В одной программе обычные потоки и поток Deamon работают параллельно. Когда все обычные паотоки завершаются, потоки Deamon так же завершатся, несмотря на то, что они выполняют на тот момент.
Примечание:
Использовать setDeamon(boolean) для настройки чтобы поток являлся Deamon или нет. Заметьте, что вы можете вызвать только функцию setDeamon(boolean) когда thread еще не запущен. Это значит, что когда thread запущен, вы не можете поменять поток из non-deamon в deamon и обратно.
Когда создается новый поток, он унаследует свойства deamon от родительского потока. Таким образом, когда вы создаете поток в функции main одного класса, являющимся потоком non-deamon, то созданный thread по умолчанию тоже является none-deamon. Поэтому если вы хотите создать новый потк в в потоке Deamon, по умолчанию это будет Deamon.
Thread thread = new MyThread();

// marks this thread as a daemon thread
// This method is only called when the thread is not a start.
// In the case of start, it will be throws an exception.
thread.setDeamon(true);


// marks this thread as a none-daemon thread
// This method is only called when the thread is not a start.
// In the case of start, it will be throws an exception.
thread.setDeamon(false);
Чтобы лучше понять, рассмотрим следующий пример, нам нужны 3 класса для участя в иллюстрации:
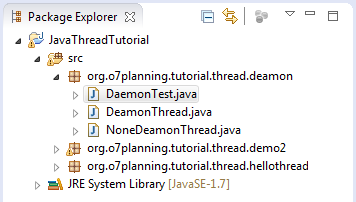
NoneDeamonThread.java
package org.o7planning.tutorial.thread.deamon;

public class NoneDeamonThread extends Thread {

   @Override
   public void run() {
       int i = 0;

       // Loop 10 times. This thread will end.
       while (i < 10) {
           System.out.println("  - Hello from None Deamon Thread " + i++);
           try {

               // Sleep 1 second
               Thread.sleep(1000);
           } catch (InterruptedException e) {
           }
       }

       // None deamon thread ending.
       System.out.println("\n==> None Deamon Thread ending\n");
   }
}
DeamonThread.java
package org.o7planning.tutorial.thread.deamon;

class DeamonThread extends Thread {

   @Override
   public void run() {
       int count = 0;

       // Infinite loop
       while (true) {
           System.out.println("+ Hello from Deamon Thread " + count++);
           try {
               // Sleep 2 second
               sleep(2000);
           } catch (InterruptedException e) {
           }
       }
   }
}
DaemonTest.java
package org.o7planning.tutorial.thread.deamon;

public class DaemonTest {

   public static void main(String[] args) {
       System.out.println("==> Main Thread running..\n");

       // Create thread
       Thread deamonThread = new DeamonThread();

       // Set deamon true
       deamonThread.setDaemon(true);
       deamonThread.start();

       // Create other thread
       new NoneDeamonThread().start();

       try {
           // Sleep 5 second
           Thread.sleep(5000);
       } catch (InterruptedException e) {
       }

       // Main Thread ending
       System.out.println("\n==> Main Thread ending\n");
   }

}
Результаты запуска класса DeamonTest:
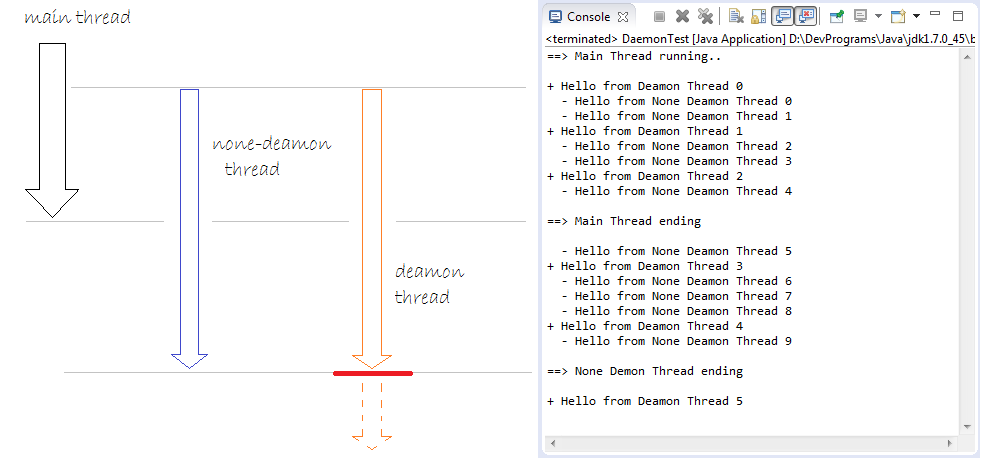
Изображение выше показывает, что поток Deamon остановлен когда все обычные потоки остановлены. Несмотря на то, что его код работает бесконечно.
Для чего обычно используется поток deamon?
Один из важных потоков Deamon в Java это поток Garbage Collection, то есть собрать ресурсы, которые больше не используются чтобы освободить память. Когда все потоки пользователя перестают работать, останавливается так же поток Garbage Collection.
5. Использование join() & join(long)
Thread.join() это метод оповещающий подождать, когда завершится этот поток, только потом продолжает запускаться родительский поток.
// Parent thread must wait until the end of this thread, before being continued.
// (This is equivalent to calling join(0))
public final void join() throws InterruptedException;

// Parent thread must wait 'millis' milliseconds to continue running.
// After call join(long).
// If the parameter millis = 0 means to wait until the end of this thread.
public final synchronized void join(long millis) throws InterruptedException;


// Parent thread must wait 'millis' milliseconds and 'nanos' nanoseconds to continue running.
// After call join(long,int).
// 1 second = 1000000 nanoseconds.
public final synchronized void join(long millis, int nanos) throws InterruptedException;
Посмотрим изображенный пример:
JoinThread.java
package org.o7planning.tutorial.thread.join;

public class JoinThread extends Thread {
  private String threadName;
  private int count;

  public JoinThread(String threadName, int count) {
      this.threadName = threadName;
      this.count = count;
  }

  @Override
  public void run() {

      for (int i = 1; i < count + 1; i++) {
          System.out.println("Hello from " + this.threadName + " " + i);
          try {
              Thread.sleep(2000);
          } catch (InterruptedException e) {
          }
      }
      System.out.println("\n==> Thread " + threadName + " end!\n");
  }
}
JoinTest.java
package org.o7planning.tutorial.thread.join;

public class JoinTest {

   public static void main(String[] args) throws InterruptedException {

       System.out.println("\n==> Main thread starting..\n");

       Thread joinThreadA = new JoinThread("A*", 2);
       Thread joinThreadB = new JoinThread("B*", 3);


       // None join Thread.
       Thread noJoinThreadC = new JoinThread("C", 5);

       joinThreadA.start();
       joinThreadB.start();
       noJoinThreadC.start();

       // Using join()
       joinThreadA.join();
       joinThreadB.join();


       // The following code will have to wait until 2
       // JoinThread A, B completed.
       System.out.println("Hello from main thread...");

       System.out.println("Thread A isLive? " + joinThreadA.isAlive());
       System.out.println("Thread B isLive? " + joinThreadB.isAlive());
       System.out.println("Thread C isLive? " + noJoinThreadC.isAlive());

       System.out.println("\n==> Main Thread end!\n");
   }
}
Результаты запуска класса JoinTest:
==> Main thread starting..

Hello from A* 1
Hello from C 1
Hello from B* 1
Hello from A* 2
Hello from C 2
Hello from B* 2

==> Thread A* end!

Hello from B* 3
Hello from C 3

==> Thread B* end!

Hello from C 4
Hello from main thread...
Thread A isLive? false
Thread B isLive? false
Thread C isLive? true

==> Main Thread end!

Hello from C 5

==> Thread C end!
Пример использования join(long millis):
JoinTest2.java
package org.o7planning.tutorial.thread.join;

public class JoinTest2 {

   public static void main(String[] args) throws InterruptedException {

       System.out.println("\n==> Main thread starting..\n");

       Thread joinThreadA = new JoinThread("A*", 5);

       joinThreadA.start();

       // Main thread must wait to 5000 miliseconds,
       // and then continue running. (Not necessarily joinThreadA finish)
       joinThreadA.join(5000);

       System.out.println("Main thread after 5000 milli second");
       System.out.println("Hello from main thread...");

       System.out.println("Thread A isLive? " + joinThreadA.isAlive());

       System.out.println("\n==> Main Thread end!\n");
   }

}
Результаты запуска примера:
==> Main thread starting..

Hello from A* 1
Hello from A* 2
Hello from A* 3
Main thread after 5000 milli second
Hello from main thread...
Thread A isLive? true

==> Main Thread end!

Hello from A* 4
Hello from A* 5

==> Thread A* end!
6. Обработки исключений для Thread
Метод Thread.setDefaultUncaughtExceptionHandler() настроен обрабатывать по умолчанию, когда поток внезапно завершается из-за непойманного исключения, и не было другой обработки, которая была определена для того потока.
ThreadExceptionDemo.java
package org.o7planning.tutorial.thread.exception;

import java.util.Random;

public class ThreadExceptionDemo {

   public static class RunnableTest implements Runnable {

       @Override
       public void run() {
           System.out.println("Thread running ..");

           while (true) {
               Random r = new Random();

               // A random number from 0-99
               int i = r.nextInt(100);
               System.out.println("Next value " + i);

               try {
                   Thread.sleep(2000);
               } catch (InterruptedException e) {
               }

               if (i > 70) {
                    // Simulate an exception was not handled in the thread.
                   throw new RuntimeException("Have a problem...");
               }
           }
       }

   }

   public static void main(String[] args) {
       System.out.println("==> Main thread running...");

       Thread thread = new Thread(new RunnableTest());
       Thread.setDefaultUncaughtExceptionHandler(new Thread.UncaughtExceptionHandler() {

           @Override
           public void uncaughtException(Thread t, Throwable e) {
               System.out.println("#Thread: " + t);
               System.out.println("#Thread exception message: " + e.getMessage());
           }
       });

       thread.start();
       System.out.println("==> Main thread end...");
   }

}
Результаты запуска примера:
==> Main thread running...
==> Main thread end...
Thread running ..
Next value 21
Next value 42
Next value 67
Next value 18
Next value 34
Next value 40
Next value 11
Next value 1
Next value 92
#Thread: Thread[Thread-0,5,main]
#Thread exception message: Have a problem...
7. Использование yield()
Теоритически, "yield" это значит отпустить, сдаться. Поток yield говорит виртуальной машине, что он готов, чтобы другие потоки расположились на его месте. Это значит он не делеает ничего важного. Заметьте, что это только подсказка, и не гарантирует быть эффективным везде.
yield() определяется в Thread.java следующим образом
public static native void yield();so, yield() method is used when you see that thread is free, it's not doing anything important, it suggests operating system give priority temporarily to the other thread.
The example below, there are two threads, each thread print out a text 100K times (the numbers are large enough to see the difference). One thread is the highest priority, and other thread is lowest priority. See completion time of 2 threads.
YieldThreadExample.java
package org.o7planning.tutorial.thread.yield;

import java.util.Date;

public class YieldThreadExample {

	private static Date importantEndTime;
	private static Date unImportantEndTime;

	public static void main(String[] args) {
		importantEndTime = new Date();
		unImportantEndTime = new Date();

		System.out.println("Create thread 1");

		Thread importantThread = new ImportantThread();

		// Set the highest priority for this thread.
		importantThread.setPriority(Thread.MAX_PRIORITY);

		System.out.println("Create thread 2");

		Thread unImportantThread = new UnImportantThread();

		// Set the lowest priority for this thread.
		unImportantThread.setPriority(Thread.MIN_PRIORITY);

		// Start threads.
		unImportantThread.start();
		importantThread.start();

	}

	// A important job which requires high priority.
	static class ImportantThread extends Thread {

		@Override
		public void run() {
			for (int i = 0; i < 100000; i++) {
				System.out.println("\n Important work " + i);

				// Notifying the operating system,
				// this thread gives priority to other threads.
				Thread.yield();
			}

			// The end time of this thread.
			importantEndTime = new Date();
			printTime();
		}

	}

	static class UnImportantThread extends Thread {
		@Override
		public void run() {
			for (int i = 0; i < 100000; i++) {
				System.out.println("\n  -- UnImportant work " + i);
			}
			// The end time of this thread.
			unImportantEndTime = new Date();
			printTime();
		}
	}

	private static void printTime() {
		// Interval (Milliseconds)
		long interval = unImportantEndTime.getTime() - importantEndTime.getTime();

		System.out.println("UnImportant Thread - Important Thread = " //
				+ interval + " milliseconds");
	}

}
The result: the lower priority thread has completed the task 51 milliseconds faster than the thread with higher priority.
...

 Important work 99995

 Important work 99996

 Important work 99997

 Important work 99998

 Important work 99999
UnImportant Thread - Important Thread = -269 millisecondsJava Basic
- Настройте java compiler для обработки вашего Annotation (Annotation Processing Tool)
- Программирование на Java для группы с помощью Eclipse и SVN
- Руководство Java WeakReference
- Руководство Java PhantomReference
- Сжатие и декомпрессия в Java
- Настройка Eclipse для использования JDK вместо JRE
- Методы String.format() и printf() в Java
- Синтаксис и новые функции в Java 8
- Регулярные выражения Java
- Руководство Java Multithreading Programming
- Библиотеки Java JDBC Driver для различных типов баз данных
- Руководство Java JDBC
- Получить значения столбцов, автоматически возрастающих при вставлении (Insert) записи, используя JDBC
- Руководство Java Stream
- Руководство Java Functional Interface
- Введение в Raspberry Pi
- Руководство Java Predicate
- Абстрактный класс и Interface в Java
- Модификатор доступа (Access modifiers) в Java
- Руководство Java Enum
- Руководство Java Annotation
- Сравнение и Сортировка в Java
- Руководство Java String, StringBuffer и StringBuilder
- Обработка исключений Java - Java Exception Handling
- Руководство Java Generics
- Манипулирование файлами и каталогами в Java
- Руководство Java BiPredicate
- Руководство Java Consumer
- Руководство Java BiConsumer
- Что мне нужно для начала работы с Java?
- История Java и разница между Oracle JDK и OpenJDK
- Установить Java в Windows
- Установите Java в Ubuntu
- Установите OpenJDK в Ubuntu
- Установить Eclipse
- Установите Eclipse в Ubuntu
- Быстрое изучение Java для начинающих
- История бит и байтов в информатике
- Типы данных в java
- Битовые операции
- Команда if else в Java
- команды switch в Java
- Циклы в Java
- Массивы (Array) в Java
- JDK Javadoc в формате CHM
- Наследование и полиморфизм в Java
- Руководство Java Function
- Руководство Java BiFunction
- Пример Java encoding и decoding с использованием Apache Base64
- Руководство Java Reflection
- Java Удаленный вызов методов - Java RMI
- Руководство Программирование Java Socket
- Какую платформу я должен выбрать для разработки приложений Java Desktop?
- Руководство Java Commons IO
- Руководство Java Commons Email
- Руководство Java Commons Logging
- Понимание Java System.identityHashCode, Object.hashCode и Object.equals
- Руководство Java SoftReference
- Руководство Java Supplier
- Аспектно-ориентированное программирование Java с помощью AspectJ (AOP)
Show More
- Руководства Java Servlet/JSP
- Руководства Java Collections Framework
- Java API для HTML, XML
- Руководства Java IO
- Руководства Java Date Time
- Руководства Spring Boot
- Руководства Maven
- Руководства Gradle
- Руководства Java Web Services
- Руководства Java SWT
- Руководства JavaFX
- Руководства Oracle Java ADF
- Руководства Struts2 Framework
- Руководства Spring Cloud