Руководство JavaFX Button
1. JavaFX Button
JavaFX Button позволяет разработчикам обрабатывать действие когда пользователь кликает на кнопку. Класс Button это расширенный класс из класса Labeled. Может отображать текст, изображение, или оба.
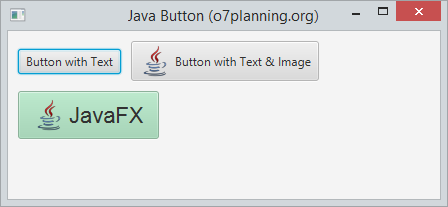
2. Пример с Button
Создайте Button с Text, или Image или обоими.
InputStream input =
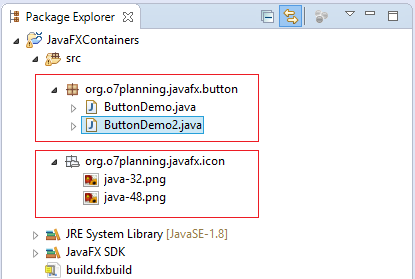
getClass().getResourceAsStream("/org/o7planning/javafx/icon/java-32.png");
Image image = new Image(input);
ImageView imageView = new ImageView(image);
// Create a Button with Text & Image from Constructor
Button button2 = new Button("Button with Text & Image", imageView);
// Or
Button button2 = new Button("Button with Text & Image");
button2.setGraphic(imageView);Смотреть полный пример:
ButtonDemo.java
package org.o7planning.javafx.button;

import java.io.InputStream;

import javafx.application.Application;
import javafx.geometry.Insets;
import javafx.scene.Scene;
import javafx.scene.control.Button;
import javafx.scene.image.Image;
import javafx.scene.image.ImageView;
import javafx.scene.layout.FlowPane;
import javafx.stage.Stage;

public class ButtonDemo extends Application {

    @Override
    public void start(Stage primaryStage) throws Exception {

        FlowPane root = new FlowPane();
        root.setPadding(new Insets(10));
        root.setHgap(10);
        root.setVgap(10);

        // Button 1
        Button button1 = new Button("Button with Text");

        InputStream input = //
                getClass().getResourceAsStream("/org/o7planning/javafx/icon/java-32.png");

        Image image = new Image(input);
        ImageView imageView = new ImageView(image);

        Button button2 = new Button("Button with Text & Image");
        button2.setGraphic(imageView);

        root.getChildren().addAll(button1, button2);

        primaryStage.setTitle("Java Button (o7planning.org)");

        Scene scene = new Scene(root, 350, 150);
        primaryStage.setScene(scene);
        primaryStage.show();

    }

    public static void main(String[] args) {
        Application.launch(args);
    }

}
3. Buttonи событие
Главные функции каждой кнопки это создать действие при клике. Использовать метод setOnAction класса Button чтобы определить что произойдет если пользователь нажмет на кнопку.
button.setOnAction(new EventHandler<ActionEvent>() {

    @Override
    public void handle(ActionEvent event) {
        label.setText(new Date().toString());
    }
});
Помимо этого, Button это Node, он наследует все методы обработки от класса Node.
** Node **
public final void setOnDragEntered(EventHandler<? super DragEvent> value)
public final void setOnDragExited(EventHandler<? super DragEvent> value)
public final void setOnDragOver(EventHandler<? super DragEvent> value)
public final void setOnDragDropped(EventHandler<? super DragEvent> value)
public final void setOnDragDone(EventHandler<? super DragEvent> value)
public final void setOnContextMenuRequested(EventHandler<? super ContextMenuEvent> value)
public final void setOnMouseClicked(EventHandler<? super MouseEvent> value)
public final void setOnMouseDragged(EventHandler<? super MouseEvent> value)
public final void setOnMouseEntered(EventHandler<? super MouseEvent> value)
public final void setOnMouseExited(EventHandler<? super MouseEvent> value)
public final void setOnMouseMoved(EventHandler<? super MouseEvent> value)
public final void setOnMousePressed(EventHandler<? super MouseEvent> value)
public final void setOnMouseReleased(EventHandler<? super MouseEvent> value)
public final void setOnDragDetected(EventHandler<? super MouseEvent> value)
public final void setOnMouseDragOver(EventHandler<? super MouseDragEvent> value)
public final void setOnMouseDragReleased(EventHandler<? super MouseDragEvent> value)
public final void setOnMouseDragEntered(EventHandler<? super MouseDragEvent> value)
public final void setOnMouseDragExited(EventHandler<? super MouseDragEvent> value)
public final void setOnScrollStarted(EventHandler<? super ScrollEvent> value)
public final void setOnScroll(EventHandler<? super ScrollEvent> value)
public final void setOnScrollFinished(EventHandler<? super ScrollEvent> value)
public final void setOnRotationStarted(EventHandler<? super RotateEvent> value)
public final void setOnRotate(EventHandler<? super RotateEvent> value)
public final void setOnRotationFinished(EventHandler<? super RotateEvent> value)
public final void setOnZoomStarted(EventHandler<? super ZoomEvent> value)
public final void setOnZoom(EventHandler<? super ZoomEvent> value)
public final void setOnZoomFinished(EventHandler<? super ZoomEvent> value)
public final void setOnSwipeUp(EventHandler<? super SwipeEvent> value)
public final void setOnSwipeDown(EventHandler<? super SwipeEvent> value)
public final void setOnSwipeLeft(EventHandler<? super SwipeEvent> value)
public final void setOnSwipeRight(EventHandler<? super SwipeEvent> value)
public final void setOnTouchPressed(EventHandler<? super TouchEvent> value)
public final void setOnTouchMoved(EventHandler<? super TouchEvent> value)
public final void setOnTouchReleased(EventHandler<? super TouchEvent> value)
public final void setOnTouchStationary(EventHandler<? super TouchEvent> value)
public final void setOnKeyPressed(EventHandler<? super KeyEvent> value)
public final void setOnKeyReleased(EventHandler<? super KeyEvent> value)
public final void setOnKeyTyped(EventHandler<? super KeyEvent> value
public final void setOnInputMethodTextChanged(EventHandler<? super InputMethodEvent> value)
Например, обработка действия произошедшее с Button.
ButtonEventDemo.java
package org.o7planning.javafx.button;

import java.util.Date;

import javafx.application.Application;
import javafx.event.ActionEvent;
import javafx.event.EventHandler;
import javafx.geometry.Insets;
import javafx.scene.Scene;
import javafx.scene.control.Button;
import javafx.scene.control.Label;
import javafx.scene.layout.FlowPane;
import javafx.stage.Stage;

public class ButtonEventDemo extends Application {

    @Override
    public void start(Stage primaryStage) throws Exception {

        FlowPane root = new FlowPane();
        root.setPadding(new Insets(10));
        root.setHgap(10);
        root.setVgap(10);

        // Button
        Button button = new Button("Show Time");
        Label label = new Label("");

        button.setOnAction(new EventHandler<ActionEvent>() {

            @Override
            public void handle(ActionEvent event) {
                label.setText(new Date().toString());
            }
        });

        root.getChildren().addAll(button,label);

        primaryStage.setTitle("Java Button (o7planning.org)");

        Scene scene = new Scene(root, 350, 150);
        primaryStage.setScene(scene);
        primaryStage.show();

    }

    public static void main(String[] args) {
        Application.launch(args);
    }

}
Запустить пример:
4. Применить эффекты к Button
Так как Button является расширенным классом от Node, поэтому вы можете применить эффекты для Button. Например эффект Drop Shadow,.. Есть многие классы связанные с эффектами, которые вы можете найти в пакете javafx.scene.effect.
Пример ниже изображает эффект Drop Shadow и эффект Motion Blur для Button когда мышь передвигается на поверхности Button.
ButtonEffectDemo.java
package org.o7planning.javafx.button;

import javafx.application.Application;
import javafx.event.EventHandler;
import javafx.geometry.Insets;
import javafx.scene.Scene;
import javafx.scene.control.Button;
import javafx.scene.effect.DropShadow;
import javafx.scene.effect.MotionBlur;
import javafx.scene.input.MouseEvent;
import javafx.scene.layout.FlowPane;
import javafx.stage.Stage;

public class ButtonEffectDemo extends Application {

    @Override
    public void start(Stage primaryStage) throws Exception {

        FlowPane root = new FlowPane();
        root.setPadding(new Insets(10));
        root.setHgap(10);
        root.setVgap(10);

        // --- Button 1 ------------
        Button button1 = new Button("Drop Shadow effect");

        DropShadow shadow = new DropShadow();

        // Adding the shadow when the mouse cursor is on
        button1.addEventHandler(MouseEvent.MOUSE_ENTERED, new EventHandler<MouseEvent>() {
            @Override
            public void handle(MouseEvent e) {
                button1.setEffect(shadow);
            }
        });

        // Removing the shadow when the mouse cursor is off
        button1.addEventHandler(MouseEvent.MOUSE_EXITED, new EventHandler<MouseEvent>() {
            @Override
            public void handle(MouseEvent e) {
                button1.setEffect(null);
            }
        });

        // --- Button 2 ------------
        Button button2 = new Button("Motion Blur effect");

        MotionBlur motionBlur = new MotionBlur();

        // Adding the Motion Blur effect when the mouse cursor is on
        button2.addEventHandler(MouseEvent.MOUSE_ENTERED, new EventHandler<MouseEvent>() {
            @Override
            public void handle(MouseEvent e) {
                button2.setEffect(motionBlur);
            }
        });

        // Removing the Motion Blur effect when the mouse cursor is off
        button2.addEventHandler(MouseEvent.MOUSE_EXITED, new EventHandler<MouseEvent>() {
            @Override
            public void handle(MouseEvent e) {
                button2.setEffect(null);
            }
        });

        root.getChildren().addAll(  button1, button2);

        primaryStage.setTitle("Java Button (o7planning.org)");

        Scene scene = new Scene(root, 350, 150);
        primaryStage.setScene(scene);
        primaryStage.show();

    }

    public static void main(String[] args) {
        Application.launch(args);
    }

}
5. Стиль Button (Css Style)
Вы можете использовать CSS в JavaFX и применить к Button, CSS в JavaFX очень похож на CSS в HTML. Вы можете определить стили в файле css, и объявить его приложению. И можете применить классы стиля, которые вы определили используя метод setStyleClass.
Так же, вы можете определить стиль для Button напрямую в коде Java используя методы setStyle.
button1.setStyle("-fx-font: 22 arial; -fx-base: #b6e7c9;");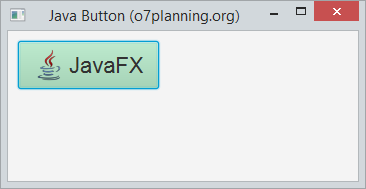
Вы так же можете посмотреть документы про JavaFX Css по ссылке:
- Руководство JavaFX CSS Style
Смотреть полный пример:
ButtonCssDemo.java
package org.o7planning.javafx.button;

import java.io.InputStream;

import javafx.application.Application;
import javafx.geometry.Insets;
import javafx.scene.Scene;
import javafx.scene.control.Button;
import javafx.scene.image.Image;
import javafx.scene.image.ImageView;
import javafx.scene.layout.FlowPane;
import javafx.stage.Stage;

public class ButtonCssDemo extends Application {

    @Override
    public void start(Stage primaryStage) throws Exception {

        FlowPane root = new FlowPane();
        root.setPadding(new Insets(10));
        root.setHgap(10);
        root.setVgap(10);


        InputStream input = //
                getClass().getResourceAsStream("/org/o7planning/javafx/icon/java-32.png");

        Image image = new Image(input);
        ImageView imageView = new ImageView(image);

        // Button 1
        Button button1 = new Button("JavaFX", imageView);

        // Set Style
        button1.setStyle("-fx-font: 22 arial; -fx-base: #b6e7c9;");

        root.getChildren().add (button1 );

        primaryStage.setTitle("Java Button (o7planning.org)");

        Scene scene = new Scene(root, 350, 150);
        primaryStage.setScene(scene);
        primaryStage.show();

    }

    public static void main(String[] args) {
        Application.launch(args);
    }

}
Руководства JavaFX
- Откройте новое окно (window) в JavaFX
- Руководство JavaFX ChoiceDialog
- Руководство JavaFX Alert Dialog
- Руководство JavaFX TextInputDialog
- Установите e(fx)clipse для Eclipse (JavaFX Tooling)
- Установите JavaFX Scene Builder для Eclipse
- Руководство JavaFX для начинающих - Hello JavaFX
- Руководство JavaFX FlowPane Layout
- Руководство JavaFX TilePane Layout
- Руководство JavaFX HBox, VBox Layout
- Руководство JavaFX BorderPane Layout
- Руководство JavaFX AnchorPane Layout
- Руководство JavaFX TitledPane
- Руководство JavaFX Accordion
- Руководство JavaFX ListView
- Руководство JavaFX Group
- Руководство JavaFX ComboBox
- Руководство JavaFX Transformations
- Эффекты (effects) в JavaFX
- Руководство JavaFX GridPane Layout
- Руководство JavaFX StackPane Layout
- Руководство JavaFX ScrollPane
- Руководство JavaFX WebView и WebEngine
- Руководство JavaFX HTMLEditor
- Руководство JavaFX TableView
- Руководство JavaFX TreeView
- Руководство JavaFX TreeTableView
- Руководство JavaFX Menu
- Руководство JavaFX ContextMenu
- Руководство JavaFX Image и ImageView
- Руководство JavaFX Label
- Руководство JavaFX Hyperlink
- Руководство JavaFX Button
- Руководство JavaFX ToggleButton
- Руководство JavaFX RadioButton
- Руководство JavaFX MenuButton и SplitMenuButton
- Руководство JavaFX TextField
- Руководство JavaFX PasswordField
- Руководство JavaFX TextArea
- Руководство JavaFX Slider
- Руководство JavaFX Spinner
- Руководство JavaFX ProgressBar и ProgressIndicator
- Руководство JavaFX ChoiceBox
- Руководство JavaFX Tooltip
- Руководство JavaFX DatePicker
- Руководство JavaFX ColorPicker
- Руководство JavaFX FileChooser и DirectoryChooser
- Руководство JavaFX PieChart
- Руководство JavaFX AreaChart и StackedAreaChart
- Руководство JavaFX BarChart и StackedBarChart
- Руководство JavaFX Line
- Руководство JavaFX Rectangle и Ellipse
Show More