Эффекты (effects) в JavaFX
1. Обзор эффектов
Эффект (Effect) это любое действие создающее воздействие на графическое изображение (Graphic image), чтобы создать другое графическое изображение. Один из эффектов, которое вы часто встречаете это эффект размытия (Motion Blur), эффект тени (Drop Shadow),...
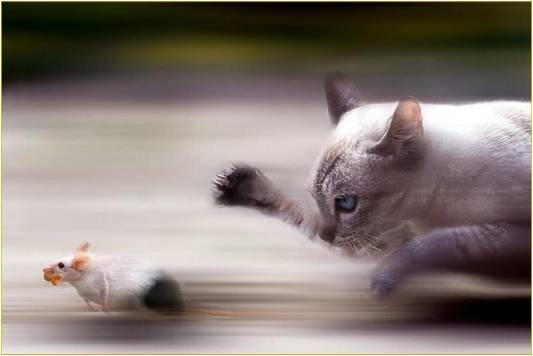
Motion Blur Effect (Эффект размытия):
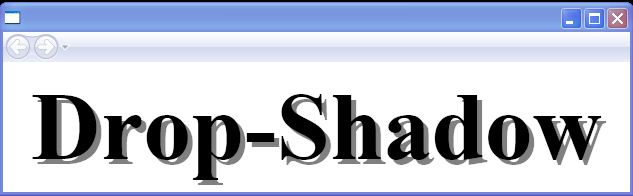
Drop Shadow Effect (Эффект тени):
В JavaFX эффект(effect) может быть применен к объекту вида Node, через метод Node.setEffect(effect).
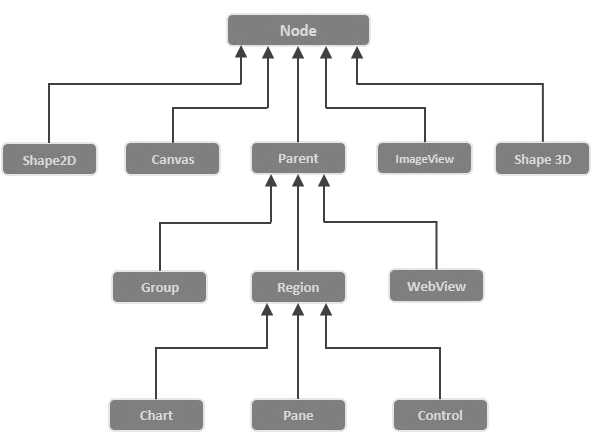
JavaFX построил некоторые классы эффектов, для разных эффектов, все находится в одном пакете (package) javafx.scene.effect. Ниже являются некоторые классы данного package (пакета).
- Blend
- Bloom
- BoxBlur
- ColorAdjust
- ColorInput
- DropShadow
- GaussianBlur
- Glow
- ImageInput
- InnerShadow
- Lighting
- MotionBlur
- PerspectiveTransform
- Reflection
- SepiaTone
- Shadow

2. ColorInput
ColorInput является эффектом для нарисования (render) заполненного цветом прямоугольника (fill) на затронутом объекте. Данный эффект полностью скроет затронутый объект.
ColorInput обычно используется с другими эффектами, чтобы создать другой смешанный эффект. И обычно используется для фона (background).
Пример:
В примере ниже, один Button настроен с эффектом ColorInput, он будет полностью скрыт, вы увидите только цветной прямоугольник.
ColorInputEffectExample.java
package org.o7planning.javafx.effect;

import javafx.application.Application;
import javafx.event.ActionEvent;
import javafx.event.EventHandler;
import javafx.scene.Group;
import javafx.scene.Scene;
import javafx.scene.control.Button;
import javafx.scene.effect.ColorInput;
import javafx.scene.paint.Color;
import javafx.scene.shape.Rectangle;
import javafx.stage.Stage;

public class ColorInputEffectExample extends Application {

   @Override
   public void start(Stage stage) {

      double x = 10;
      double y = 10;
      double w = 40;
      double h = 180;

      // Rectangle
      Rectangle rect = new Rectangle(x, y, w, h);
      rect.setFill(Color.WHITE);
      rect.setStrokeWidth(1);
      rect.setStroke(Color.BLACK);

      // Button
      Button button = new Button("Click me to apply ColorInput effect to me");

      button.setLayoutX(100);
      button.setLayoutY(30);

      button.setPrefSize(250, 150);

      button.setOnAction(new EventHandler<ActionEvent>() {

         @Override
         public void handle(ActionEvent event) {
            ColorInput colorInput = new ColorInput();
            colorInput.setPaint(Color.STEELBLUE);
            colorInput.setX(x);
            colorInput.setY(y);
            colorInput.setWidth(w);
            colorInput.setHeight(h);

            // Setting ColorInput effect
            button.setEffect(colorInput);
         }
      });

      Group root = new Group();

      root.getChildren().addAll(button, rect);

      Scene scene = new Scene(root, 450, 300);
      stage.setTitle("JavaFX ColorInput Effect (o7planning.org)");
      stage.setScene(scene);

      stage.show();

   }

   public static void main(String args[]) {
      launch(args);
   }

}
3. ImageInput
ImageInput это эффект использующийся для нарисования (render) изображения (image) на затронутый объект. Данный эффект полностью скроет затронутый объект.
ImageInput обычно используется вместе с другими эффектами для создания смешанного эффекта и применяется к фону (background).
Например:
В примере ниже, один Button настроен с эффектом ImageInput, он будет полностью скрыт, вы увидите только изображение (image).
ImageInputEffectExample.java
package org.o7planning.javafx.effect;
import javafx.application.Application;
import javafx.event.ActionEvent;
import javafx.event.EventHandler;
import javafx.scene.Group;
import javafx.scene.Scene;
import javafx.scene.control.Button;
import javafx.scene.effect.ImageInput;
import javafx.scene.image.Image;
import javafx.stage.Stage;
public class ImageInputEffectExample extends Application {
@Override
public void start(Stage stage) {
double x = 10;
double y = 10;
// Button
Button button = new Button("Click me to apply ImageInput effect to me");
button.setLayoutX(100);
button.setLayoutY(30);
button.setPrefSize(250, 50);
button.setOnAction(new EventHandler<ActionEvent>() {
@Override
public void handle(ActionEvent event) {
String imageUrl= "http://o7planning.org/templates/o7planning/resources/images/favi.png";
Image image = new Image(imageUrl);
ImageInput imageInput = new ImageInput();
imageInput.setSource(image);
imageInput.setX(x);
imageInput.setY(y);
// Setting ColorInput effect
button.setEffect(imageInput);
}
});
Group root = new Group();
root.getChildren().addAll(button );
Scene scene = new Scene(root, 450, 250);
stage.setTitle("JavaFX ImageInput Effect (o7planning.org)");
stage.setScene(scene);
stage.show();
}
public static void main(String args[]) {
launch(args);
}
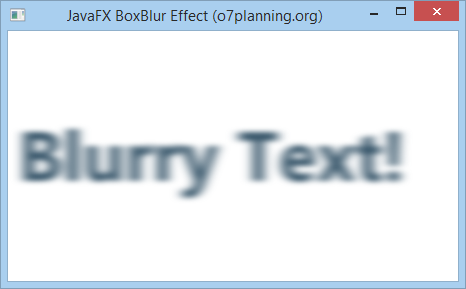
}4. BoxBlur
Например:
BoxBlurEffectExample.java
package org.o7planning.javafx.effect;

import javafx.application.Application;
import javafx.scene.Group;
import javafx.scene.Scene;
import javafx.scene.effect.BoxBlur;
import javafx.scene.paint.Color;
import javafx.scene.text.Font;
import javafx.scene.text.FontWeight;
import javafx.scene.text.Text;
import javafx.stage.Stage;

public class BoxBlurEffectExample extends Application {

    @Override
    public void start(Stage stage) {

        double x = 10;
        double y = 150;

        Text text = new Text();
        text.setText("Blurry Text!");
        text.setFill(Color.web("0x3b596d"));
        text.setFont(Font.font(null, FontWeight.BOLD, 70));
        text.setX(x);
        text.setY(y);

        BoxBlur boxBlur = new BoxBlur();

        // Min: 0.0 Max: 255.0
        boxBlur.setWidth(10);

        // Min: 0.0 Max: 255.0
        boxBlur.setHeight(5);

        // Min: 0 Max: 3
        boxBlur.setIterations(3);
        text.setEffect(boxBlur);

        Group root = new Group();

        root.getChildren().addAll(text);

        Scene scene = new Scene(root, 450, 250);
        stage.setTitle("JavaFX BoxBlur Effect (o7planning.org)");
        stage.setScene(scene);

        stage.show();

    }

    public static void main(String args[]) {
        launch(args);
    }

}
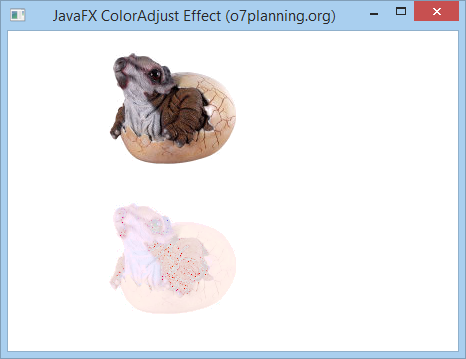
5. ColorAdjust
Вы так же можете изменить цвет изображения применяя эффект изменения цвета (Color adjust efffect). Чтобы изменить цвет на изображении вам нужно изменить 5 следующих свойств (property):
- hue
- saturation
- brightness
- contrast
Все свойства выше могут применяться для каждого pixel (пикселя) одельно.
Свойство | Описание |
hue | hue является свойством с видом double, значение которого в рамке -1..1, оно представляет значение коррекции оттенка (hue) для данного эффекта. |
saturation | saturation является свойством с видом double, значение которого в рамке -1..1, оно представляет значение регулировки насыщенности (saturation) для данного эффекта. |
brightness | brightness является свойством с видом double, значение которого в рамке -1..1, оно представляет яркость (brightness) для данного эффекта. |
contrast | contrast является свойством с видом double, значение которого в рамке -1..1, оно представляет контраст (contrast) для данного эффекта. |
Например:
ColorAdjustEffectExample.java
package org.o7planning.javafx.effect;

import javafx.application.Application;
import javafx.scene.Group;
import javafx.scene.Scene;
import javafx.scene.effect.ColorAdjust;
import javafx.scene.image.Image;
import javafx.scene.image.ImageView;
import javafx.stage.Stage;

public class ColorAdjustEffectExample extends Application {

   @Override
   public void start(Stage stage) {

      String imageUrl = "http://o7planning.org/templates/o7planning/resources/images/favi.png";
      Image image = new Image(imageUrl);

      ImageView imageView1 = new ImageView(image);
      imageView1.setX(100);
      imageView1.setY(20);

      ImageView imageView2 = new ImageView(image);

      imageView2.setX(100);
      imageView2.setY(170);

      // Create the ColorAdjust
      ColorAdjust colorAdjust = new ColorAdjust();

      // Setting the contrast value
      colorAdjust.setContrast(0.3);

      // Setting the hue value
      colorAdjust.setHue(-0.05);

      // Setting the brightness value
      colorAdjust.setBrightness(0.9);

      // Setting the saturation value
      colorAdjust.setSaturation(0.7);

      // Applying ColorAdjust effect to the ImageView node
      imageView2.setEffect(colorAdjust);

      Group root = new Group(imageView1, imageView2);

      Scene scene = new Scene(root, 450, 320);
      stage.setTitle("JavaFX ColorAdjust Effect (o7planning.org)");
      stage.setScene(scene);
      stage.show();
   }

   public static void main(String args[]) {
      launch(args);
   }

}
Запуск примера:
Пример 2:
Другой пример позволяет вам изменить свойства hue, saturation, brightness и contrast через Slider:
ColorAdjustEffectExample2.java
package org.o7planning.javafx.effect;
import javafx.application.Application;
import javafx.beans.value.ChangeListener;
import javafx.beans.value.ObservableValue;
import javafx.geometry.Insets;
import javafx.scene.Scene;
import javafx.scene.control.Label;
import javafx.scene.control.Slider;
import javafx.scene.effect.ColorAdjust;
import javafx.scene.image.Image;
import javafx.scene.image.ImageView;
import javafx.scene.layout.VBox;
import javafx.stage.Stage;
public class ColorAdjustEffectExample2 extends Application {
private static final int ADJUST_TYPE_HUE = 1;
private static final int ADJUST_TYPE_CONTRAST = 2;
private static final int ADJUST_TYPE_SATURATION = 3;
private static final int ADJUST_TYPE_BRIGHTNESS = 4;
private ColorAdjust colorAdjust;
@Override
public void start(Stage stage) {
Label contrastLabel = new Label("Contrast:");
Label hueLabel = new Label("Hue:");
Label saturationLabel = new Label("Saturation:");
Label brightnessLabel = new Label("Brightness:");
Slider contrastSlider = this.createSlider(ADJUST_TYPE_CONTRAST);
Slider hueSlider = this.createSlider(ADJUST_TYPE_HUE);
Slider saturationSlider = this.createSlider(ADJUST_TYPE_SATURATION);
Slider brightnessSlider = this.createSlider(ADJUST_TYPE_BRIGHTNESS);
String imageUrl = "http://o7planning.org/templates/o7planning/resources/images/favi.png";
Image image = new Image(imageUrl);
ImageView imageView = new ImageView(image);
// Create the ColorAdjust
colorAdjust = new ColorAdjust();
// Applying ColorAdjust effect to the ImageView node
imageView.setEffect(colorAdjust);
VBox root = new VBox();
root.setPadding(new Insets(10));
root.getChildren().addAll(contrastLabel, contrastSlider, //
hueLabel, hueSlider, //
saturationLabel, saturationSlider, //
brightnessLabel, brightnessSlider, imageView);
Scene scene = new Scene(root, 450, 320);
stage.setTitle("JavaFX ColorAdjust Effect (o7planning.org)");
stage.setScene(scene);
stage.show();
}
// Create Slider to Adjust Color
private Slider createSlider(final int adjustType) {
Slider slider = new Slider();
slider.setMin(-1);
slider.setMax(1);
slider.setBlockIncrement(0.1);
slider.setValue(0);
slider.valueProperty().addListener(new ChangeListener<Number>() {
@Override
public void changed(ObservableValue<? extends Number> observable, //
Number oldValue, Number newValue) {
switch (adjustType) {
case ADJUST_TYPE_HUE:
colorAdjust.setHue(newValue.doubleValue());
break;
case ADJUST_TYPE_CONTRAST:
colorAdjust.setContrast(newValue.doubleValue());
break;
case ADJUST_TYPE_SATURATION:
colorAdjust.setSaturation(newValue.doubleValue());
break;
case ADJUST_TYPE_BRIGHTNESS:
colorAdjust.setBrightness(newValue.doubleValue());
break;
}
}
});
return slider;
}
public static void main(String args[]) {
launch(args);
}
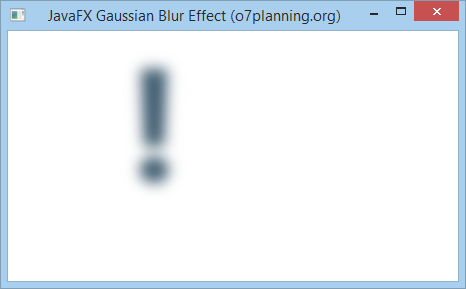
}6. Gaussian Blur
Gaussian Blur effect (Эффект размытия по Гауссу) использует алгоритм Gaussian для создания размытого эффекта. Позволить конфигурацию свойства (property) radius.
- Свойство radius является радиусом размытого круга, который окружает каждый пункт геометрического объекта, который настроил данный эффект.
Например:
GaussianBlurEffectExample.java
package org.o7planning.javafx.effect;

import javafx.animation.KeyFrame;
import javafx.animation.KeyValue;
import javafx.animation.Timeline;
import javafx.application.Application;
import javafx.scene.Group;
import javafx.scene.Node;
import javafx.scene.Scene;
import javafx.scene.effect.GaussianBlur;
import javafx.scene.paint.Color;
import javafx.scene.text.Font;
import javafx.scene.text.FontWeight;
import javafx.scene.text.Text;
import javafx.stage.Stage;
import javafx.util.Duration;

public class GaussianBlurEffectExample extends Application {

	// 30 millisencond.
	private static final int UI_ANIMATION_TIME_MSEC = 30000;

	private static final double MIN_RADIUS = 0.0;
	private static final double MAX_RADIUS = 70.0;

	private void applyEffect(Node node) {
		// Create Gaussian Blur effect with radius = 0
		GaussianBlur blur = new GaussianBlur(MIN_RADIUS);
		node.setEffect(blur);

		// Create animation effect
		Timeline timeline = new Timeline();
		KeyValue kv = new KeyValue(blur.radiusProperty(), MAX_RADIUS);
		KeyFrame kf = new KeyFrame(Duration.millis(UI_ANIMATION_TIME_MSEC), kv);
		timeline.getKeyFrames().add(kf);
		timeline.play();
	}

	@Override
	public void start(Stage stage) {

		Text text = new Text();
		text.setX(120.0);
		text.setY(150.0);
		text.setText("!");
		text.setFill(Color.web("0x3b596d"));
		text.setFont(Font.font(null, FontWeight.BOLD, 160));

		this.applyEffect(text);

		Group root = new Group();

		root.getChildren().addAll(text);

		Scene scene = new Scene(root, 450, 250);
		stage.setTitle("JavaFX Gaussian Blur Effect (o7planning.org)");
		stage.setScene(scene);

		stage.show();

	}

	public static void main(String args[]) {
		launch(args);
	}

}
Запуск примера:
7. Bloom Effect
Bloom (свечение) является эффектом, похожим на ощущение когда вы смотрите на сильно яркий предмет. Вы можете настроить предел (Threshold) яркости эффекта. Он является числом в рамке 0..1.
Пример:
В примере ниже, объект Text настроит эффект Bloom (Свечение).
BloomEffectExample.java
package org.o7planning.javafx.effect;
import javafx.application.Application;
import javafx.event.ActionEvent;
import javafx.event.EventHandler;
import javafx.scene.Group;
import javafx.scene.Scene;
import javafx.scene.control.Button;
import javafx.scene.control.Label;
import javafx.scene.effect.Bloom;
import javafx.scene.paint.Color;
import javafx.scene.shape.Rectangle;
import javafx.scene.text.Font;
import javafx.scene.text.FontWeight;
import javafx.scene.text.Text;
import javafx.stage.Stage;
public class BloomEffectExample extends Application {
@Override
public void start(Stage stage) {
Label label = new Label();
label.setLayoutX(10);
label.setLayoutY(50);
Rectangle rect = new Rectangle();
rect.setX(10);
rect.setY(70);
rect.setWidth(360);
rect.setHeight(80);
rect.setFill(Color.DARKSLATEBLUE);
Text text = new Text();
text.setText("Bloom!");
text.setFill(Color.ALICEBLUE);
text.setFont(Font.font(null, FontWeight.BOLD, 40));
text.setX(25);
text.setY(125);
// Create Bloom Effect
Bloom bloom = new Bloom();
// Setting Threshold
bloom.setThreshold(0.8);
text.setEffect(bloom);
Button plusButton = new Button("+");
plusButton.setLayoutX(50);
plusButton.setLayoutY(10);
plusButton.setOnAction(new EventHandler<ActionEvent>() {
@Override
public void handle(ActionEvent event) {
double threshold = bloom.getThreshold();
threshold += 0.1;
if (threshold > 1) {
threshold = 1;
}
bloom.setThreshold(threshold);
label.setText("Threshold: " + threshold);
}
});
Button minusButton = new Button("-");
minusButton.setLayoutX(10);
minusButton.setLayoutY(10);
minusButton.setOnAction(new EventHandler<ActionEvent>() {
@Override
public void handle(ActionEvent event) {
double threshold = bloom.getThreshold();
threshold -= 0.1;
if (threshold < 0) {
threshold = 0;
}
bloom.setThreshold(threshold);
label.setText("Threshold: " + threshold);
}
});
Group root = new Group();
root.getChildren().addAll(rect, text, label, minusButton, plusButton);
Scene scene = new Scene(root, 450, 250);
stage.setTitle("JavaFX Bloom Effect (o7planning.org)");
stage.setScene(scene);
stage.show();
}
public static void main(String args[]) {
launch(args);
}
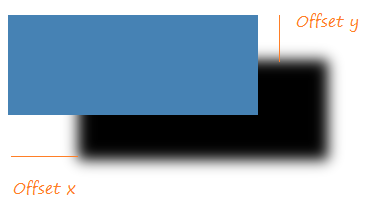
}8. Drop Shadow
Drop Shadow является эффектом высокого уровня (hight level), который создает тень для геометрического объекта.

Drop Shadow Effect (Эффект Drop Shadow) имеет 3 важных свойства (property), которые вам нужно настроить это:
- Offset (Offset x, Offset y)
- Radius (Радиус размытого круга)
- Color (Цвет тени)
Offset
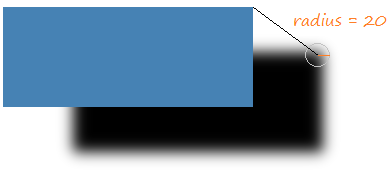
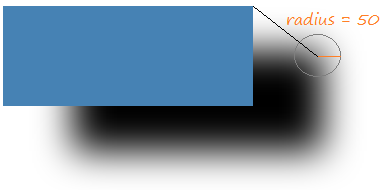
Radius (Радиус)
Каждая точка на объекте создаст свою точку тени. Данная точка тени является центром размытого круга. Вы можете настроить радиус данного круга.
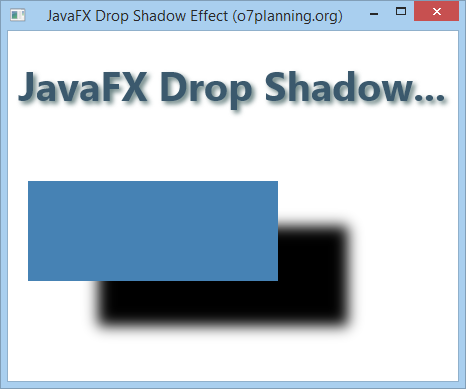
Например:
DropShadowEffectExample.java
package org.o7planning.javafx.effect;

import javafx.application.Application;
import javafx.scene.Group;
import javafx.scene.Scene;
import javafx.scene.effect.DropShadow;
import javafx.scene.paint.Color;
import javafx.scene.shape.Rectangle;
import javafx.scene.text.Font;
import javafx.scene.text.FontWeight;
import javafx.scene.text.Text;
import javafx.stage.Stage;

public class DropShadowEffectExample extends Application {

    @Override
    public void start(Stage stage) {

        DropShadow dropShadow = new DropShadow();
        dropShadow.setRadius(5.0);
        dropShadow.setOffsetX(3.0);
        dropShadow.setOffsetY(3.0);
        dropShadow.setColor(Color.color(0.4, 0.5, 0.5));

        Text text = new Text();
        text.setCache(true);
        text.setX(10.0);
        text.setY(70.0);
        text.setFill(Color.web("0x3b596d"));
        text.setText("JavaFX Drop Shadow...");
        text.setFont(Font.font(null, FontWeight.BOLD, 40));

        text.setEffect(dropShadow);

        DropShadow dropShadow2 = new DropShadow();
        dropShadow2.setOffsetX(70.0);
        dropShadow2.setOffsetY(45.0);
        dropShadow2.setRadius(20);

        Rectangle rect = new Rectangle(20, 150, 250, 100);
        rect.setFill(Color.STEELBLUE);
        rect.setCache(true);

        rect.setEffect(dropShadow2);

        Group root = new Group();

        root.getChildren().addAll(rect, text);

        Scene scene = new Scene(root, 450, 350);
        stage.setTitle("JavaFX Drop Shadow Effect (o7planning.org)");
        stage.setScene(scene);

        stage.show();

    }

    public static void main(String args[]) {
        launch(args);
    }

}
Запуск примера:
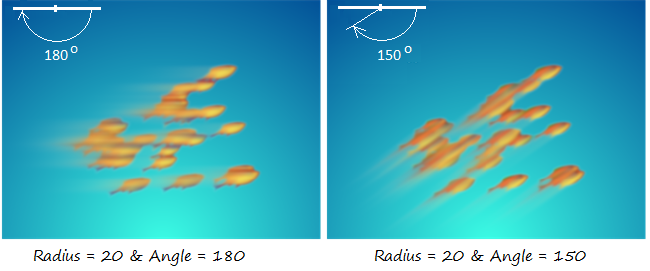
9. Motion Blur
Motion Blur effect (Эффект размытости при воспроизведении) используется ядро (kernel) это алгоритм Gaussian для создания эффекта размытия, одновременно позволяет конфигурировать свойства (property) радиуса (radius) и угла (angle).
- Свойство angle помогает определить направления движения передвигающегося объекта.
- Свойство radius является радиусом размытого круга окружающего каждую точку передвигающегося объекта.
Пример 1:
MotionBlurEffectExample.java
package org.o7planning.javafx.effect;

import javafx.application.Application;
import javafx.scene.Group;
import javafx.scene.Scene;
import javafx.scene.effect.MotionBlur;
import javafx.scene.paint.Color;
import javafx.scene.text.Font;
import javafx.scene.text.FontWeight;
import javafx.scene.text.Text;
import javafx.stage.Stage;

public class MotionBlurEffectExample extends Application {

    @Override
    public void start(Stage stage) {

        MotionBlur motionBlur = new MotionBlur();
        motionBlur.setRadius(55);
        motionBlur.setAngle(150.0);

        Text text = new Text();
        text.setX(120.0);
        text.setY(150.0);
        text.setText("!");
        text.setFill(Color.web("0x3b596d"));
        text.setFont(Font.font(null, FontWeight.BOLD, 160));
        text.setEffect(motionBlur);

        Group root = new Group();

        root.getChildren().addAll(text);

        Scene scene = new Scene(root, 450, 250);
        stage.setTitle("JavaFX Motion Blur Effect (o7planning.org)");
        stage.setScene(scene);

        stage.show();

    }

    public static void main(String args[]) {
        launch(args);
    }

}
Запуск примера:

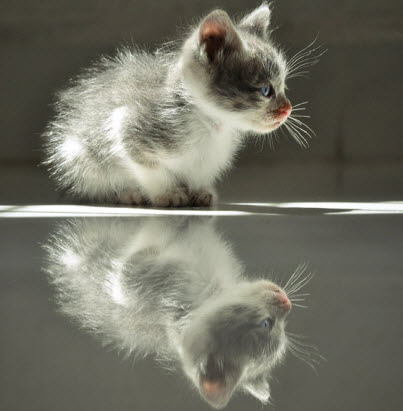
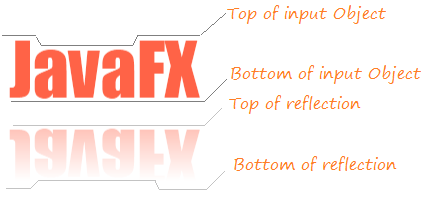
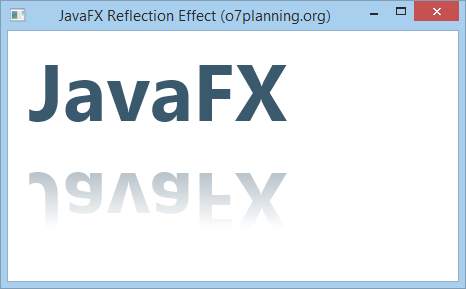
10. Reflection
Reflection (Отражение) является эффектом, который создает отражение изображения входного объекта, будто когда вы стоите перед зеркалом.
Имеются 4 свойства (property) важных для эффекта отображения:
- topOpacity
- bottomOpacity
- topOffset
- fraction
- input
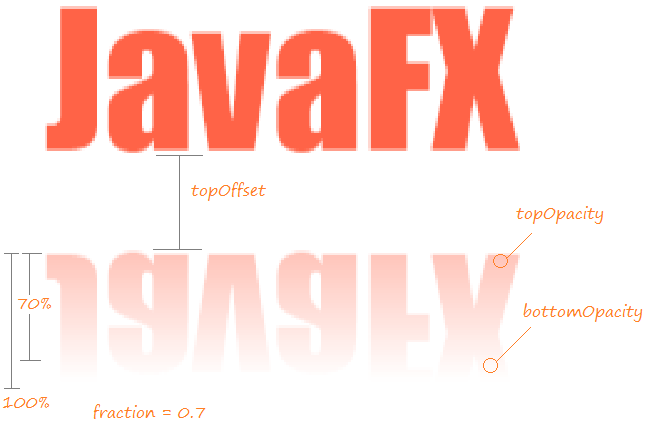
Свойство | Описание |
topOpacity | topOpacity является свойством с видом double, со значением в рамке 0..1, по умолчанию 0, данное значение представляет уровень размытости (opacity) отображения изображения на самом его верху. |
bottomOpacity | bottomOpacity является свойством с видом double, со значением в рамке 0..1, по умолчанию 0, данное значение представляет уровень размытости (opacity) отображения изображения в самом его низу |
topOffset | topOffset является свойством с видом double, это расстояние между нижней точкой объекта и верхней отраженного изображения. |
fraction | fraction является свойством с видом double, со значением в рамке 0..1, по умолчанию 0.75 (75%). Если данное значение движется к 1 (100%), точки рядом с верхними точками объекта будут иметь отраженное изображение. (Смотрите иллюстрированное изображение ниже). |
input |
Пример:
ReflectionEffectExample.java
package org.o7planning.javafx.effect;

import javafx.application.Application;
import javafx.scene.Group;
import javafx.scene.Scene;
import javafx.scene.effect.Reflection;
import javafx.scene.paint.Color;
import javafx.scene.text.Font;
import javafx.scene.text.FontWeight;
import javafx.scene.text.Text;
import javafx.stage.Stage;

public class ReflectionEffectExample extends Application {

   @Override
   public void start(Stage stage) {

      Reflection reflection = new Reflection();

      // Setting the bottom opacity of the reflection
      reflection.setBottomOpacity(0.0);

      // Setting the top opacity of the reflection
      reflection.setTopOpacity(0.5);

      // Setting the top offset of the reflection
      reflection.setTopOffset(10);

      // Setting the fraction of the reflection
      reflection.setFraction(0.7);

      Text text = new Text();
      text.setX(20.0);
      text.setY(90.0);

      text.setCache(true);
      text.setText("JavaFX");
      text.setFill(Color.web("0x3b596d"));
      text.setFont(Font.font(null, FontWeight.BOLD, 80));

      text.setEffect(reflection);

      Group root = new Group();

      root.getChildren().addAll(text);

      Scene scene = new Scene(root, 450, 250);
      stage.setTitle("JavaFX Reflection Effect (o7planning.org)");
      stage.setScene(scene);

      stage.show();

   }

   public static void main(String args[]) {
      launch(args);
   }
}
Запуск примера:
No ADS
Руководства JavaFX
- Откройте новое окно (window) в JavaFX
- Руководство JavaFX ChoiceDialog
- Руководство JavaFX Alert Dialog
- Руководство JavaFX TextInputDialog
- Установите e(fx)clipse для Eclipse (JavaFX Tooling)
- Установите JavaFX Scene Builder для Eclipse
- Руководство JavaFX для начинающих - Hello JavaFX
- Руководство JavaFX FlowPane Layout
- Руководство JavaFX TilePane Layout
- Руководство JavaFX HBox, VBox Layout
- Руководство JavaFX BorderPane Layout
- Руководство JavaFX AnchorPane Layout
- Руководство JavaFX TitledPane
- Руководство JavaFX Accordion
- Руководство JavaFX ListView
- Руководство JavaFX Group
- Руководство JavaFX ComboBox
- Руководство JavaFX Transformations
- Эффекты (effects) в JavaFX
- Руководство JavaFX GridPane Layout
- Руководство JavaFX StackPane Layout
- Руководство JavaFX ScrollPane
- Руководство JavaFX WebView и WebEngine
- Руководство JavaFX HTMLEditor
- Руководство JavaFX TableView
- Руководство JavaFX TreeView
- Руководство JavaFX TreeTableView
- Руководство JavaFX Menu
- Руководство JavaFX ContextMenu
- Руководство JavaFX Image и ImageView
- Руководство JavaFX Label
- Руководство JavaFX Hyperlink
- Руководство JavaFX Button
- Руководство JavaFX ToggleButton
- Руководство JavaFX RadioButton
- Руководство JavaFX MenuButton и SplitMenuButton
- Руководство JavaFX TextField
- Руководство JavaFX PasswordField
- Руководство JavaFX TextArea
- Руководство JavaFX Slider
- Руководство JavaFX Spinner
- Руководство JavaFX ProgressBar и ProgressIndicator
- Руководство JavaFX ChoiceBox
- Руководство JavaFX Tooltip
- Руководство JavaFX DatePicker
- Руководство JavaFX ColorPicker
- Руководство JavaFX FileChooser и DirectoryChooser
- Руководство JavaFX PieChart
- Руководство JavaFX AreaChart и StackedAreaChart
- Руководство JavaFX BarChart и StackedBarChart
- Руководство JavaFX Line
- Руководство JavaFX Rectangle и Ellipse
Show More