Руководство Flutter Scaffold
1. Scaffold
Класс Scaffold - это виджет, который способен расширить и заполнить доступное пространство или экран. Он предоставляет API для отображения основных виджетов приложения, таких как Drawer, SnackBar, Bottom-Sheet, FloatingActionButton, AppBar, BottomNavigationBar,...
Scaffold Constructor:
Scaffold constructor
const Scaffold({
  Key key,
  PreferredSizeWidget appBar,
  Widget body,
  Widget floatingActionButton,
  FloatingActionButtonLocation floatingActionButtonLocation,
  FloatingActionButtonAnimator floatingActionButtonAnimator,
  List<Widget> persistentFooterButtons,
  Widget drawer,
  Widget endDrawer,
  Widget bottomNavigationBar,
  Widget bottomSheet,
  Color backgroundColor,
  bool resizeToAvoidBottomPadding,
  bool resizeToAvoidBottomInset,
  bool primary: true,
  DragStartBehavior drawerDragStartBehavior:   DragStartBehavior.down
})
2. Examples
main.dart (ex1)
import 'package:flutter/material.dart';

void main() {
  runApp(MyApp());
}

class MyApp extends StatelessWidget {
  // This widget is the root of your application.
  @override
  Widget build(BuildContext context) {
    return MaterialApp(
      title: 'o7planning.org',
      debugShowCheckedModeBanner: false,
      theme: ThemeData(
        primarySwatch: Colors.blue,
        visualDensity: VisualDensity.adaptivePlatformDensity,
      ),
      home: MyHomePage(title: 'Flutter Scaffold Example'),
    );
  }
}

class MyHomePage extends StatelessWidget {
  MyHomePage({Key key, this.title}) : super(key: key);
  final String title;

  @override
  Widget build(BuildContext context) {
    return Scaffold(
      appBar: AppBar(
        title: Text(this.title),
      ),
      body: Center(
          child:
          Text (
            'Hello World',
          )
      ),
    );
  }
}
В этом примере мы создали Scaffold с двумя параметрами: appBar и body.
Scaffold (appBar + body)
// Create a Scaffold with 2 parameters: appBar, body.
Scaffold(
  appBar: AppBar(
    title: Text('Flutter Scaffold Example'),
  ),
  body: Center(
      child:
      Text(
        'Hello World',
      )
  ),
);3. floatingActionButton
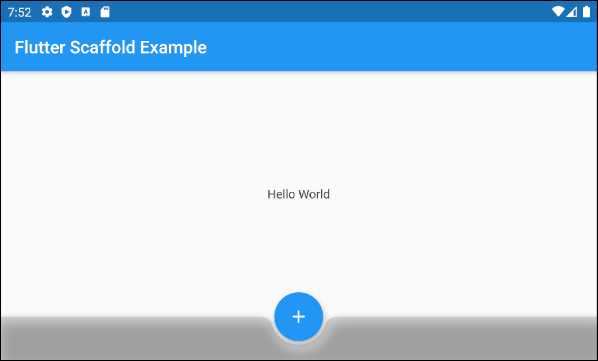
floatingActionButton - это кнопка, плавающая на поверхности body. По умолчанию она будет отображена в правом нижнем углу экрана. Вы можете указать её местоположение с помощью свойства floatingActionButtonLocation.
Widget floatingActionButton
main.dart (floatingActionButton ex1)
import 'package:flutter/material.dart';

void main() => runApp(MyApp());

// This Widget is the main application widget.
class MyApp extends StatelessWidget {
  @override
  Widget build(BuildContext context) {
    return MaterialApp(
      title: "o7planning.org",
      debugShowCheckedModeBanner: false,
      theme: ThemeData(
        primarySwatch: Colors.blue,
        visualDensity: VisualDensity.adaptivePlatformDensity,
      ),
      home: MyHomePage(),
    );
  }
}

class MyHomePage extends StatefulWidget {
  MyHomePage({Key key}) : super(key: key);

  @override
  MyHomePageState createState() => MyHomePageState();
}

class MyHomePageState extends State<MyHomePage> {
  int _count = 0;

  Widget build(BuildContext context) {
    return Scaffold(
      appBar: AppBar(
        title:  Text('Flutter Scaffold Example'),
      ),
      body: Center(
          child: Text('You have pressed the button $_count times.')
      ),
      floatingActionButton: FloatingActionButton(
        onPressed: ()  {
          setState(() => this._count++);
        },
        tooltip: 'Increment Counter',
        child: const Icon(Icons.add),
      ),
    );
  }
}- Руководство Flutter FloatingActionButton
4. floatingActionButtonLocation
Свойство floatingActionButtonLocation используется для указания места отображения floatingActionButton. Его значение по умолчанию - FloatingActionButtonLocation.endFloat.
FloatingActionButtonLocation floatingActionButtonLocationНапример:
Scaffold (floatingActionButtonLocation ex1)
Scaffold(
appBar: AppBar(
title: Text('Flutter Scaffold Example'),
),
body: Center(
child: Text('Hello World')
),
bottomNavigationBar: BottomAppBar(
shape: CircularNotchedRectangle(),
color: Colors.black12,
child: Container(
height: 50.0,
),
),
floatingActionButton: FloatingActionButton(
onPressed: () {},
tooltip: 'Increment Counter',
child: Icon(Icons.add),
),
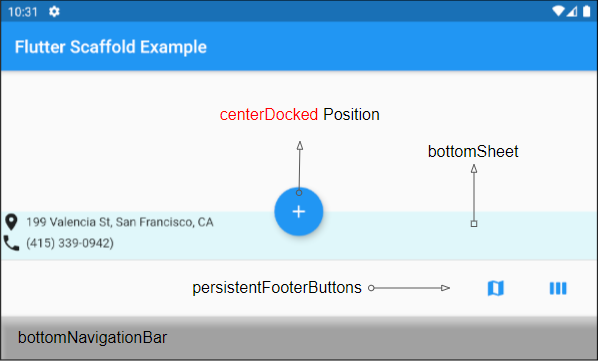
floatingActionButtonLocation: FloatingActionButtonLocation.centerDocked,
);Класс FloatingActionButtonLocation позволяет определить место отображения FloatingActionButton. Существует несколько предопределенных позиций в качестве статических констант этого класса:
- FloatingActionButtonLocation.centerDocked
- FloatingActionButtonLocation.centerFloat
- FloatingActionButtonLocation.centerTop
- FloatingActionButtonLocation.endDocked
- FloatingActionButtonLocation.endFloat
- FloatingActionButtonLocation.endTop
- FloatingActionButtonLocation.miniCenterDocked
- FloatingActionButtonLocation.miniCenterFloat
- FloatingActionButtonLocation.miniCenterTop
- FloatingActionButtonLocation.miniEndDocked
- FloatingActionButtonLocation.miniEndFloat
- FloatingActionButtonLocation.miniEndTo
- FloatingActionButtonLocation.miniStartDocked
- FloatingActionButtonLocation.miniStartFloat
- FloatingActionButtonLocation.miniStartTop
- FloatingActionButtonLocation.startDocked
- FloatingActionButtonLocation.startFloat
- FloatingActionButtonLocation.startTop
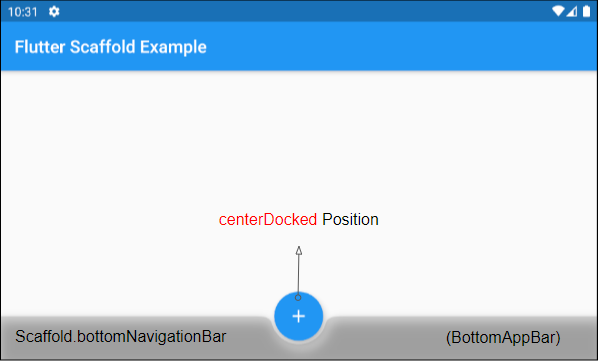
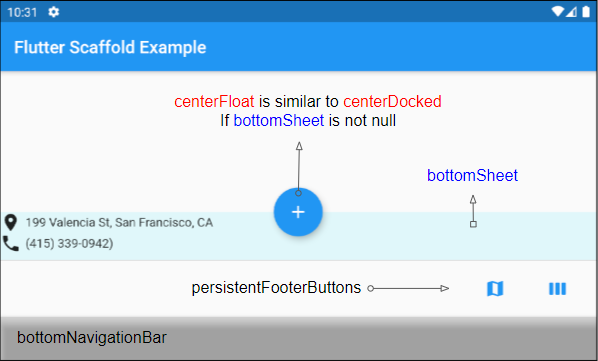
*Docked
Константы startDocked, centerDocked, endDocked, miniStartDocked, miniCenterDocked, miniEndDocked позволяют отображать Scaffold.floatingActionButton на поверхности
Scaffold.body так, чтобы центр кнопки был выровнен по верхней границе Scaffold.bottomSheet или Scaffold.persistentFooterButtons или Scaffold.bottomNavigationBar (в таком порядке приоритета).
Scaffold.body так, чтобы центр кнопки был выровнен по верхней границе Scaffold.bottomSheet или Scaffold.persistentFooterButtons или Scaffold.bottomNavigationBar (в таком порядке приоритета).
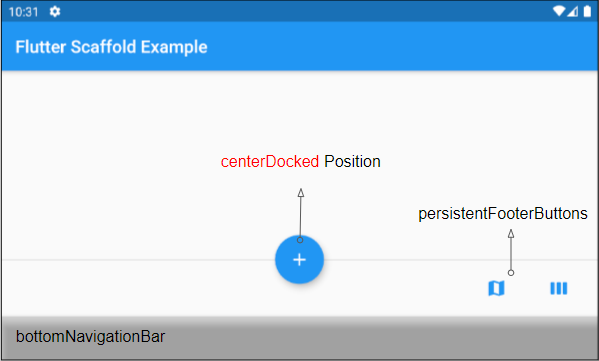
Если значения Scaffold.bottomSheet и Scaffold.persistentFooterButtons равны null, а Scaffold.bottomNavigationBar является объектом BottomAppBar, то Scaffold.floatingActionButton будет создавать notch на поверхности Scaffold.bottomNavigationBar.
*Float
Константы startFloat, centerFloat, endFloat, miniStartFloat, miniCenterFloat, miniEndFloat позволяют отображать Scaffold.floatingActionButton выше, не перекрывая другие виджеты: Scaffold.persistentFooterButtons và Scaffold.bottomNavigationBar.
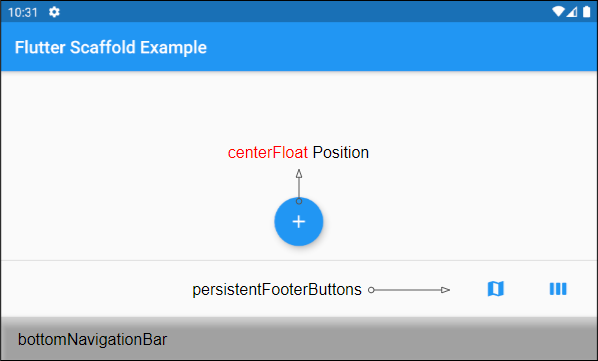
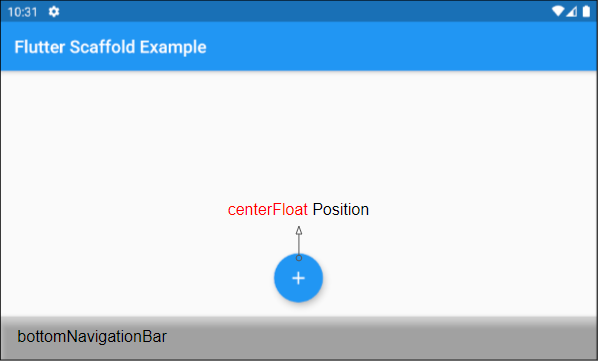
Если значение Scaffold.bottomSheet не равен null, то центр Scaffold.floatingActionButton будет выровнен по верхней границе Scaffold.bottomSheet.
*Top
константы startTop, centerTop, endTop, miniStartTop, miniCenterTop, miniEndTop позволяют отображать Scaffold.floatingActionButton прямо под верхней панелью инструментов так, чтобы центр кнопки был выровнен по нижней границе панели инструментов.
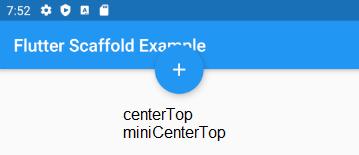
mini*
Константы с префиксом "mini" образуют Scaffold.floatingActionButton немного меньше, чем обычно, что эквивалентно настройкеFloatingActionButton.mini = true.
5. floatingActionButtonAnimator
Свойство floatingActionButtonAnimator используется для создания анимированных эффектов для FloatingActionButton.
FloatingActionButtonAnimator floatingActionButtonAnimator6. drawer
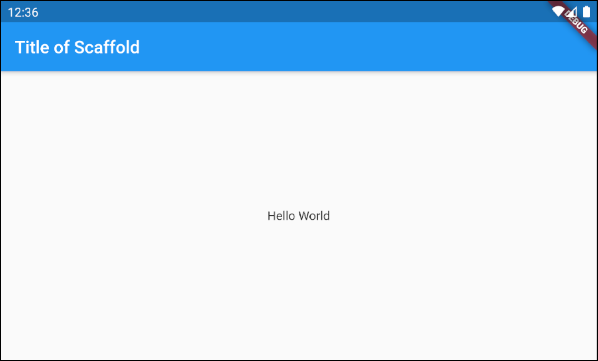
drawer -это панель, отображаемая с левой стороны body (если textDirection = TextDirection.ltr). Обычно она скрыта на мобильных устройствах, поэтому вам нужно провести пальцем слева направо, чтобы она появилась.
Widget drawerВ некоторых ситуациях кнопка может быть автоматически добавлена в AppBar.leading или AppBar.actions, что позволяет пользователям быстро открыть drawer. Это описано в следующей статье:
Например:
main.dart (drawer)
import 'package:flutter/material.dart';

void main() {
  runApp(MyApp());
}

class MyApp extends StatelessWidget {
  // This widget is the root of your application.
  @override
  Widget build(BuildContext context) {
    return MaterialApp(
      title: 'Title of Application',
      theme: ThemeData(
        primarySwatch: Colors.blue,
        visualDensity: VisualDensity.adaptivePlatformDensity,
      ),
      home: MyHomePage(title: 'Flutter Scaffold Example'),
    );
  }
}

class MyHomePage extends StatelessWidget {
  MyHomePage({Key key, this.title}) : super(key: key);
  final String title;

  @override
  Widget build(BuildContext context) {
    return Scaffold (
      appBar: AppBar(
        title: Text(this.title),
      ),
      body: Center(
          child:
          Text(
            'Hello World',
          )
      ),
      drawer: Drawer(
        child: ListView(
          children: const <Widget> [
            DrawerHeader(
              decoration: BoxDecoration(
                color: Colors.green,
              ),
              child: Text(
                'Hello World',
                style: TextStyle(
                  color: Colors.green,
                  fontSize: 24,
                ),
              ),
            ),
            ListTile(
              title: Text('Gallery'),
            ),
            ListTile(
              title: Text('Slideshow'),
            ),
          ],
        ),
      ),
    );
  }
}- Руководство Flutter Drawer
7. endDrawer
endDrawer - это панель, отображаемая с правой стороны body (если textDirection = TextDirection.ltr). Она обычно скрыта на мобильных устройствах, поэтому вам нужно провести пальцем справа налево, чтобы она появилась.
Widget endDrawerВ некоторых ситуациях кнопка может быть автоматически добавлена в AppBar.leading или AppBar.actions , что позволяет пользователям быстро открыть drawer. Это описано в следующей статье:
Например:
main.dart (endDrawer ex1)
import 'package:flutter/material.dart';

void main() {
  runApp(MyApp());
}

class MyApp extends StatelessWidget {
  @override
  Widget build(BuildContext context) {
    return MaterialApp(
      title: 'o7planning.org',
      debugShowCheckedModeBanner: false,
      theme: ThemeData(
        primarySwatch: Colors.blue,
        visualDensity: VisualDensity.adaptivePlatformDensity,
      ),
      home: MyHomePage(title: 'Flutter Scaffold Example'),
    );
  }
}

class MyHomePage extends StatelessWidget {
  MyHomePage({Key key, this.title}) : super(key: key);
  final String title;

  @override
  Widget build(BuildContext context) {
    return Scaffold (
      appBar: AppBar(
        title: Text(this.title),
      ),
      body: Center(
          child:
          Text(
            'Hello World',
          )
      ),
      endDrawer: Drawer(
        child: ListView(
          children: const <Widget> [
            DrawerHeader(
              decoration: BoxDecoration(
                color: Colors.green,
              ),
              child: Text(
                'Hello World',
                style: TextStyle(
                  color: Colors.green,
                  fontSize: 24,
                ),
              ),
            ),
            ListTile(
              title: Text('Gallery'),
            ),
            ListTile(
              title: Text('Slideshow'),
            ),
          ],
        ),
      ),
    );
  }
}- Руководство Flutter Drawer
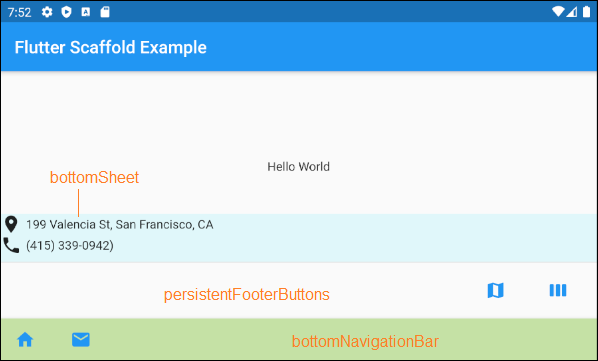
9. bottomNavigationBar
bottomNavigationBar - это панель навигации, отображаемая в нижней части Scaffold. В большинстве случаев она используется в качестве объекта BottomAppBar или BottomNativationBar.
Widget bottomNavigationBar
Scaffold (buttomNavigationBar)
import 'package:flutter/material.dart';

void main() {
  runApp(MyApp());
}

class MyApp extends StatelessWidget {
  // This widget is the root of your application.
  @override
  Widget build(BuildContext context) {
    return MaterialApp(
      title: 'Title of Application',
      theme: ThemeData(
        primarySwatch: Colors.blue,
        visualDensity: VisualDensity.adaptivePlatformDensity,
      ),
      home: MyHomePage(title: 'Flutter Scaffold Example'),
    );
  }
}

class MyHomePage extends StatelessWidget {
  MyHomePage({Key key, this.title}) : super(key: key);
  final String title;

  @override
  Widget build(BuildContext context) {
    return Scaffold(
      appBar: AppBar(
        title: Text(this.title),
      ),
      body: Center(
          child: Text('Hello World')
      ),
      bottomNavigationBar : BottomNavigationBar(
          currentIndex : 0,
          fixedColor  : Colors.green,
          items : [
            BottomNavigationBarItem(
              title  : Text("Home"),
              icon  : Icon(Icons.home),
            ),
            BottomNavigationBarItem(
              title : Text("Search"),
              icon  : Icon(Icons.search),
            ),
            BottomNavigationBarItem(
              title  : Text("Profile"),
              icon  : Icon(Icons.account_circle),
            ),
          ],
          onTap  : (int indexOfItem) {

          }),
    );
  }
}10. persistentFooterButtons
persistentFooterButtons - это список кнопок, завернутых в ButtonBar и отображаемых в нижней части Scaffold. Они отображаются, даже когда пользователь прокручивает bodyScaffold. В большинстве случаев они являются TextButton.
List<Widget> persistentFooterButtonsНапример, Scaffold с persistentFooterButtons и без bottomNavigationBar:
persistentFooterButtons (ex1)
Scaffold(
    appBar: AppBar(
      title:  Text('Flutter Scaffold Example'),
    ),
    body: Center(
        child: Text('Hello World')
    ),
    persistentFooterButtons :  [
      TextButton.icon(icon: Icon(Icons.map), label: Text(""), onPressed: () {}),
      TextButton.icon(icon: Icon(Icons.view_week), label: Text(""), onPressed: () {}),
    ]
)
Например, Scaffold с persistentFooterButtons и bottomNavigationBar:
persistentFooterButtons (ex2)
Scaffold(
    appBar: AppBar(
      title:  Text('Flutter Scaffold Example'),
    ),
    body: Center(
        child: Text('Hello World')
    ),
    persistentFooterButtons :  [
      TextButton.icon(icon: Icon(Icons.map), label: Text(""), onPressed: () {}),
      TextButton.icon(icon: Icon(Icons.view_week), label: Text(""), onPressed: () {}),
    ],
    bottomNavigationBar: BottomAppBar(
      color: Colors.lightGreen[200],
      child: new Row(
        mainAxisSize: MainAxisSize.max,
        mainAxisAlignment: MainAxisAlignment.start,
        children: <Widget>[
          TextButton.icon(icon: Icon(Icons.home), label: Text(""), onPressed: () {},),
          TextButton.icon(icon: Icon(Icons.email), label: Text(""), onPressed: () {},),
        ],
      ),
    )
)11. bottomSheet
bottomSheet отображает дополнительную информацию для основного контентf приложения. Она постоянно отображается в нижней части Scaffold, даже когда пользователь взаимодействует с другими частями приложения.
Widget bottomSheetНесмотря на то, что bottomSheet находится в нижней части Scaffold , она все еще стоит перед persistentFooterButtons и bottomNavigationBar.
bottomSheet (ex1)
Scaffold(
    appBar: AppBar(
      title:  Text('Flutter Scaffold Example'),
    ),
    body: Center(
        child: Text('Hello World')
    ),
    bottomSheet: Container(
        height: 55,
        color: Colors.cyan[50],
        child:Column    (
          children: [
            Row (
              children: [
                Icon(Icons.place),
                SizedBox(width:5, height:5),
                Text("199 Valencia St, San Francisco, CA")
              ],
            ),
            Row (
              children: [
                Icon(Icons.phone),
                SizedBox(width:5, height:5),
                Text("(415) 339-0942)")
              ],
            )
          ],
        )
    ),
    persistentFooterButtons :  [
      TextButton.icon(icon: Icon(Icons.map), label: Text(""), onPressed: () {}),
      TextButton.icon(icon: Icon(Icons.view_week), label: Text(""), onPressed: () {}),
    ],
    bottomNavigationBar: BottomAppBar(
      color: Colors.lightGreen[200],
      child: new Row(
        mainAxisSize: MainAxisSize.max,
        mainAxisAlignment: MainAxisAlignment.start,
        children: <Widget>[
          TextButton.icon(icon: Icon(Icons.home), label: Text(""), onPressed: () {},),
          TextButton.icon(icon: Icon(Icons.email), label: Text(""), onPressed: () {},),
        ],
      ),
    )
)
ScaffoldState.showButtonSheet()
Метод ScaffoldState.showBottomSheet() используется для создания и отображения bottomSheet для Scaffold , если это необходимо, и пользователь может закрыть bottomSheet, чтобы сэкономить место для приложения.
main.dart (bottomSheet ex2)
import 'package:flutter/material.dart';

void main() => runApp(MyApp());

// This Widget is the main application widget.
class MyApp extends StatelessWidget {
  @override
  Widget build(BuildContext context) {
    return MaterialApp(
      title: "o7planning.org",
      debugShowCheckedModeBanner: false,
      theme: ThemeData(
        primarySwatch: Colors.blue,
        visualDensity: VisualDensity.adaptivePlatformDensity,
      ),
      home: MyHomePage(),
    );
  }
}

class MyHomePage extends StatefulWidget {
  MyHomePage({Key key}) : super(key: key);

  @override
  MyHomePageState createState() => MyHomePageState();
}

class MyHomePageState extends State<MyHomePage> {


  Widget build(BuildContext context) {
    return Scaffold(
        appBar: AppBar(
          title:  Text('Flutter Scaffold Example'),
        ),
        body: Center(
          child: Center(
              child:  Builder ( // The Builder return a ElevatedButton
                // We need a context of Scaffold
                builder: (BuildContext ctxOfScaffold)  {
                  return  ElevatedButton(
                    onPressed: ()  {
                      this._showMyBottomSheet(ctxOfScaffold);
                    },
                    child: Icon(Icons.add),
                  );
                },
              )
          ),
        ),
        floatingActionButton: Builder ( // The Builder return a FloatingActionButton
          // We need a context of Scaffold
          builder: (BuildContext ctxOfScaffold)  {
            return  FloatingActionButton(
              onPressed: ()  {
                this._showMyBottomSheet(ctxOfScaffold);
              },
              tooltip: 'Increment Counter',
              child: Icon(Icons.add),
            );
          },
        ),
        bottomNavigationBar: BottomAppBar(
          color: Colors.lightGreen[200],
          child: new Row(
            mainAxisSize: MainAxisSize.max,
            mainAxisAlignment: MainAxisAlignment.start,
            children: <Widget>[
              TextButton.icon(icon: Icon(Icons.home), label: Text(""), onPressed: () {},),
              TextButton.icon(icon: Icon(Icons.email), label: Text(""), onPressed: () {},),
            ],
          ),
        )
    );
  }

  // We need a context object of Scaffold to draw Scaffold.bottomSheet.
  void _showMyBottomSheet(BuildContext ctxOfScaffold)  { // context of Scaffold.

    // ScaffoldState.showBottomSheet:
    Scaffold.of(ctxOfScaffold).showBottomSheet<void>(
          (BuildContext context) {
        return Container(
          height: 200,
          color: Colors.amber,
          child: Center(
            child: Column(
              mainAxisAlignment: MainAxisAlignment.center,
              mainAxisSize: MainAxisSize.min,
              children: <Widget>[
                const Text('BottomSheet'),
                ElevatedButton(
                  child: Text('Close BottomSheet'),
                  onPressed: () => Navigator.pop(context),
                )
              ],
            ),
          ),
        );
      },
    );
  }
}
showModalBottomSheet()
Функция showModalBottomSheet() используется для создания и отображения окна Dialog, содержащего bottom-sheet, который плавает над всеми остальными элементами приложения. Поэтому чтобы взаимодействовать с элементами, находящимися под этим окном, вы должны закрыть его.
main.dart (bottomSheet ex3)
import 'package:flutter/material.dart';

void main() => runApp(MyApp());

class MyApp extends StatelessWidget {
  @override
  Widget build(BuildContext context) {
    return MaterialApp(
      title: 'o7planning.org',
      debugShowCheckedModeBanner: false,
      theme: ThemeData(
        primarySwatch: Colors.blue,
      ),
      home: MyHomePage(title: 'Flutter Scaffold Example'),
    );
  }
}

class MyHomePage extends StatefulWidget {
  MyHomePage({Key key, this.title}) : super(key: key);

  final String title;

  @override
  MyHomePageState createState() => MyHomePageState();
}

class MyHomePageState extends State<MyHomePage> {

  @override
  Widget build(BuildContext context) {
    return Scaffold(
        appBar: AppBar(
          title: Text(widget.title),
        ),
        body: Center(
          child: Column(
            mainAxisAlignment: MainAxisAlignment.center,
            children: <Widget>[
              Text(
                'Click the floating action button to show bottom sheet.',
              ),
            ],
          ),
        ),
        floatingActionButton: FloatingActionButton(
          onPressed:() =>  _showMyBottomSheet(context),
          child: Icon(Icons.add),
        ),
        bottomNavigationBar: BottomAppBar(
          color: Colors.lightGreen[200],
          child: new Row(
            mainAxisSize: MainAxisSize.max,
            mainAxisAlignment: MainAxisAlignment.start,
            children: <Widget>[
              TextButton.icon(icon: Icon(Icons.home), label: Text(""), onPressed: () {},),
              TextButton.icon(icon: Icon(Icons.email), label: Text(""), onPressed: () {},),
            ],
          ),
        )
    );
  }


  void _showMyBottomSheet(BuildContext context) {
    // Call showModalBottomSheet(), this function open a Dialog
    // and return Future object.
    showModalBottomSheet (
        context: context,
        builder: (ctx) {
          return Container(
            height: MediaQuery.of(context).size.height  * 0.4,
            child: Center(
              child: Text("Welcome to o7planning.org!"),
            ),
          );
        }
    );
  }
}Pуководства Flutter
- Руководство Flutter Column
- Руководство Flutter Stack
- Руководство Flutter IndexedStack
- Руководство Flutter Spacer
- Руководство Flutter Expanded
- Руководство Flutter SizedBox
- Руководство Flutter Tween
- Установите Flutter SDK в Windows
- Установите Flutter Plugin для Android Studio
- Создайте свое первое приложение Flutter - Hello Flutter
- Руководство Flutter Scaffold
- Руководство Flutter AppBar
- Руководство Flutter BottomAppBar
- Руководство Flutter TextButton
- Руководство Flutter ElevatedButton
- Руководство Flutter EdgeInsetsGeometry
- Руководство Flutter EdgeInsets
- Руководство Flutter CircularProgressIndicator
- Руководство Flutter LinearProgressIndicator
- Руководство Flutter Center
- Руководство Flutter Align
- Руководство Flutter Row
- Руководство Flutter SplashScreen
- Руководство Flutter Alignment
- Руководство Flutter Positioned
- Руководство Flutter SimpleDialog
- Руководство Flutter AlertDialog
- Navigation и Routing в Flutter
- Руководство Flutter TabBar
- Руководство Flutter Banner
- Руководство Flutter BottomNavigationBar
- Руководство Flutter FancyBottomNavigation
- Руководство Flutter Card
- Руководство Flutter Border
- Руководство Flutter ContinuousRectangleBorder
- Руководство Flutter RoundedRectangleBorder
- Руководство Flutter CircleBorder
- Руководство Flutter StadiumBorder
- Руководство Flutter Container
- Руководство Flutter RotatedBox
- Руководство Flutter CircleAvatar
- Руководство Flutter IconButton
- Руководство Flutter FlatButton
- Руководство Flutter SnackBar
Show More