Использовать оповещения в Android - Android Notification
1. Android Notification
Уведомление (Notification) это сообщение, которое вы можете показать пользователю за пределами вашего приложения. При запросе системы выдавать уведомления, для начала оно отображается в виде значка в области уведомления. Чтобы посмотреть детали уведомления, пользователь открывает яшик уведомления (Notification Drawer). Область уведомления и ящик уведомления являютя областями системного урпавления, которые пользователь может посмотреть в любое время.
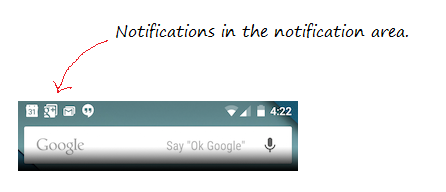
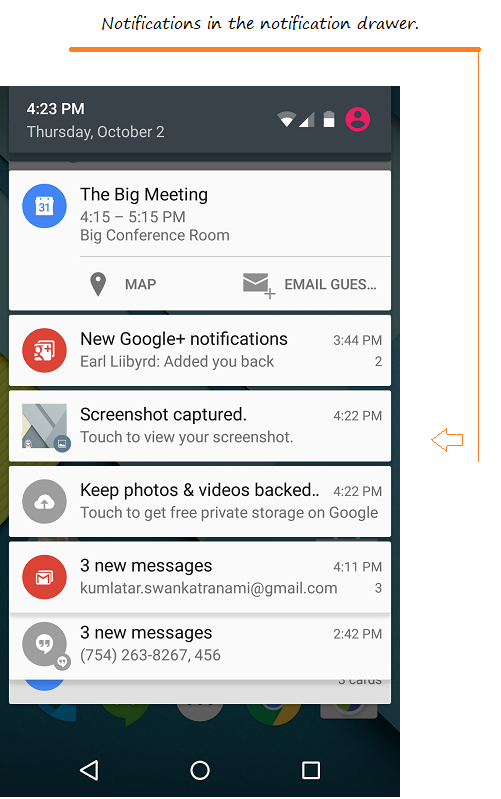
Notification Channel
Начиная с версии 8.0 (Oreo), Android начал групповые уведомления (notification) в разные каналы (Channel). Каждый канал имеет определенное поведение и данное поведение будет применяться ко всем его уведомлениям. Каждый канал имеет свой ID, который его представляет.
- Android Notification Channel
2. Основной пример
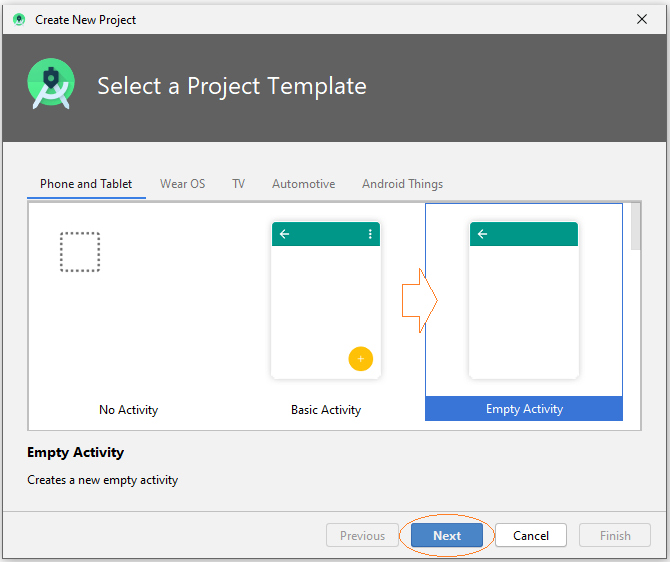
Создать новый Android project - AndroidNotification
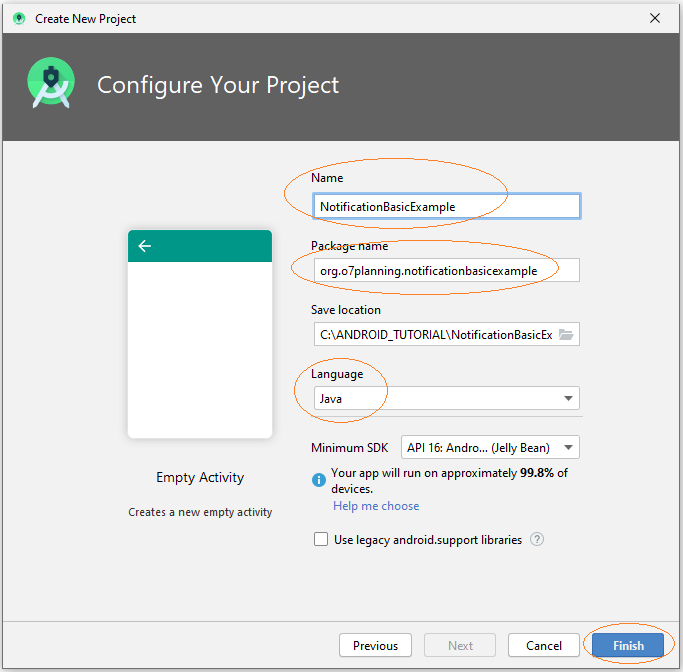
- Name: NotificationBasicExample
- Package name: org.o7planning.notificationbasicexample
Icons
Android Studio имеет библиотеку иконок (Icon), которая может быть полезна вашему приложению. Я беру 2 иконки из данной библиотеки, чтобы использовать для текущего приложения.
Примечание: Если вы не хотите использовать Icon в библиотеке Android Studio, вы можете использовать любые Icon и копировать их в папку "drawable" у project. Например, icon_notify1.png, icon_notify2.png.
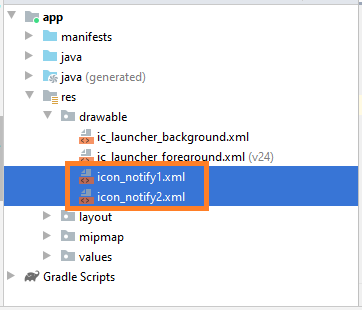
Смотрите так же:
Интерфейс приложения:
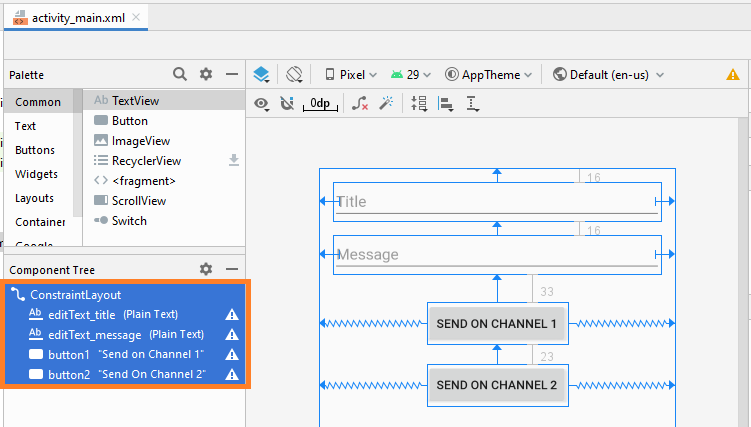
activity_main.xml
<?xml version="1.0" encoding="utf-8"?>
<androidx.constraintlayout.widget.ConstraintLayout
    xmlns:android="http://schemas.android.com/apk/res/android"
    xmlns:app="http://schemas.android.com/apk/res-auto"
    xmlns:tools="http://schemas.android.com/tools"
    android:layout_width="match_parent"
    android:layout_height="match_parent"
    tools:context=".MainActivity" >

    <EditText
        android:id="@+id/editText_title"
        android:layout_width="0dp"
        android:layout_height="wrap_content"
        android:layout_marginStart="16dp"
        android:layout_marginTop="16dp"
        android:layout_marginEnd="16dp"
        android:ems="10"
        android:hint="Title"
        android:inputType="textPersonName"
        app:layout_constraintEnd_toEndOf="parent"
        app:layout_constraintStart_toStartOf="parent"
        app:layout_constraintTop_toTopOf="parent" />

    <EditText
        android:id="@+id/editText_message"
        android:layout_width="0dp"
        android:layout_height="wrap_content"
        android:layout_marginStart="16dp"
        android:layout_marginTop="16dp"
        android:layout_marginEnd="16dp"
        android:ems="10"
        android:hint="Message"
        android:inputType="textPersonName"
        app:layout_constraintEnd_toEndOf="parent"
        app:layout_constraintStart_toStartOf="parent"
        app:layout_constraintTop_toBottomOf="@+id/editText_title" />

    <Button
        android:id="@+id/button1"
        android:layout_width="wrap_content"
        android:layout_height="wrap_content"
        android:layout_marginTop="33dp"
        android:text="Send on Channel 1"
        app:layout_constraintEnd_toEndOf="parent"
        app:layout_constraintStart_toStartOf="parent"
        app:layout_constraintTop_toBottomOf="@+id/editText_message" />

    <Button
        android:id="@+id/button2"
        android:layout_width="wrap_content"
        android:layout_height="wrap_content"
        android:layout_marginTop="23dp"
        android:text="Send On Channel 2"
        app:layout_constraintEnd_toEndOf="parent"
        app:layout_constraintStart_toStartOf="parent"
        app:layout_constraintTop_toBottomOf="@+id/button1" />
</androidx.constraintlayout.widget.ConstraintLayout>
Notification Application
NotificationApp.java
package org.o7planning.notificationbasicexample;

import android.app.Application;
import android.app.NotificationChannel;
import android.app.NotificationManager;
import android.os.Build;

public class NotificationApp extends Application  {

    public static final  String CHANNEL_1_ID = "channel1";
    public static final  String CHANNEL_2_ID = "channel2";

    @Override
    public void onCreate() {
        super.onCreate();

        this.createNotificationChannels();
    }

    private void createNotificationChannels()  {
        if(Build.VERSION.SDK_INT >= Build.VERSION_CODES.O) {
            NotificationChannel channel1 = new NotificationChannel(
                    CHANNEL_1_ID,
                    "Channel 1",
                    NotificationManager.IMPORTANCE_HIGH
            );
            channel1.setDescription("This is channel 1");

            NotificationChannel channel2 = new NotificationChannel(
                    CHANNEL_2_ID,
                    "Channel 2",
                    NotificationManager.IMPORTANCE_LOW
            );
            channel1.setDescription("This is channel 2");


            NotificationManager manager = this.getSystemService(NotificationManager.class);
            manager.createNotificationChannel(channel1);
            manager.createNotificationChannel(channel2);
        }
    }
}
Объявить NotificationApp в AndroidManifest.xml:
<application
        android:name=".NotificationApp"
        ....
>
...
</application>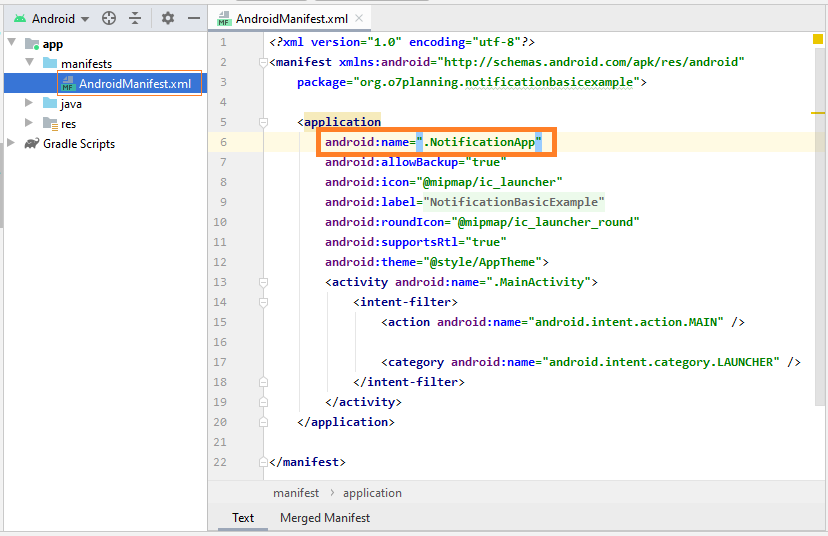
AndroidManifest.xml
<?xml version="1.0" encoding="utf-8"?>
<manifest xmlns:android="http://schemas.android.com/apk/res/android"
    package="org.o7planning.notificationbasicexample">

    <application
        android:name=".NotificationApp"
        android:allowBackup="true"
        android:icon="@mipmap/ic_launcher"
        android:label="@string/app_name"
        android:roundIcon="@mipmap/ic_launcher_round"
        android:supportsRtl="true"
        android:theme="@style/AppTheme">
        <activity android:name=".MainActivity">
            <intent-filter>
                <action android:name="android.intent.action.MAIN" />

                <category android:name="android.intent.category.LAUNCHER" />
            </intent-filter>
        </activity>
    </application>

</manifest>
MainActivity.java
package org.o7planning.notificationbasicexample;

import android.app.Notification;
import android.os.Bundle;
import android.view.View;
import android.widget.Button;
import android.widget.EditText;
import androidx.appcompat.app.AppCompatActivity;
import androidx.core.app.NotificationCompat;
import androidx.core.app.NotificationManagerCompat;


public class MainActivity extends AppCompatActivity {

    private NotificationManagerCompat notificationManagerCompat;

    private EditText editTextTitle;
    private EditText editTextMessage;

    private Button button1;
    private Button button2;


    @Override
    protected void onCreate(Bundle savedInstanceState) {

        super.onCreate(savedInstanceState);
        setContentView(R.layout.activity_main);

        this.editTextTitle = (EditText) this.findViewById(R.id.editText_title);
        this.editTextMessage = (EditText) this.findViewById(R.id.editText_message);

        this.button1 = (Button) this.findViewById(R.id.button1);
        this.button2 = (Button) this.findViewById(R.id.button2);

        this.button1.setOnClickListener(new View.OnClickListener() {

            @Override
            public void onClick(View view) {
                sendOnChannel1(  );
            }
        });

        this.button2.setOnClickListener(new View.OnClickListener() {

            @Override
            public void onClick(View view) {
                sendOnChannel2(  );
            }
        });

        //
        this.notificationManagerCompat = NotificationManagerCompat.from(this);
    }


    private void sendOnChannel1()  {
        String title = this.editTextTitle.getText().toString();
        String message = this.editTextMessage.getText().toString();

        Notification notification = new NotificationCompat.Builder(this, NotificationApp.CHANNEL_1_ID)
                .setSmallIcon(R.drawable.icon_notify1)
                .setContentTitle(title)
                .setContentText(message)
                .setPriority(NotificationCompat.PRIORITY_HIGH)
                .setCategory(NotificationCompat.CATEGORY_MESSAGE)
                .build();

        int notificationId = 1;
        this.notificationManagerCompat.notify(notificationId, notification);
    }

    private void sendOnChannel2()  {
        String title = this.editTextTitle.getText().toString();
        String message = this.editTextMessage.getText().toString();

        Notification notification = new NotificationCompat.Builder(this, NotificationApp.CHANNEL_2_ID)
                .setSmallIcon(R.drawable.icon_notify2)
                .setContentTitle(title)
                .setContentText(message)
                .setPriority(NotificationCompat.PRIORITY_LOW)
                .setCategory(NotificationCompat.CATEGORY_PROMO) // Promotion.
                .build();

        int notificationId = 2;
        this.notificationManagerCompat.notify(notificationId, notification);
    }
}
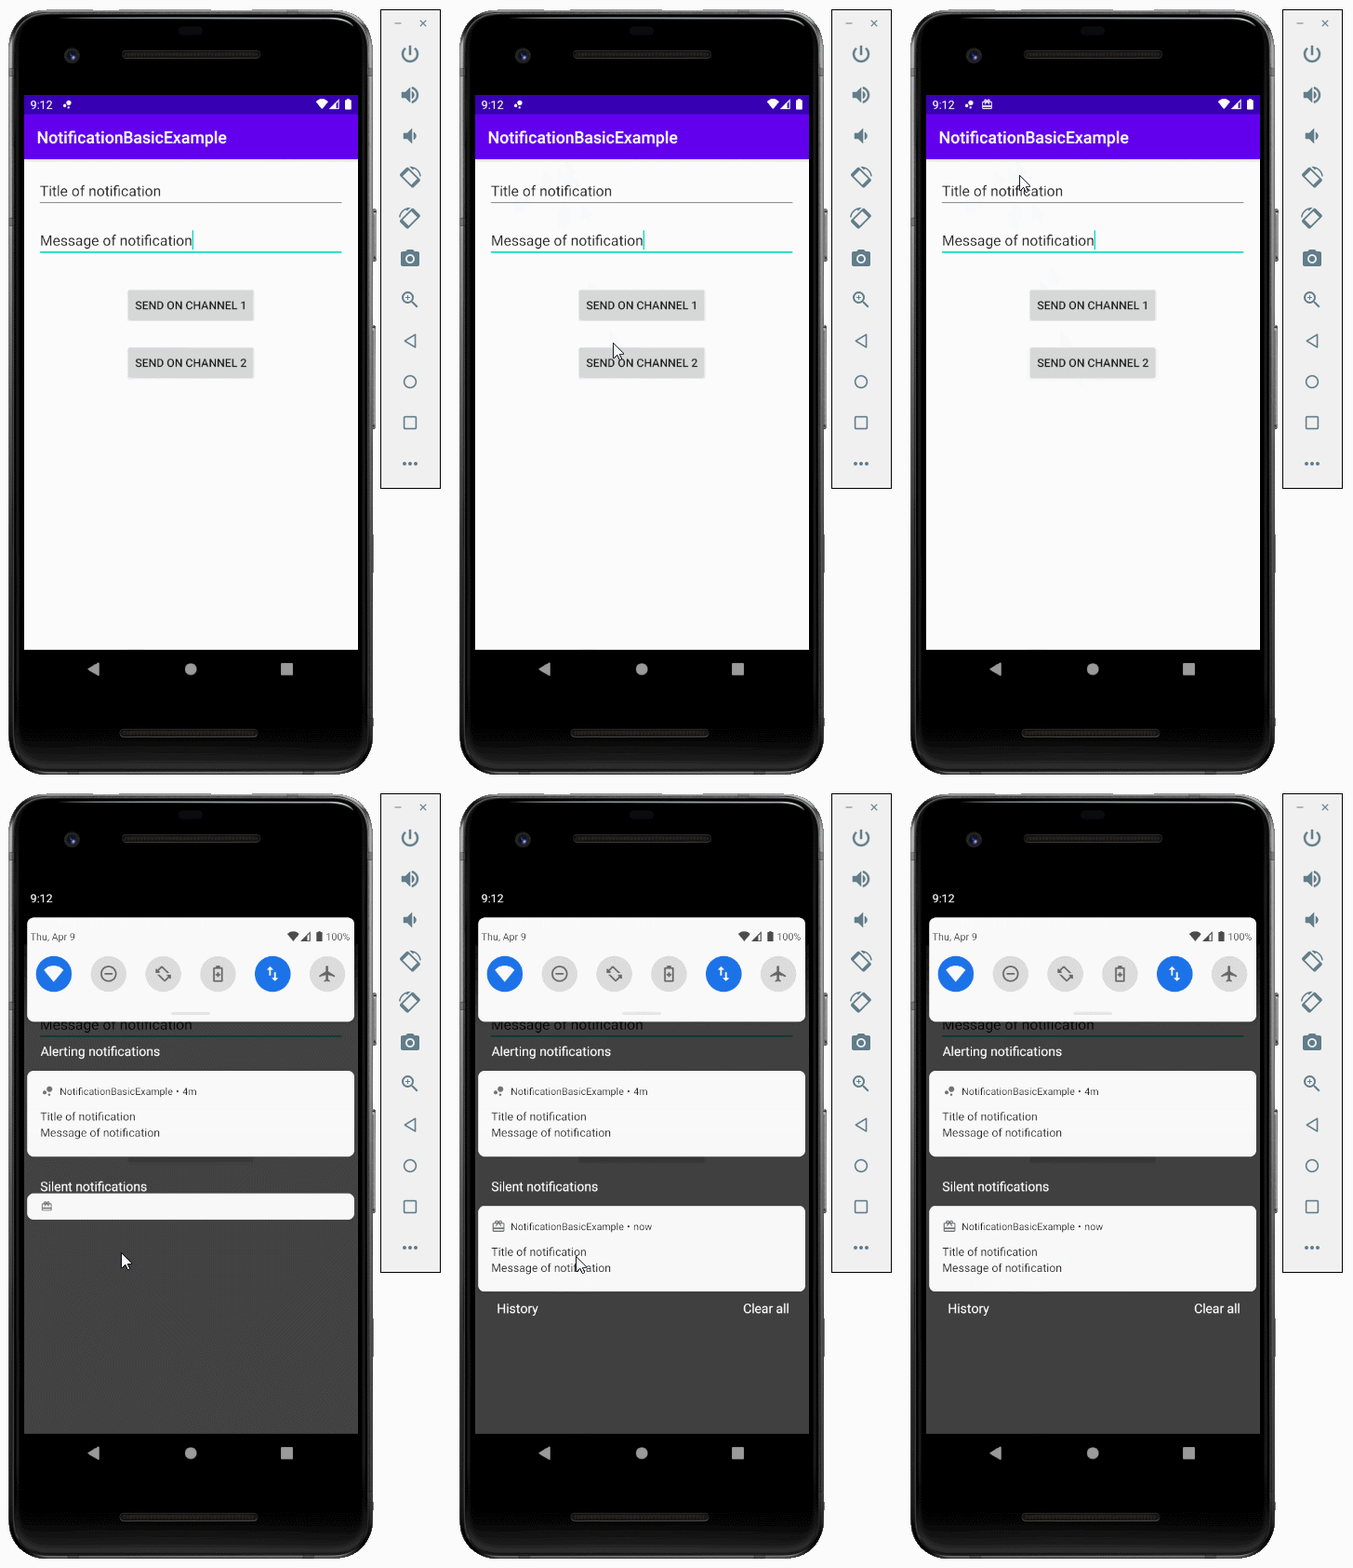
Запуск приложения:
Когда важное уведомление (notification) отправлено на систему, пользователь может услышать звук уведомления.
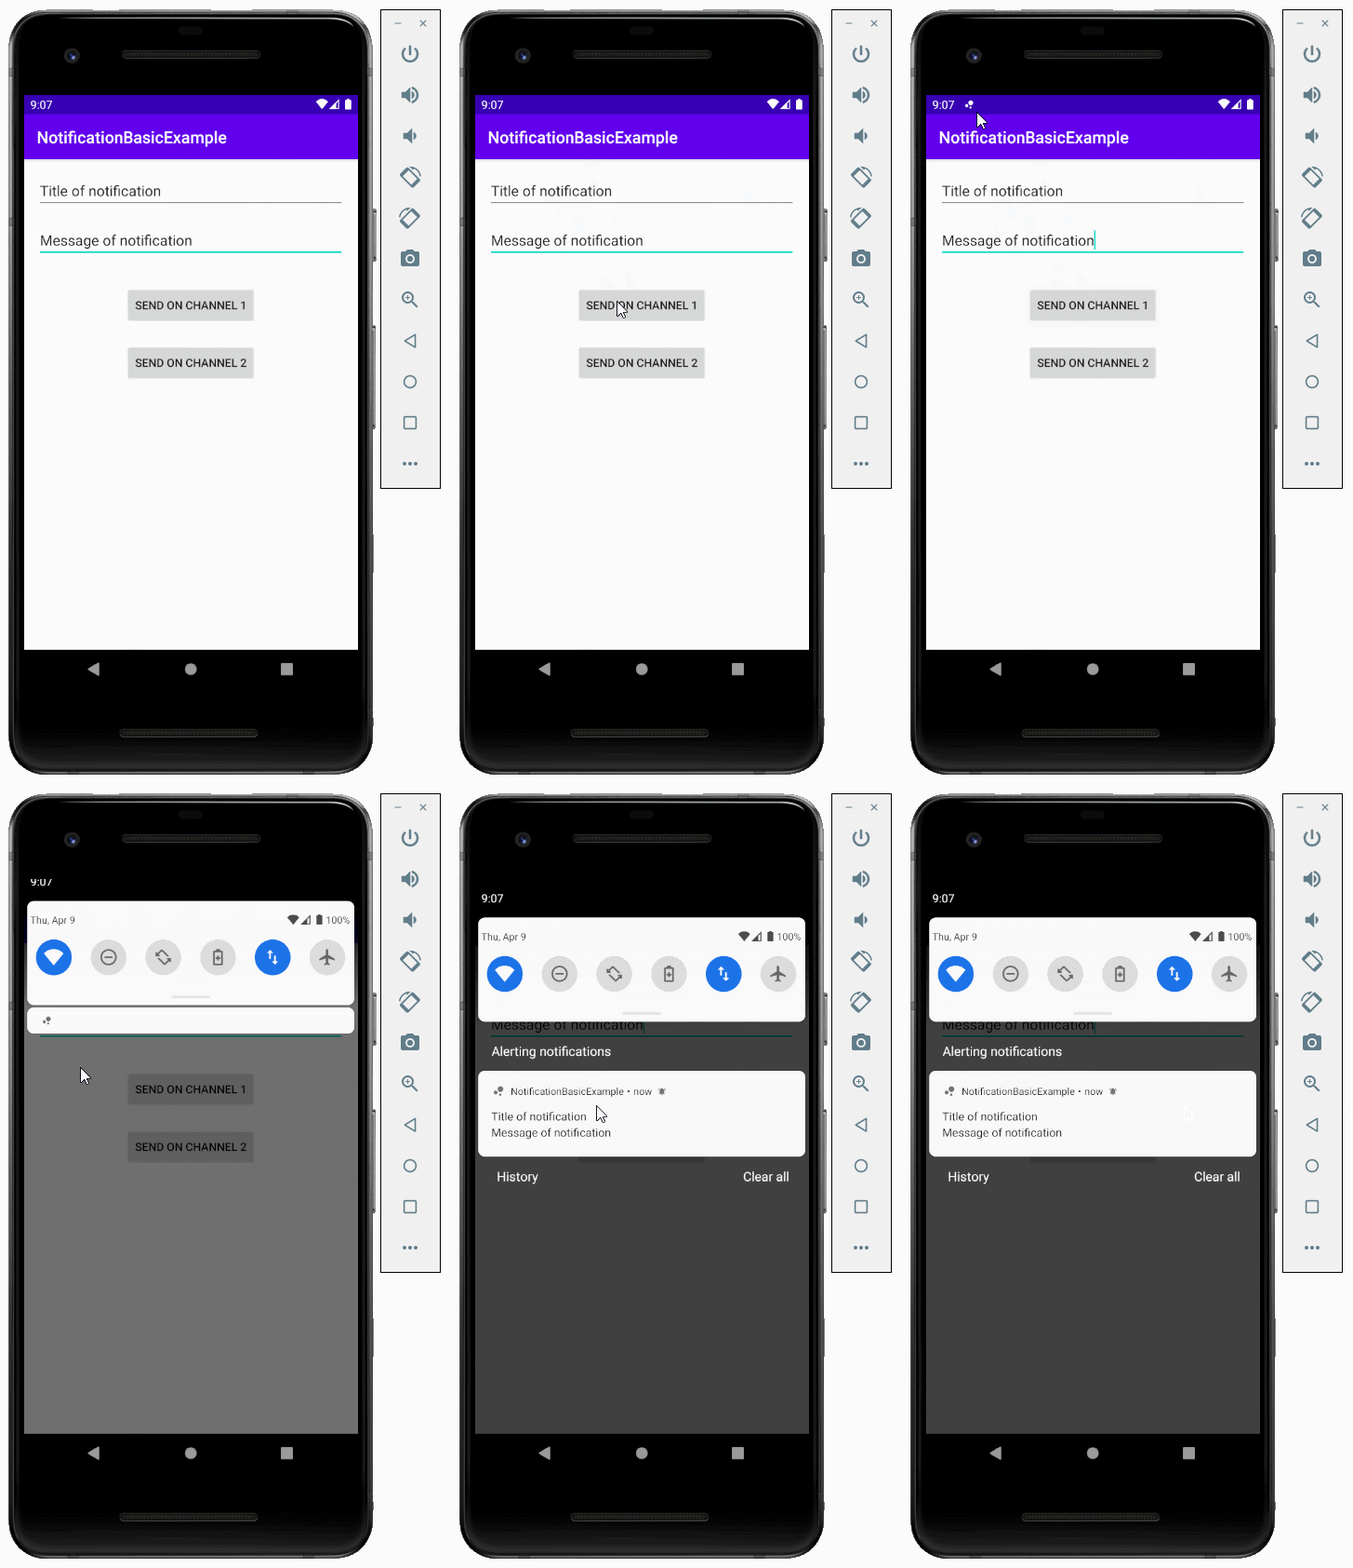
При этом, менее важные уведомления (notification) будут отправлены без звука.
Pуководства Android
- Настроить Android Emulator в Android Studio
- Руководство Android ToggleButton
- Создать простой File Finder Dialog в Android
- Руководство Android TimePickerDialog
- Руководство Android DatePickerDialog
- Что мне нужно для начала работы с Android?
- Установите Android Studio в Windows
- Установите Intel® HAXM для Android Studio
- Руководство Android AsyncTask
- Руководство Android AsyncTaskLoader
- Руководство Android для начинающих - основные примеры
- Как узнать номер телефона Android Emulator и изменить его?
- Руководство Android TextInputLayout
- Руководство Android CardView
- Руководство Android ViewPager2
- Получить номер телефона в Android с помощью TelephonyManager
- Руководство Android Phone Call
- Руководство Android Wifi Scanning
- Руководство Android 2D Game для начинающих
- Руководство Android DialogFragment
- Руководство Android CharacterPickerDialog
- Руководство Android для начинающих - Hello Android
- Использование Android Device File Explorer
- Включить USB Debugging на устройстве Android
- Руководство Android UI Layouts
- Руководство Android SMS
- Руководство Android SQLite Database
- Руководство Google Maps Android API
- Руководство Текст в речь на Android
- Руководство Android Space
- Руководство Android Toast
- Создание пользовательских Android Toast
- Руководство Android SnackBar
- Руководство Android TextView
- Руководство Android TextClock
- Руководство Android EditText
- Руководство Android TextWatcher
- Форматирование номера кредитной карты с помощью Android TextWatcher
- Руководство Android Clipboard
- Создать простой File Chooser в Android
- Руководство Android AutoCompleteTextView и MultiAutoCompleteTextView
- Руководство Android ImageView
- Руководство Android ImageSwitcher
- Руководство Android ScrollView и HorizontalScrollView
- Руководство Android WebView
- Руководство Android SeekBar
- Руководство Android Dialog
- Руководство Android AlertDialog
- Руководство Android RatingBar
- Руководство Android ProgressBar
- Руководство Android Spinner
- Руководство Android Button
- Руководство Android Switch
- Руководство Android ImageButton
- Руководство Android FloatingActionButton
- Руководство Android CheckBox
- Руководство Android RadioGroup и RadioButton
- Руководство Android Chip и ChipGroup
- Использование Image assets и Icon assets Android Studio
- Настройка SD Card для Android Emulator
- Пример ChipGroup и Chip Entry
- Как добавить внешние библиотеки в Android Project в Android Studio?
- Как отключить разрешения, уже предоставленные приложению Android?
- Как удалить приложения из Android Emulator?
- Руководство Android LinearLayout
- Руководство Android TableLayout
- Руководство Android FrameLayout
- Руководство Android QuickContactBadge
- Руководство Android StackView
- Руководство Android Camera
- Руководство Android MediaPlayer
- Руководство Android VideoView
- Воспроизведение звуковых эффектов в Android с помощью SoundPool
- Руководство Android Networking
- Руководство Android JSON Parser
- Руководство Android SharedPreferences
- Руководство Android Internal Storage
- Руководство Android External Storage
- Руководство Android Intents
- Пример явного Android Intent, вызов другого Intent
- Пример неявного Android Intent, откройте URL, отправьте email
- Руководство Android Services
- Использовать оповещения в Android - Android Notification
- Руководство Android DatePicker
- Руководство Android TimePicker
- Руководство Android Chronometer
- Руководство Android OptionMenu
- Руководство Android ContextMenu
- Руководство Android PopupMenu
- Руководство Android Fragment
- Руководство Android ListView
- Android ListView с Checkbox с помощью ArrayAdapter
- Руководство Android GridView
Show More