Руководство Android AlertDialog
1. Android AlertDialog
Android AlertDialog это диалоговое окно отображающее сообщение и поддерживает 1, 2 или 3 button, он помогает вам легко создавать диалоговое окно с несколькими кодовыми строкамию
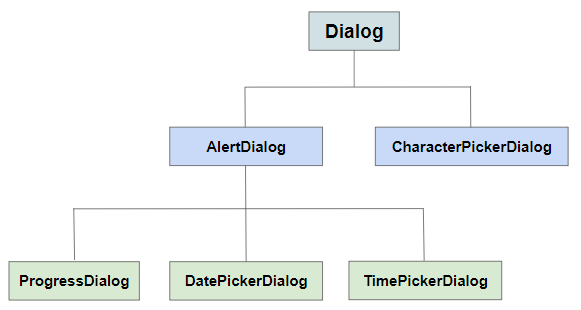
AlertDialog включает 3 зоны:
- Зона заголовка (Title area)
- Зона содержания (Content area)
- Зона содержащая кнопки (Buttons area)
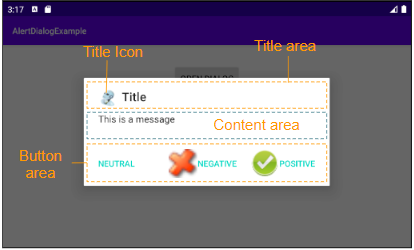
Landscape screen
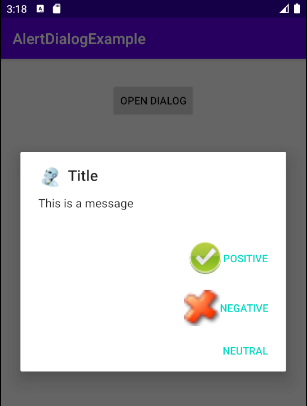
Portrait screen
Title area
Используйте метод setTitle(), setIcon() чтобы настроить заголовок и иконку для диалогового окна, они будут видны на Title area. Или используйте метод setCustomTitle(View) если вы хотите получить кастомизированную зону заголовка (Title area).
Content area
Зона содержания (Content area) может отображать сообщение, список выборов,...
Buttons area
Данная зона имеет максимум 3 button: Positive button, Negative button, Neutral button. В них 2 первые button поддерживают Text & Icon, а Neutral button поддерживает только Text, но вы можете отобразить для нее иконку с маленьким трюком (Смотрите в примере).
2. Пример AlertDialog (1)
Просмотр примера:
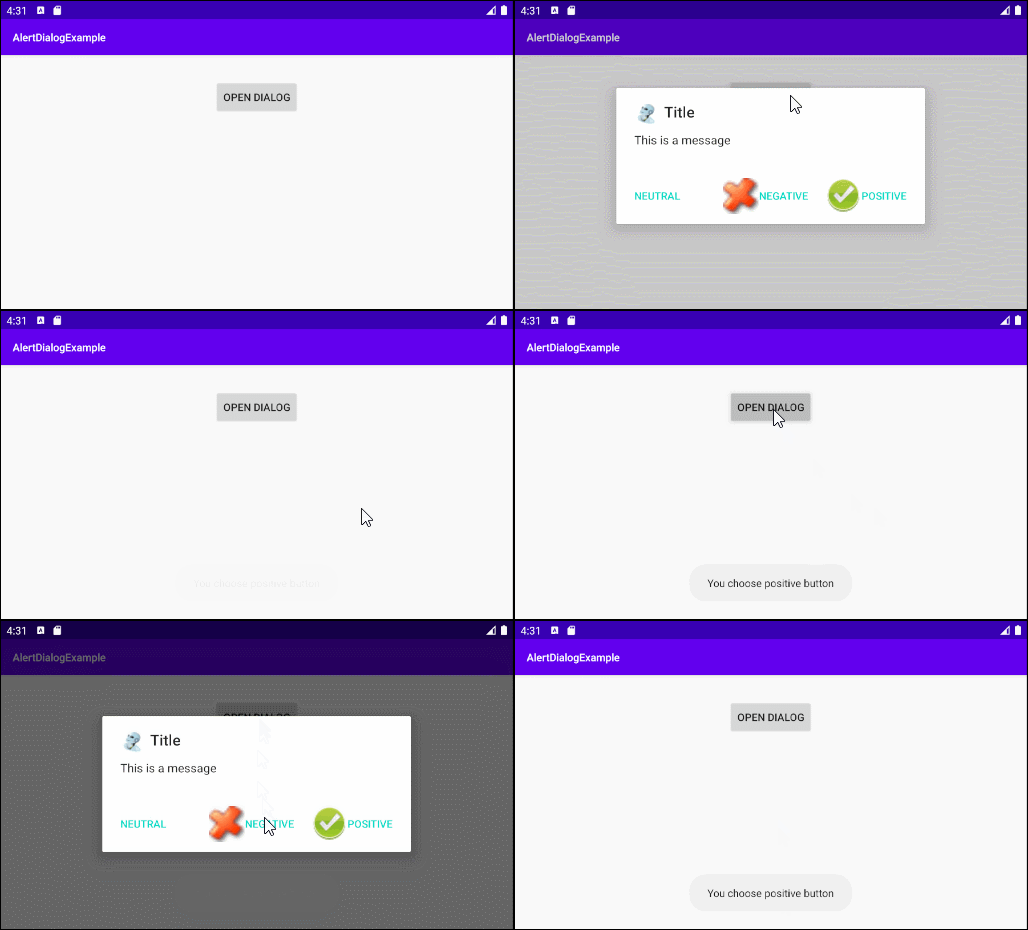
AlertButtonExample0.java
package org.o7planning.alertdialogexample;

import android.content.Context;
import android.content.DialogInterface;
import android.graphics.drawable.Drawable;
import android.widget.Toast;

import androidx.appcompat.app.AlertDialog;

public class AlertDialogExample0 {

    public static void showAlertDialog(final Context context)  {
        final Drawable positiveIcon = context.getResources().getDrawable(R.drawable.icon_positive);
        final Drawable negativeIcon = context.getResources().getDrawable(R.drawable.icon_negative);
        final Drawable neutralIcon = context.getResources().getDrawable(R.drawable.icon_neutral);

        AlertDialog.Builder builder = new AlertDialog.Builder(context);

        // Set Title and Message:
        builder.setTitle("Title").setMessage("This is a message");

        //
        builder.setCancelable(true);
        builder.setIcon(R.drawable.icon_title);

        // Create "Positive" button with OnClickListener.
        builder.setPositiveButton("Positive", new DialogInterface.OnClickListener() {
            public void onClick(DialogInterface dialog, int id) {
                Toast.makeText(context,"You choose positive button",
                        Toast.LENGTH_SHORT).show();
            }
        });
        builder.setPositiveButtonIcon(positiveIcon);

        // Create "Negative" button with OnClickListener.
        builder.setNegativeButton("Negative", new DialogInterface.OnClickListener() {
            public void onClick(DialogInterface dialog, int id) {
                Toast.makeText(context,"You choose positive button",
                        Toast.LENGTH_SHORT).show();
                //  Cancel
                dialog.cancel();
            }
        });
        builder.setNegativeButtonIcon(negativeIcon);

        // Create "Neutral" button with OnClickListener.
        builder.setNeutralButton("Neutral", new DialogInterface.OnClickListener() {
            public void onClick(DialogInterface dialog, int id) {
                //  Action for 'NO' Button
                Toast.makeText(context,"You choose neutral button",
                        Toast.LENGTH_SHORT).show();
            }
        });
        builder.setNeutralButtonIcon(neutralIcon); // Not working!!!

        // Create AlertDialog:
        AlertDialog alert = builder.create();
        alert.show();
    }
}
3. Пример AlertDialog (2)
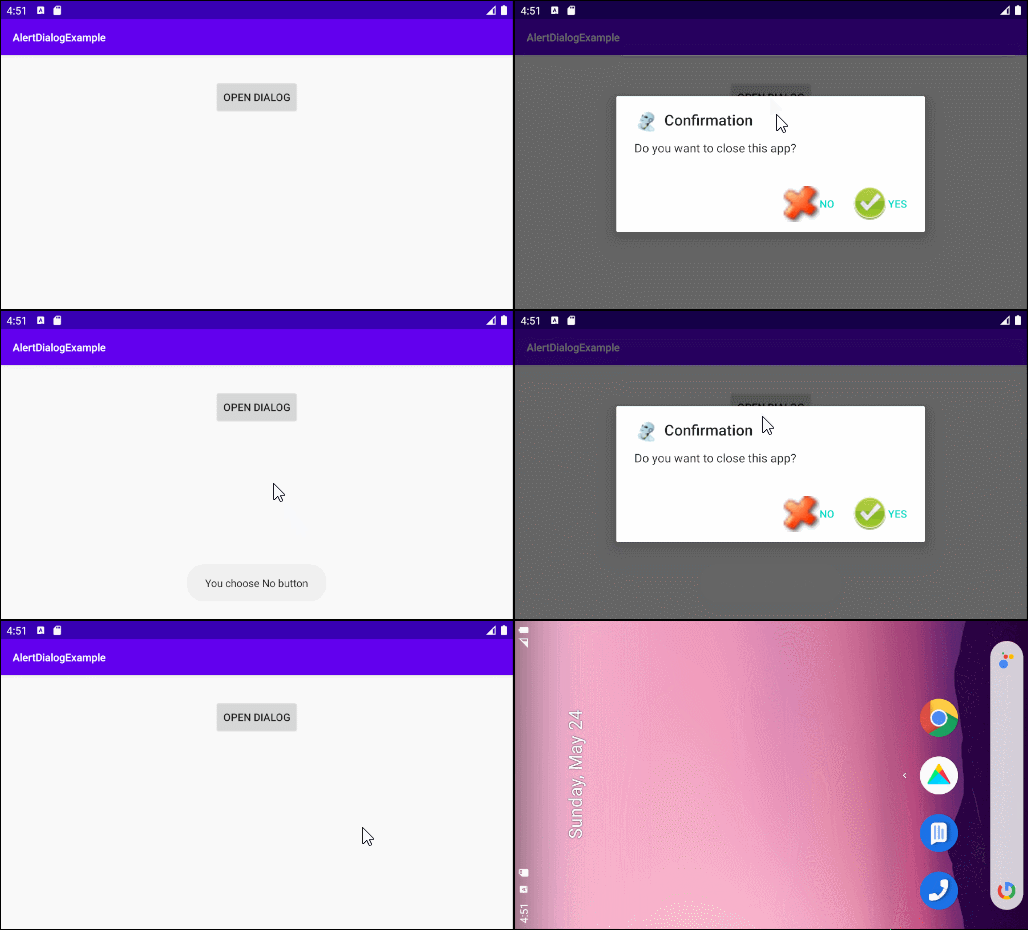
AlertDialogExample2.java
package org.o7planning.alertdialogexample;

import android.app.Activity;
import android.content.Context;
import android.content.DialogInterface;
import android.graphics.drawable.Drawable;
import android.widget.Toast;

import androidx.appcompat.app.AlertDialog;

public class AlertDialogExample2 {

    public static void showAlertDialog(final Context context)  {
        final Drawable positiveIcon = context.getResources().getDrawable(R.drawable.icon_positive);
        final Drawable negativeIcon = context.getResources().getDrawable(R.drawable.icon_negative);

        AlertDialog.Builder builder = new AlertDialog.Builder(context);

        // Set Title and Message:
        builder.setTitle("Confirmation").setMessage("Do you want to close this app?");

        //
        builder.setCancelable(true);
        builder.setIcon(R.drawable.icon_title);

        // Create "Yes" button with OnClickListener.
        builder.setPositiveButton("Yes", new DialogInterface.OnClickListener() {
            public void onClick(DialogInterface dialog, int id) {
                Toast.makeText(context,"You choose Yes button",
                        Toast.LENGTH_SHORT).show();
                Activity activity = (Activity) context;
                activity.finish();
            }
        });
        builder.setPositiveButtonIcon(positiveIcon);

        // Create "No" button with OnClickListener.
        builder.setNegativeButton("No", new DialogInterface.OnClickListener() {
            public void onClick(DialogInterface dialog, int id) {
                Toast.makeText(context,"You choose No button",
                        Toast.LENGTH_SHORT).show();
                //  Cancel
                dialog.cancel();
            }
        });
        builder.setNegativeButtonIcon(negativeIcon);

        // Create AlertDialog:
        AlertDialog alert = builder.create();
        alert.show();
    }
}
4. Пример AlertDialog (List)
Например AlertDialog со списком выборов для пользователя.
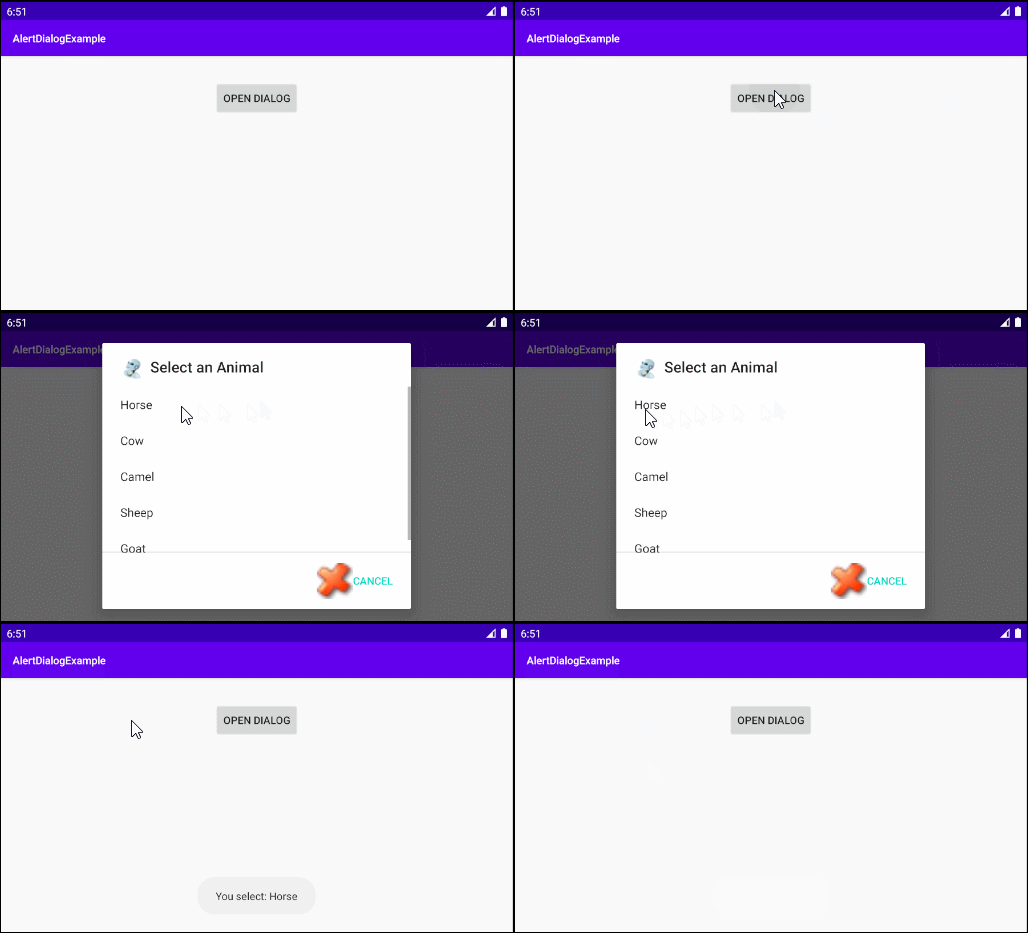
AlertDialogListExample.java
package org.o7planning.alertdialogexample;

import android.app.Activity;
import android.content.Context;
import android.content.DialogInterface;
import android.graphics.drawable.Drawable;
import android.widget.Toast;

import androidx.appcompat.app.AlertDialog;

public class AlertDialogListExample {

    public static void showAlertDialog(final Activity activity)  {
        final Drawable negativeIcon = activity.getResources().getDrawable(R.drawable.icon_negative);

        AlertDialog.Builder builder = new AlertDialog.Builder(activity);

        // Set Title.
        builder.setTitle("Select an Animal");

        // Add a list
        final String[] animals = {"Horse", "Cow", "Camel", "Sheep", "Goat"};
        builder.setItems(animals, new DialogInterface.OnClickListener() {
            @Override
            public void onClick(DialogInterface dialog, int which) {
                String animal = animals[which];

                dialog.dismiss(); // Close Dialog
                // Do some thing....
                // For example: Call method of MainActivity.
                Toast.makeText(activity,"You select: " + animal,
                        Toast.LENGTH_SHORT).show();
                // activity.someMethod(animal);
            }
        });

        //
        builder.setCancelable(true);
        builder.setIcon(R.drawable.icon_title);

        // Create "Cancel" button with OnClickListener.
        builder.setNegativeButton("Cancel", new DialogInterface.OnClickListener() {
            public void onClick(DialogInterface dialog, int id) {
                Toast.makeText(activity,"You choose No button",
                        Toast.LENGTH_SHORT).show();
                //  Cancel
                dialog.cancel();
            }
        });
        builder.setNegativeButtonIcon(negativeIcon);

        // Create AlertDialog:
        AlertDialog alert = builder.create();
        alert.show();
    }

}
5. Пример AlertDialog (Single Choice)
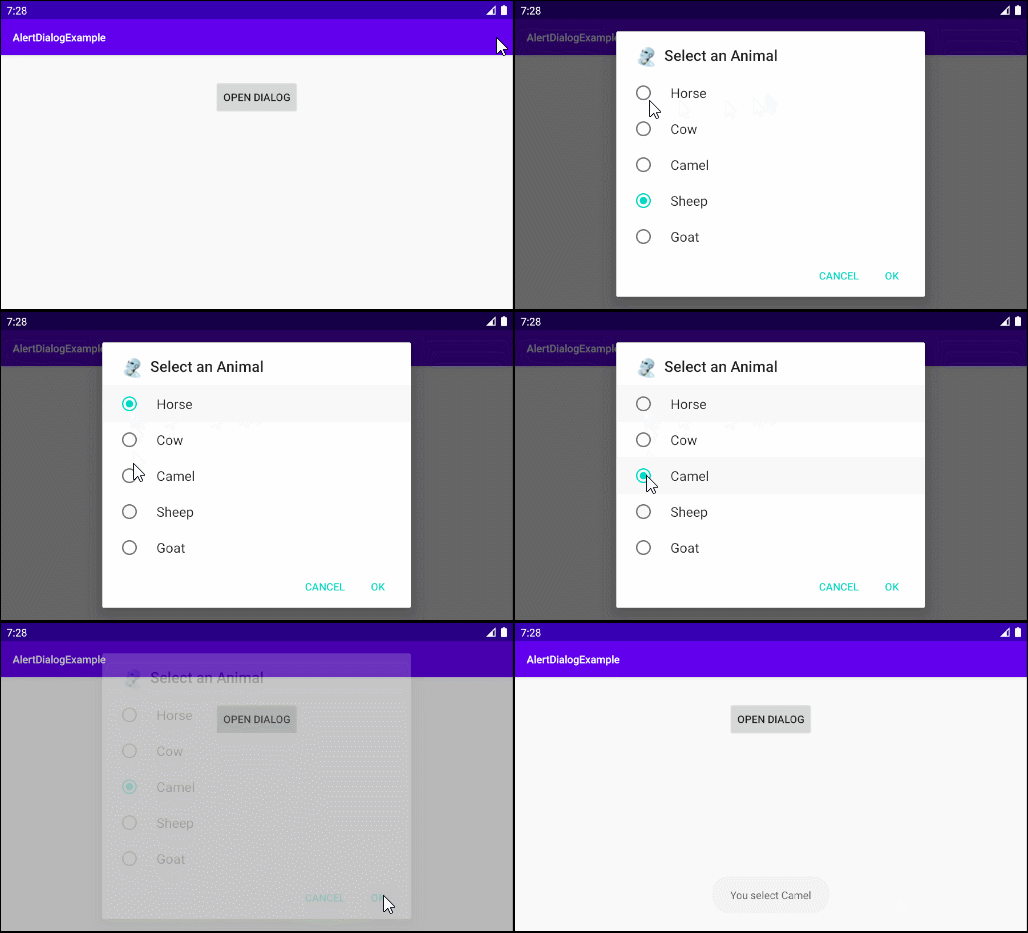
AlertDialogSingleChoiceExample.java
package org.o7planning.alertdialogexample;

import android.app.Activity;
import android.content.DialogInterface;
import android.widget.Toast;

import androidx.appcompat.app.AlertDialog;

import java.util.HashSet;
import java.util.Set;

public class AlertDialogSingleChoiceExample {


    public static void showAlertDialog(final Activity activity)  {
        AlertDialog.Builder builder = new AlertDialog.Builder(activity);

        // Set Title.
        builder.setTitle("Select an Animal");

        // Add a list
        final String[] animals = {"Horse", "Cow", "Camel", "Sheep", "Goat"};

        int checkedItem = 3; // Sheep
        final Set<String> selectedItems = new HashSet<String>();
        selectedItems.add(animals[checkedItem]);

        builder.setSingleChoiceItems(animals, checkedItem, new DialogInterface.OnClickListener() {
            @Override
            public void onClick(DialogInterface dialog, int which) {
                // Do Something...
                selectedItems.clear();
                selectedItems.add(animals[which]);
            }
        });

        //
        builder.setCancelable(true);
        builder.setIcon(R.drawable.icon_title);

        // Create "Yes" button with OnClickListener.
        builder.setPositiveButton("OK", new DialogInterface.OnClickListener() {
            public void onClick(DialogInterface dialog, int id) {
                if(selectedItems.isEmpty()) {
                    return;
                }
                String animal = selectedItems.iterator().next();

                // Close Dialog
                dialog.dismiss();
                // Do something, for example: Call a method of Activity...
                Toast.makeText(activity,"You select " + animal,
                        Toast.LENGTH_SHORT).show();

            }
        });

        // Create "Cancel" button with OnClickListener.
        builder.setNegativeButton("Cancel", new DialogInterface.OnClickListener() {
            public void onClick(DialogInterface dialog, int id) {
                Toast.makeText(activity,"You choose Cancel button",
                        Toast.LENGTH_SHORT).show();
                //  Cancel
                dialog.cancel();
            }
        });

        // Create AlertDialog:
        AlertDialog alert = builder.create();
        alert.show();
    }

}
6. Пример AlertDialog (Multi Choice)
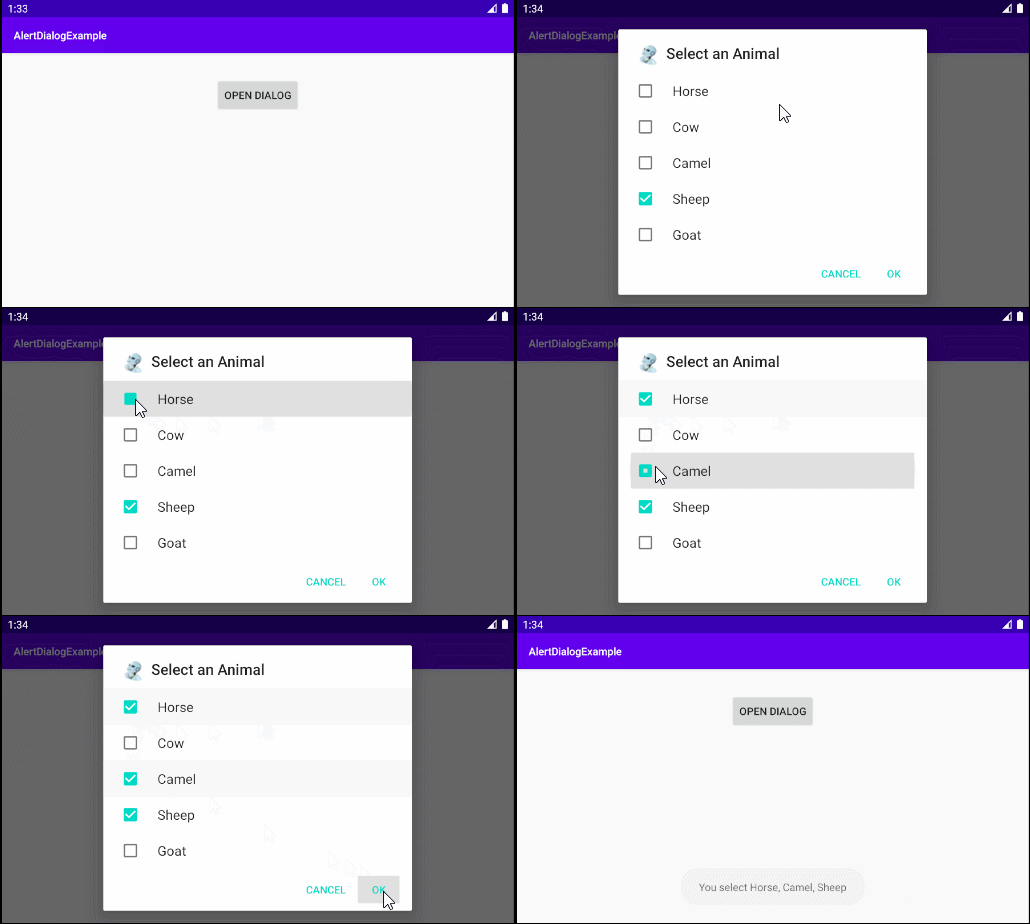
AlertDialogMultiChoiceExample.java
package org.o7planning.alertdialogexample;

import android.app.Activity;
import android.content.DialogInterface;
import android.widget.Toast;

import androidx.appcompat.app.AlertDialog;

import java.util.HashSet;
import java.util.Set;

public class AlertDialogMultiChoiceExample {


    public static void showAlertDialog(final Activity activity)  {
        AlertDialog.Builder builder = new AlertDialog.Builder(activity);

        // Set Title.
        builder.setTitle("Select an Animal");

        // Add a list
        final String[] animals = {"Horse", "Cow", "Camel", "Sheep", "Goat"};

        final boolean[] checkedInfos = new boolean[]{false, false, false, true, false}; // Sheep


        builder.setMultiChoiceItems(animals, checkedInfos, new DialogInterface.OnMultiChoiceClickListener()  {
            @Override
            public void onClick(DialogInterface dialog, int which, boolean isChecked) {
                checkedInfos[which] = isChecked;
            }
        });

        //
        builder.setCancelable(true);
        builder.setIcon(R.drawable.icon_title);

        // Create "Yes" button with OnClickListener.
        builder.setPositiveButton("OK", new DialogInterface.OnClickListener() {
            public void onClick(DialogInterface dialog, int id) {
                // Close Dialog
                dialog.dismiss();

                String s= null;
                for(int i=0; i< animals.length;i++)  {
                    if(checkedInfos[i]) {
                        if(s == null)  {
                            s = animals[i];
                        } else {
                            s+= ", " + animals[i];
                        }
                    }
                }
                s = s == null? "":s;

                // Do something, for example: Call a method of Activity...
                Toast.makeText(activity,"You select " + s,
                        Toast.LENGTH_SHORT).show();
            }
        });

        // Create "Cancel" button with OnClickListener.
        builder.setNegativeButton("Cancel", new DialogInterface.OnClickListener() {
            public void onClick(DialogInterface dialog, int id) {
                Toast.makeText(activity,"You choose Cancel button",
                        Toast.LENGTH_SHORT).show();
                //  Cancel
                dialog.cancel();
            }
        });

        // Create AlertDialog:
        AlertDialog alert = builder.create();
        alert.show();
    }

}
7. Пример кастомизированного Title Area
Применяя метод setCustomTitle(View) вы можете кастомизировать зону заголовка (Title area) у AlertDialog:
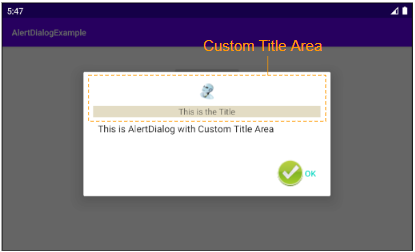
И можете использовать Android Resource File чтобы создать интерфейс для зоны заголовка (Title area).
AlertDialog.Builder builder = new AlertDialog.Builder(context);

// Custom Title Area.
LayoutInflater inflater = context.getLayoutInflater();
View view = inflater.inflate(R.layout.layout_custom_title, null);
builder.setCustomTitle(view);
...

// Create AlertDialog:
AlertDialog alert = builder.create();
alert.show();
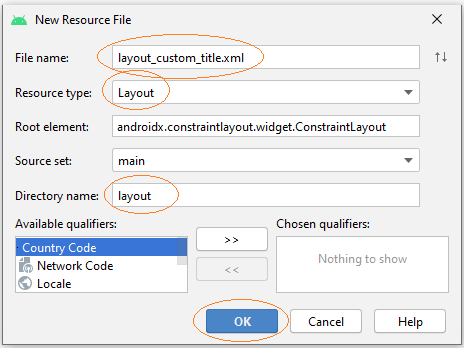
OK, создайте Layout Resource File:
- File > New > Android Resource File
- File Name: layout_custom_title.xml
- Resource type: Layout
- Directory name: layout
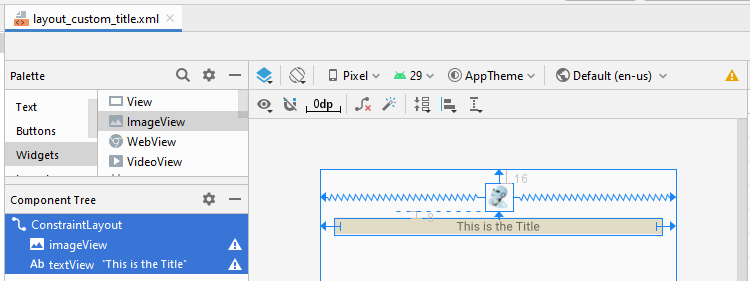
Смоделируйте интерфейс для зоны заголовка (Title area):
layout_custom_title.xml
<?xml version="1.0" encoding="utf-8"?>
<androidx.constraintlayout.widget.ConstraintLayout
    xmlns:android="http://schemas.android.com/apk/res/android"
    xmlns:app="http://schemas.android.com/apk/res-auto"
    xmlns:tools="http://schemas.android.com/tools"
    android:layout_width="match_parent"
    android:layout_height="match_parent">

    <ImageView
        android:id="@+id/imageView"
        android:layout_width="wrap_content"
        android:layout_height="wrap_content"
        android:layout_marginTop="16dp"
        app:layout_constraintEnd_toEndOf="parent"
        app:layout_constraintStart_toStartOf="parent"
        app:layout_constraintTop_toTopOf="parent"
        app:srcCompat="@drawable/icon_title" />

    <TextView
        android:id="@+id/textView"
        android:layout_width="0dp"
        android:layout_height="wrap_content"
        android:layout_marginStart="16dp"
        android:layout_marginLeft="16dp"
        android:layout_marginTop="8dp"
        android:layout_marginEnd="16dp"
        android:layout_marginRight="16dp"
        android:background="#E3DCC4"
        android:gravity="center"
        android:text="This is the Title"
        app:layout_constraintEnd_toEndOf="parent"
        app:layout_constraintStart_toStartOf="parent"
        app:layout_constraintTop_toBottomOf="@+id/imageView" />

</androidx.constraintlayout.widget.ConstraintLayout>
AlertDialogCustomTitleExample.java
package org.o7planning.alertdialogexample;

import android.app.Activity;
import android.content.Context;
import android.content.DialogInterface;
import android.graphics.drawable.Drawable;
import android.view.LayoutInflater;
import android.view.View;
import android.widget.Toast;

import androidx.appcompat.app.AlertDialog;

public class AlertDialogCustomTitleExample {

    public static void showAlertDialog(final Activity context)  {
        final Drawable positiveIcon = context.getResources().getDrawable(R.drawable.icon_positive);

        AlertDialog.Builder builder = new AlertDialog.Builder(context);

        // Custom Title Area.
        LayoutInflater inflater = context.getLayoutInflater();
        View view = inflater.inflate(R.layout.layout_custom_title, null);
        builder.setCustomTitle(view);

        // Message.
        builder.setMessage("This is AlertDialog with Custom Title Area");
        //
        builder.setCancelable(true);
        builder.setIcon(R.drawable.icon_title);

        // Create "OK" button with OnClickListener.
        builder.setPositiveButton("OK", new DialogInterface.OnClickListener() {
            public void onClick(DialogInterface dialog, int id) {
            }
        });
        builder.setPositiveButtonIcon(positiveIcon);

        // Create AlertDialog:
        AlertDialog alert = builder.create();
        alert.show();
    }
}
Pуководства Android
- Настроить Android Emulator в Android Studio
- Руководство Android ToggleButton
- Создать простой File Finder Dialog в Android
- Руководство Android TimePickerDialog
- Руководство Android DatePickerDialog
- Что мне нужно для начала работы с Android?
- Установите Android Studio в Windows
- Установите Intel® HAXM для Android Studio
- Руководство Android AsyncTask
- Руководство Android AsyncTaskLoader
- Руководство Android для начинающих - основные примеры
- Как узнать номер телефона Android Emulator и изменить его?
- Руководство Android TextInputLayout
- Руководство Android CardView
- Руководство Android ViewPager2
- Получить номер телефона в Android с помощью TelephonyManager
- Руководство Android Phone Call
- Руководство Android Wifi Scanning
- Руководство Android 2D Game для начинающих
- Руководство Android DialogFragment
- Руководство Android CharacterPickerDialog
- Руководство Android для начинающих - Hello Android
- Использование Android Device File Explorer
- Включить USB Debugging на устройстве Android
- Руководство Android UI Layouts
- Руководство Android SMS
- Руководство Android SQLite Database
- Руководство Google Maps Android API
- Руководство Текст в речь на Android
- Руководство Android Space
- Руководство Android Toast
- Создание пользовательских Android Toast
- Руководство Android SnackBar
- Руководство Android TextView
- Руководство Android TextClock
- Руководство Android EditText
- Руководство Android TextWatcher
- Форматирование номера кредитной карты с помощью Android TextWatcher
- Руководство Android Clipboard
- Создать простой File Chooser в Android
- Руководство Android AutoCompleteTextView и MultiAutoCompleteTextView
- Руководство Android ImageView
- Руководство Android ImageSwitcher
- Руководство Android ScrollView и HorizontalScrollView
- Руководство Android WebView
- Руководство Android SeekBar
- Руководство Android Dialog
- Руководство Android AlertDialog
- Руководство Android RatingBar
- Руководство Android ProgressBar
- Руководство Android Spinner
- Руководство Android Button
- Руководство Android Switch
- Руководство Android ImageButton
- Руководство Android FloatingActionButton
- Руководство Android CheckBox
- Руководство Android RadioGroup и RadioButton
- Руководство Android Chip и ChipGroup
- Использование Image assets и Icon assets Android Studio
- Настройка SD Card для Android Emulator
- Пример ChipGroup и Chip Entry
- Как добавить внешние библиотеки в Android Project в Android Studio?
- Как отключить разрешения, уже предоставленные приложению Android?
- Как удалить приложения из Android Emulator?
- Руководство Android LinearLayout
- Руководство Android TableLayout
- Руководство Android FrameLayout
- Руководство Android QuickContactBadge
- Руководство Android StackView
- Руководство Android Camera
- Руководство Android MediaPlayer
- Руководство Android VideoView
- Воспроизведение звуковых эффектов в Android с помощью SoundPool
- Руководство Android Networking
- Руководство Android JSON Parser
- Руководство Android SharedPreferences
- Руководство Android Internal Storage
- Руководство Android External Storage
- Руководство Android Intents
- Пример явного Android Intent, вызов другого Intent
- Пример неявного Android Intent, откройте URL, отправьте email
- Руководство Android Services
- Использовать оповещения в Android - Android Notification
- Руководство Android DatePicker
- Руководство Android TimePicker
- Руководство Android Chronometer
- Руководство Android OptionMenu
- Руководство Android ContextMenu
- Руководство Android PopupMenu
- Руководство Android Fragment
- Руководство Android ListView
- Android ListView с Checkbox с помощью ArrayAdapter
- Руководство Android GridView
Show More