Руководство Android LinearLayout
1. Android LinearLayout
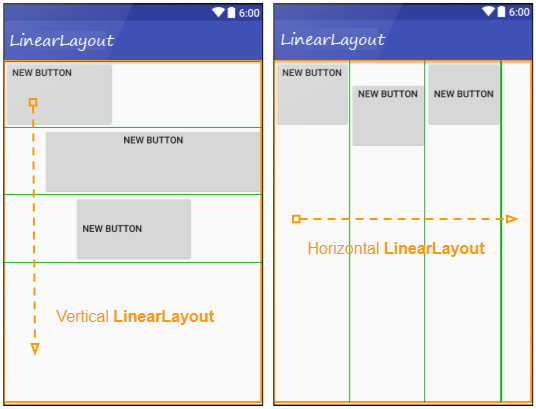
LinearLayout это ViewGroup который распределяет дочерние View по единственному направлению, по вертикали или по горизонтали. Вы можете сориентировать (orientation) его используя атрибут: android:orientation.
<!-- Horizontal LinearLayout (Default) -->
<LinearLayout
    ...
    android:orientation="horizontal">

   ...
</LinearLayout>


<!-- Vertical LinearLayout -->
<LinearLayout
    ...
    android:orientation="vertical">

   ...
</LinearLayout>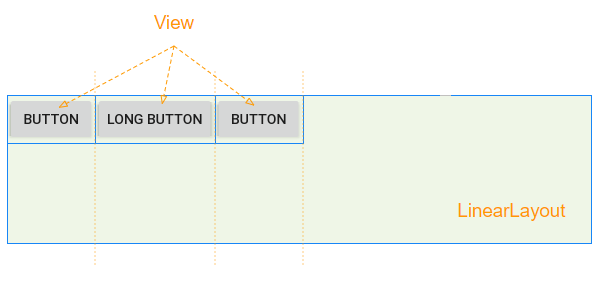
Например: Используйте Java чтобы создать LinearLayout, и добавить дочерние View в LinearLayout:
// linearLayout = new LinearLayout(MainActivity.this);
// linearLayout.setOrientation(LinearLayout.HORIZONTAL);

LinearLayout.LayoutParams layoutParams
        = new LinearLayout.LayoutParams(LinearLayout.LayoutParams.WRAP_CONTENT,
        LinearLayout.LayoutParams.WRAP_CONTENT, 0);

Button button1 = new Button(this);
button1.setText("Button");
linearLayout.addView(button1, layoutParams);

Button button2 = new Button(this);
button2.setText("Long Button");
button2.setLayoutParams(layoutParams);
linearLayout.addView(button2);
2. android:layout_weight
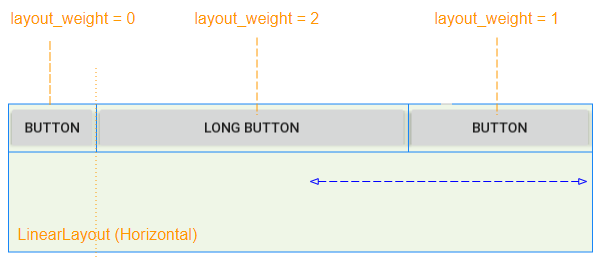
android:layout_weight это важный атрибут, который используется для дочерних View у LinearLayout, он определяет сколько простраства займет дочерний View в родительском View (LinearLayout) (По горизонтали или вертикали). Значение layout_weight больше чем 0 позволяет дочернему View расшириться, чтобы заполнить любое оставшееся пространство в родительском View. Дочерние View могут определять значение layout_weight > 0, и потом любое оставшееся пространство в родительском View будет прикреплено к дочерним View по соотношению их layout_weight.
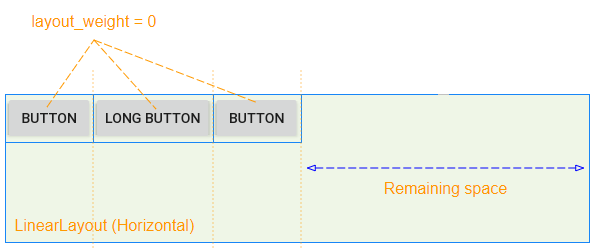
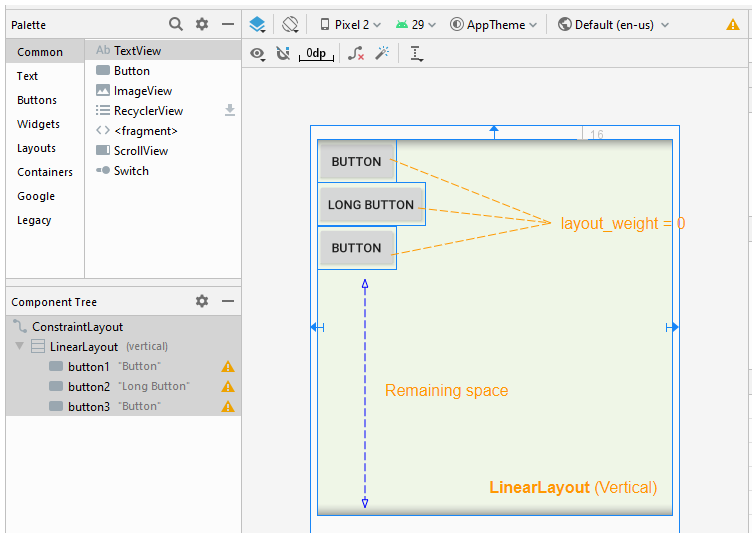
Когда все дочерние View имеют android:layout_weight=0, вы увидите свободное пространство в родительском View (LinearLayout):
Дочерние View имеющие android:layout_weight>0 займут свободное пространство родительского View (LinearLayout):
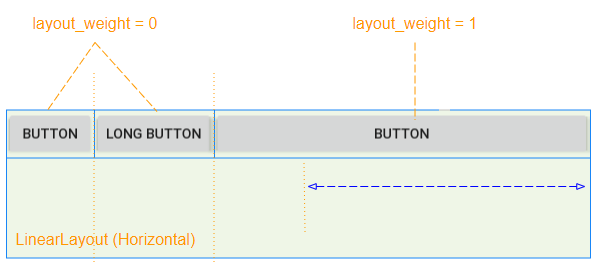
Свободное пространство родительского View cha (LinearLayout) будет распределено дочерним View по соотношению их layout_weight.
Атрибут android:layout_weight имеет такое же индентичное значение в вертикальном LinearLayout:
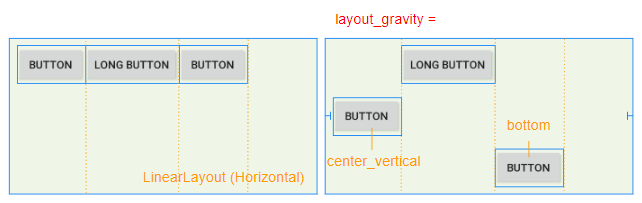
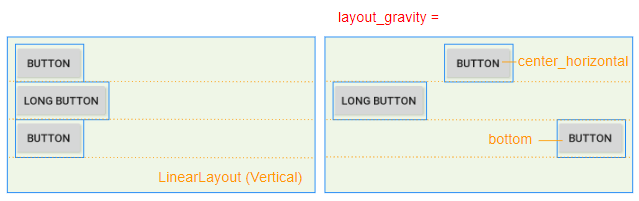
3. android:layout_gravity
Атрибут android:layout_gravity применяется к дочернему View чтобы определить относительное расположение дочернего View внутри родительского View (LinearLayout).
Constant in Java | Value | Description |
Gravity.LEFT | left | |
Gravity.CENTER_HORIZONTAL | center_horizontal | |
Gravity.RIGHT | right | |
Gravity.TOP | top | |
Gravity.CENTER_VERTICAL | center_vertical | |
Gravity.BOTTOM | bottom | |
Gravity.START | start | |
Gravity.END | end | |
Gravity.CENTER | center | |
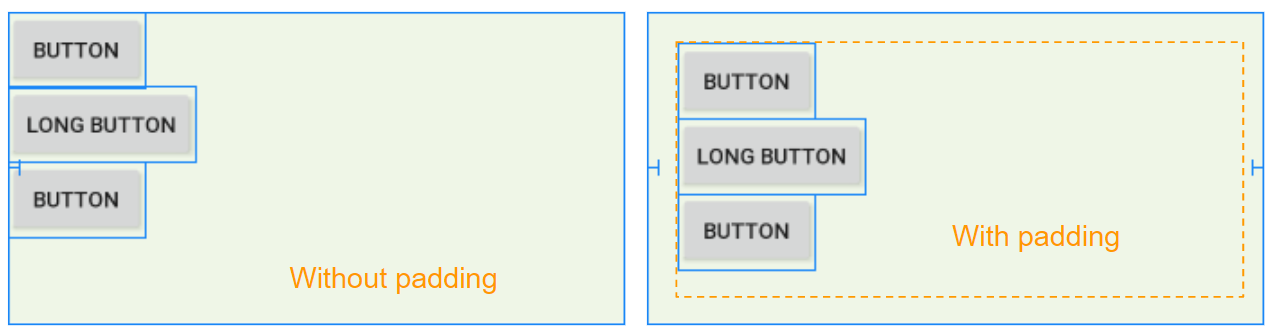
4. android:padding
Padding это пространство в LinearLayout (Внутри границ), и окружает 4 стороны содержания.
Вы можете настроить padding для LinearLayout через следующие атрибуты:
- android:padding
- android:paddingTop
- android:paddingRight
- android:paddingBottom
- android:paddingLeft
<LinearLayout
    ...
    android:orientation="horizontal"
    android:paddingTop="20dp"
    android:paddingRight="30dp"
    android:paddingBottom="10dp"
    android:paddingLeft="20dp">

    <Button
        android:id="@+id/button1"
        android:layout_width="wrap_content"
        android:layout_height="wrap_content"
        android:layout_weight="0"
        android:text="Button" />

</LinearLayout>
5. LinearLayout spacing
Иногда вы хотите настроить пространство между дочерними View у LinearLayout, есть несколько способов, чтобы вы выполнили это:
android:layout_margin
Применение атрибута android:layout_margin для всех дочерних View у LinearLayout поможет настроить расстояние между ними.
* layout_margin (Java code) *
// linearLayout = new LinearLayout(MainActivity.this);
// linearLayout.setOrientation(LinearLayout.HORIZONTAL);

LinearLayout.LayoutParams layoutParams
        = new LinearLayout.LayoutParams(LinearLayout.LayoutParams.WRAP_CONTENT,
                          LinearLayout.LayoutParams.WRAP_CONTENT, 0);
layoutParams.setMargins(30, 20, 30, 0);

Button button1 = new Button(this);
button1.setText("Button");
linearLayout.addView(button1, layoutParams);

Button button2 = new Button(this);
button2.setText("Long Button");
button2.setLayoutParams(layoutParams);
linearLayout.addView(button2);
Space View
Android 4.0+ (API Level 14+) поддерживает новый вид View это Space, он помогает вам добавить свободного пространства в интерфейс. Вы можете использовать Space чтобы разделить дочерние View внутри LinearLayout.

<LinearLayout
    ...
    android:layout_width="0dp"
    android:layout_height="200dp"
    android:background="#EFF6E7"
    android:orientation="horizontal">

    <Button
        android:id="@+id/button1"
        android:layout_width="wrap_content"
        android:layout_height="wrap_content"
        android:layout_weight="0"
        android:text="Button" />

    <Space
        android:layout_width="10dp"
        android:layout_height="wrap_content"
        android:layout_weight="0" />

    <Button
        android:id="@+id/button2"
        android:layout_width="wrap_content"
        android:layout_height="wrap_content"
        android:layout_weight="0"
        android:text="Long Button" />

    <Button
        android:id="@+id/button3"
        android:layout_width="wrap_content"
        android:layout_height="wrap_content"
        android:layout_weight="0"
        android:text="Button" />
</LinearLayout>
* Add Space (Java code) *
// linearLayout = new LinearLayout(MainActivity.this);
// linearLayout.setOrientation(LinearLayout.HORIZONTAL);

LinearLayout.LayoutParams layoutParams
        = new LinearLayout.LayoutParams(LinearLayout.LayoutParams.WRAP_CONTENT,
        LinearLayout.LayoutParams.WRAP_CONTENT, 0);

LinearLayout.LayoutParams layoutParams2
        = new LinearLayout.LayoutParams(15,
        LinearLayout.LayoutParams.WRAP_CONTENT, 0);

Button button1 = new Button(this);
button1.setText("Button");
linearLayout.addView(button1, layoutParams);

// Create a Space View.
Space space = new Space(this);
space.setLayoutParams(layoutParams2);
linearLayout.addView(space);

Button button2 = new Button(this);
button2.setText("Long Button");
button2.setLayoutParams(layoutParams);
linearLayout.addView(button2);
android:divider
Android 3.0+ (API Level 11+) позволяет вам добавить Divider (Дивайдер) между 2-мя дочерними View в LinearLayout, вы даже можете определить стиль, цвет для Divider.
* Divider *
<LinearLayout
    ...
    android:orientation="horizontal">

    <Button
        android:id="@+id/button1"
        android:layout_width="wrap_content"
        android:layout_height="wrap_content"
        android:layout_weight="0"
        android:text="Button" />

     <!-- Divider -->
    <View
        android:id="@+id/divider"
        android:layout_width="15dp"
        android:layout_height="match_parent"
        android:layout_weight="0"
        android:background="?android:attr/listDivider" />

    <Button
        android:id="@+id/button2"
        android:layout_width="wrap_content"
        android:layout_height="wrap_content"
        android:layout_weight="0"
        android:text="Long Button" />

    <Button
        android:id="@+id/button3"
        android:layout_width="wrap_content"
        android:layout_height="wrap_content"
        android:layout_weight="0"
        android:text="Button" />
</LinearLayout>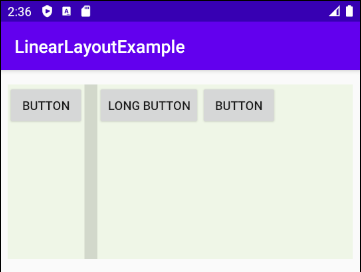
* Add Divider (Java code) *
// linearLayout = new LinearLayout(MainActivity.this);
// linearLayout.setOrientation(LinearLayout.HORIZONTAL);

LinearLayout.LayoutParams layoutParams
        = new LinearLayout.LayoutParams(LinearLayout.LayoutParams.WRAP_CONTENT,
        LinearLayout.LayoutParams.WRAP_CONTENT, 0);

LinearLayout.LayoutParams layoutParams2
        = new LinearLayout.LayoutParams(15,
        LinearLayout.LayoutParams.MATCH_PARENT, 0);

Button button1 = new Button(this);
button1.setText("Button");
linearLayout.addView(button1, layoutParams);

// Create a Divider.
View divider = new View(this);
// android:background="?android:attr/listDivider"
divider.setBackgroundResource(android.R.drawable.divider_horizontal_bright);
linearLayout.addView(divider, layoutParams2);

Button button2 = new Button(this);
button2.setText("Long Button");
button2.setLayoutParams(layoutParams);
linearLayout.addView(button2);
Смотрите более подробную статью про Divider, она поможет вам кастомизировать Divider который подойдет вашему приложению:
- Руководство Android Divider
Pуководства Android
- Настроить Android Emulator в Android Studio
- Руководство Android ToggleButton
- Создать простой File Finder Dialog в Android
- Руководство Android TimePickerDialog
- Руководство Android DatePickerDialog
- Что мне нужно для начала работы с Android?
- Установите Android Studio в Windows
- Установите Intel® HAXM для Android Studio
- Руководство Android AsyncTask
- Руководство Android AsyncTaskLoader
- Руководство Android для начинающих - основные примеры
- Как узнать номер телефона Android Emulator и изменить его?
- Руководство Android TextInputLayout
- Руководство Android CardView
- Руководство Android ViewPager2
- Получить номер телефона в Android с помощью TelephonyManager
- Руководство Android Phone Call
- Руководство Android Wifi Scanning
- Руководство Android 2D Game для начинающих
- Руководство Android DialogFragment
- Руководство Android CharacterPickerDialog
- Руководство Android для начинающих - Hello Android
- Использование Android Device File Explorer
- Включить USB Debugging на устройстве Android
- Руководство Android UI Layouts
- Руководство Android SMS
- Руководство Android SQLite Database
- Руководство Google Maps Android API
- Руководство Текст в речь на Android
- Руководство Android Space
- Руководство Android Toast
- Создание пользовательских Android Toast
- Руководство Android SnackBar
- Руководство Android TextView
- Руководство Android TextClock
- Руководство Android EditText
- Руководство Android TextWatcher
- Форматирование номера кредитной карты с помощью Android TextWatcher
- Руководство Android Clipboard
- Создать простой File Chooser в Android
- Руководство Android AutoCompleteTextView и MultiAutoCompleteTextView
- Руководство Android ImageView
- Руководство Android ImageSwitcher
- Руководство Android ScrollView и HorizontalScrollView
- Руководство Android WebView
- Руководство Android SeekBar
- Руководство Android Dialog
- Руководство Android AlertDialog
- Руководство Android RatingBar
- Руководство Android ProgressBar
- Руководство Android Spinner
- Руководство Android Button
- Руководство Android Switch
- Руководство Android ImageButton
- Руководство Android FloatingActionButton
- Руководство Android CheckBox
- Руководство Android RadioGroup и RadioButton
- Руководство Android Chip и ChipGroup
- Использование Image assets и Icon assets Android Studio
- Настройка SD Card для Android Emulator
- Пример ChipGroup и Chip Entry
- Как добавить внешние библиотеки в Android Project в Android Studio?
- Как отключить разрешения, уже предоставленные приложению Android?
- Как удалить приложения из Android Emulator?
- Руководство Android LinearLayout
- Руководство Android TableLayout
- Руководство Android FrameLayout
- Руководство Android QuickContactBadge
- Руководство Android StackView
- Руководство Android Camera
- Руководство Android MediaPlayer
- Руководство Android VideoView
- Воспроизведение звуковых эффектов в Android с помощью SoundPool
- Руководство Android Networking
- Руководство Android JSON Parser
- Руководство Android SharedPreferences
- Руководство Android Internal Storage
- Руководство Android External Storage
- Руководство Android Intents
- Пример явного Android Intent, вызов другого Intent
- Пример неявного Android Intent, откройте URL, отправьте email
- Руководство Android Services
- Использовать оповещения в Android - Android Notification
- Руководство Android DatePicker
- Руководство Android TimePicker
- Руководство Android Chronometer
- Руководство Android OptionMenu
- Руководство Android ContextMenu
- Руководство Android PopupMenu
- Руководство Android Fragment
- Руководство Android ListView
- Android ListView с Checkbox с помощью ArrayAdapter
- Руководство Android GridView
Show More