Руководство Android VideoView
1. Android VideoView
VideoView это персонализировенный компонент в Android, это комбинация между MediaPlayer и SuffaceView, помогающий вам легко воспроизвести видео.
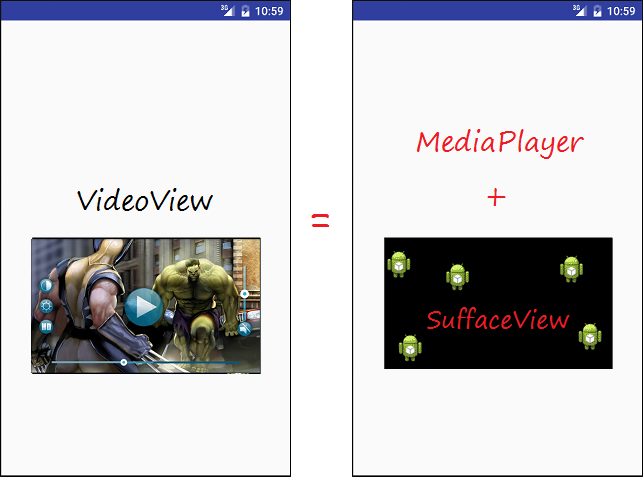
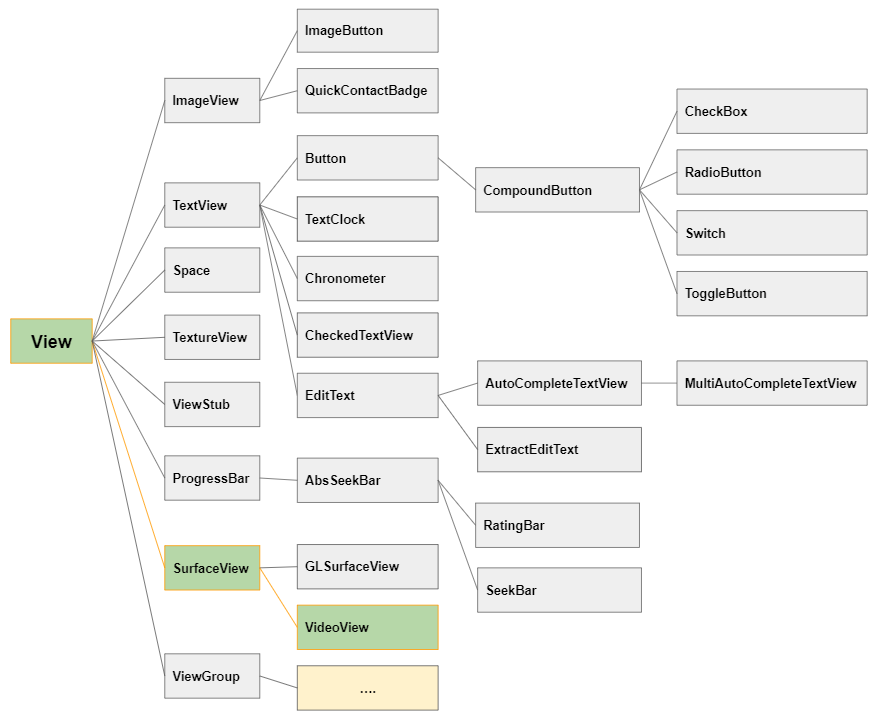
При использовании VideoView вы можете пользоваться MediaController, это компонент имеющийся в Android для контроля медиа (Например старт, остановить, перемотка, пауза,..)
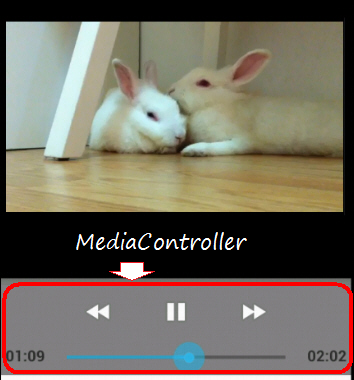
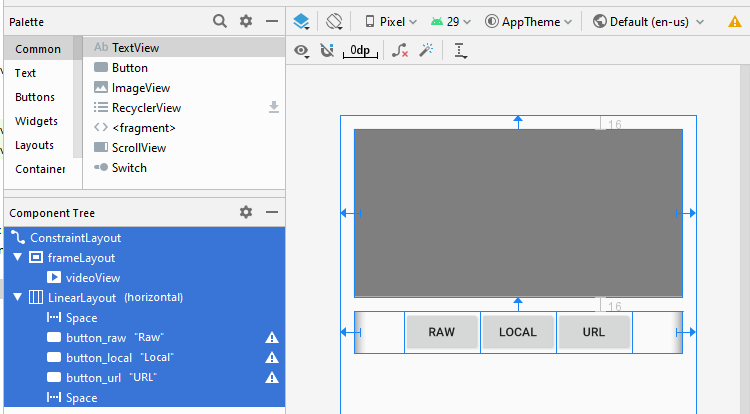
Если вы поставите VideoView и MediaController в одном FrameLayout, вы получите следующий интерфейс:
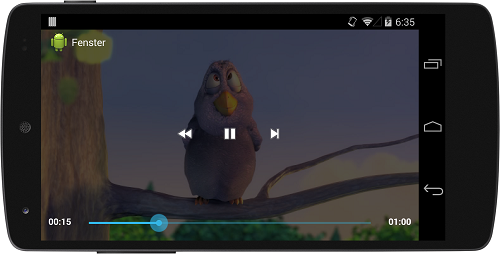
2. Пример проигрывания видео с VideoView
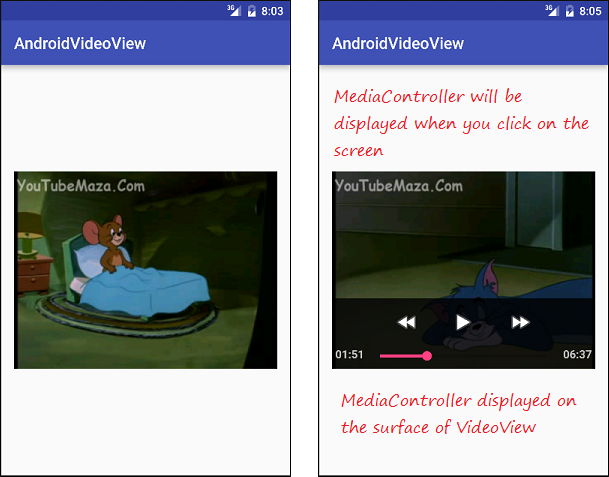
Теперь мы можем посмотреть пример с VideoView и MediaController находящиеся на поверхности видео. Смотрите иллюстрацию примера ниже:
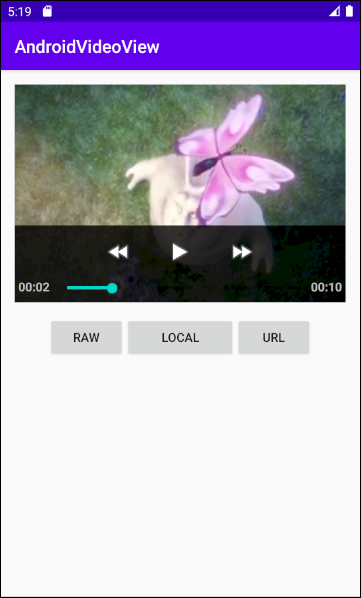
Создать Project с названием AndroidVideoView:
- File > New > New Project > Empty Activity
- Name: AndroidVideoView
- Package name: org.o7planning.androidvideoview
- Language: Java
Создать папку raw для содержания видео файлов.
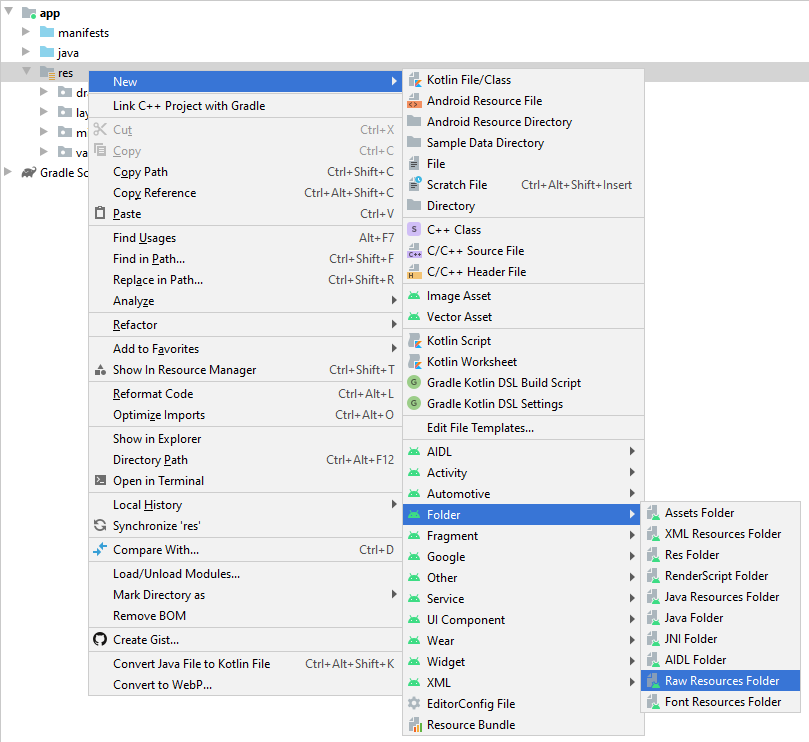
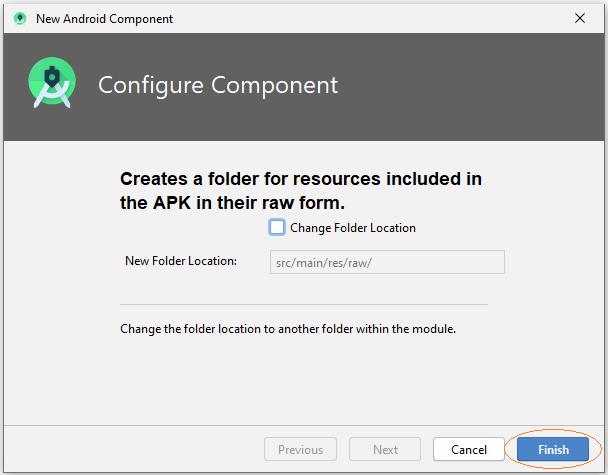
Копировать и вставить видео файлы mp4 в паку raw:
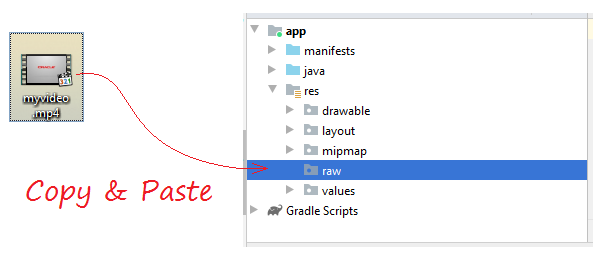
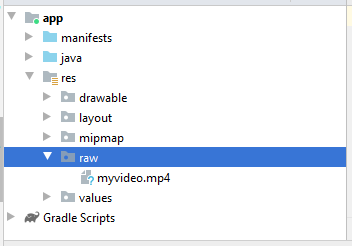
Если вы хотите воспроизвести video из URL, вам нужно разрешить приложению использовать сеть, добавьте следующий XML код в AndroidManifest.xml:
<uses-permission android:name="android.permission.INTERNET"/>AndroidManifest.xml
<?xml version="1.0" encoding="utf-8"?>
<manifest xmlns:android="http://schemas.android.com/apk/res/android"
    package="org.o7planning.androidvideoview">

    <uses-permission android:name="android.permission.INTERNET"/>

    <application
        android:allowBackup="true"
        android:icon="@mipmap/ic_launcher"
        android:label="@string/app_name"
        android:roundIcon="@mipmap/ic_launcher_round"
        android:supportsRtl="true"
        android:theme="@style/AppTheme">
        <activity android:name=".MainActivity">
            <intent-filter>
                <action android:name="android.intent.action.MAIN" />

                <category android:name="android.intent.category.LAUNCHER" />
            </intent-filter>
        </activity>
    </application>

</manifest>
Design the Interface:
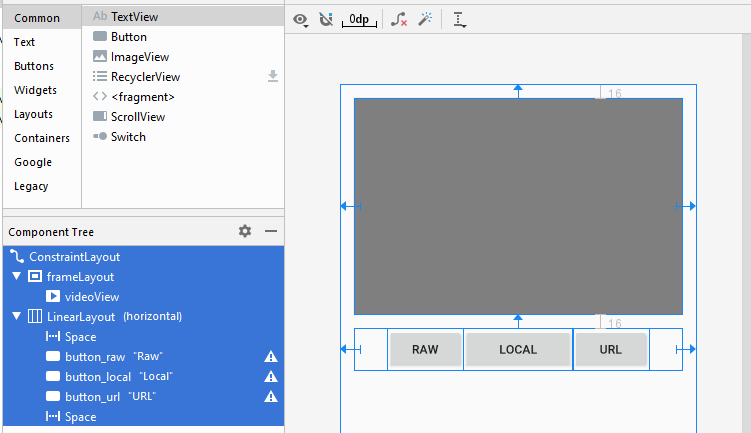
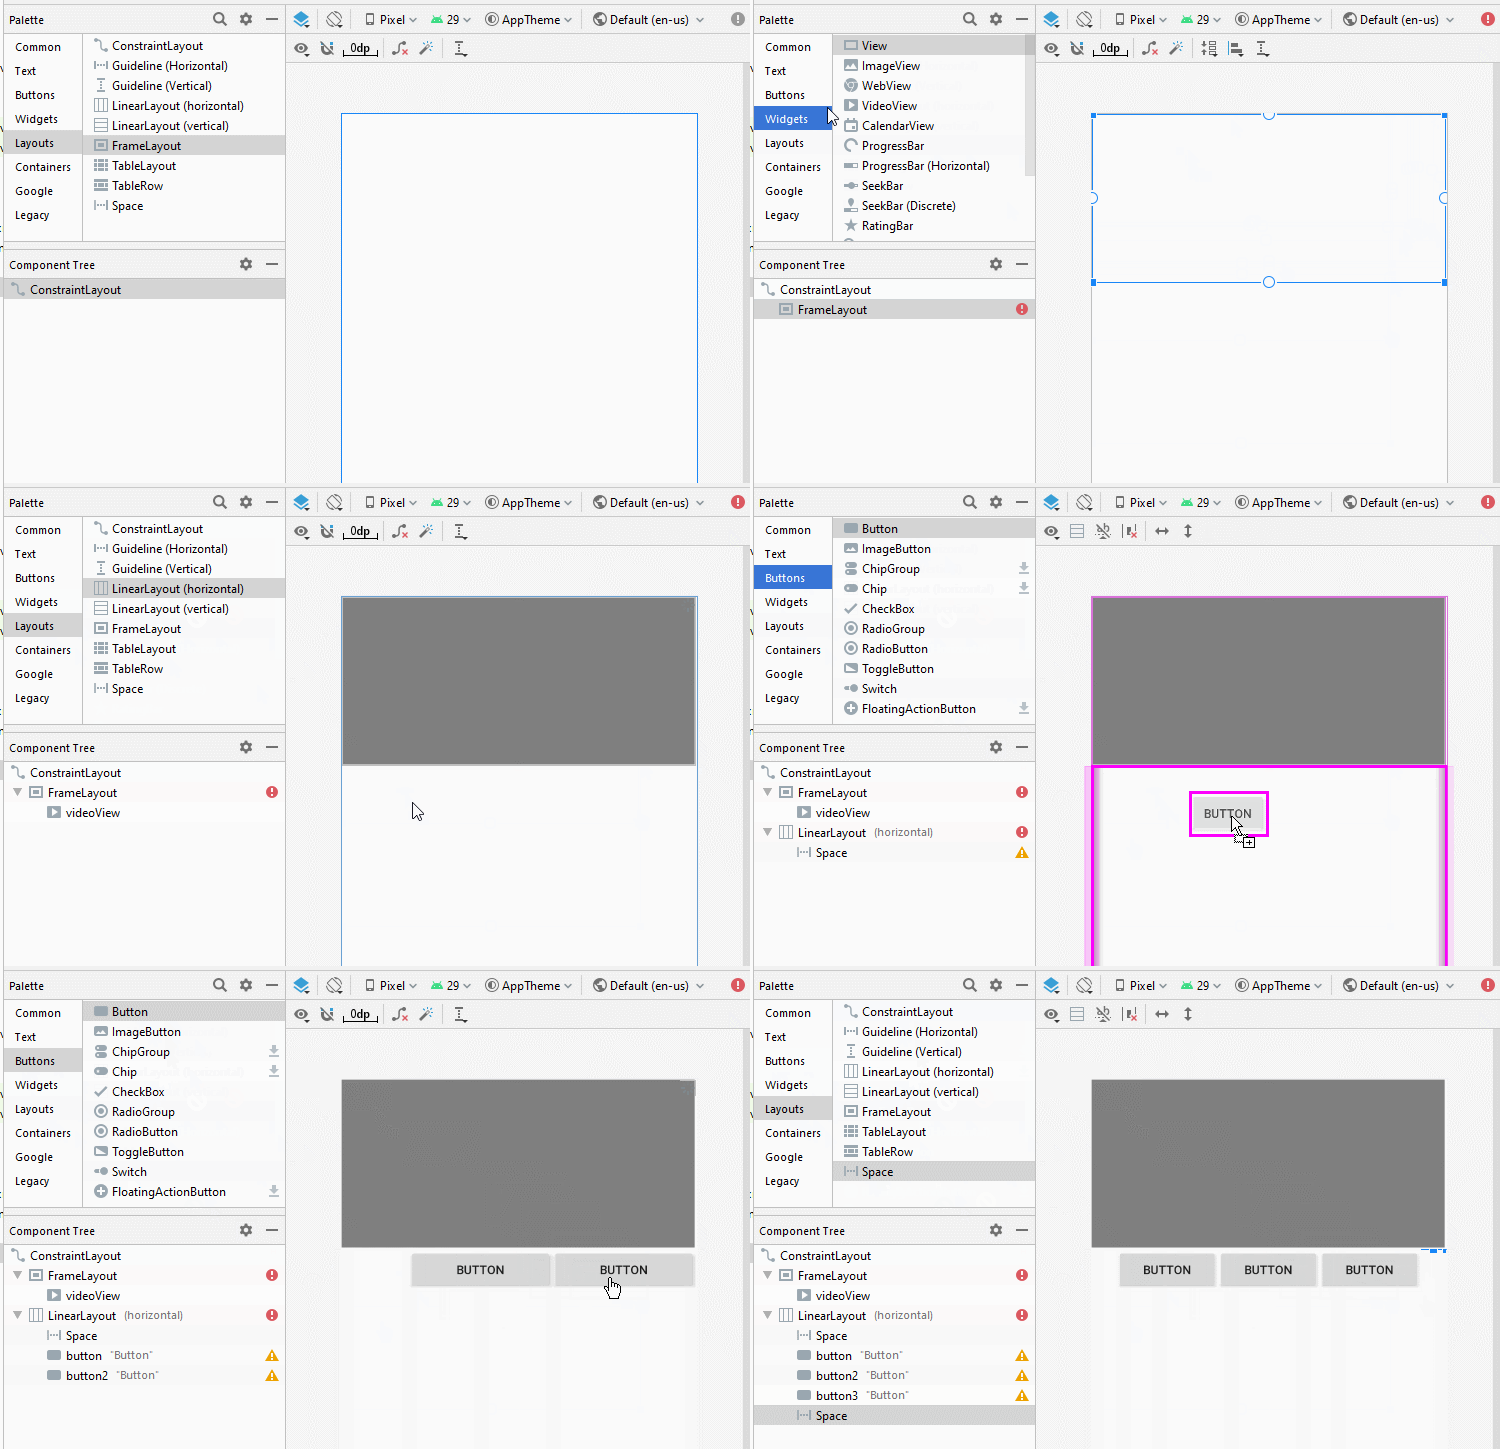
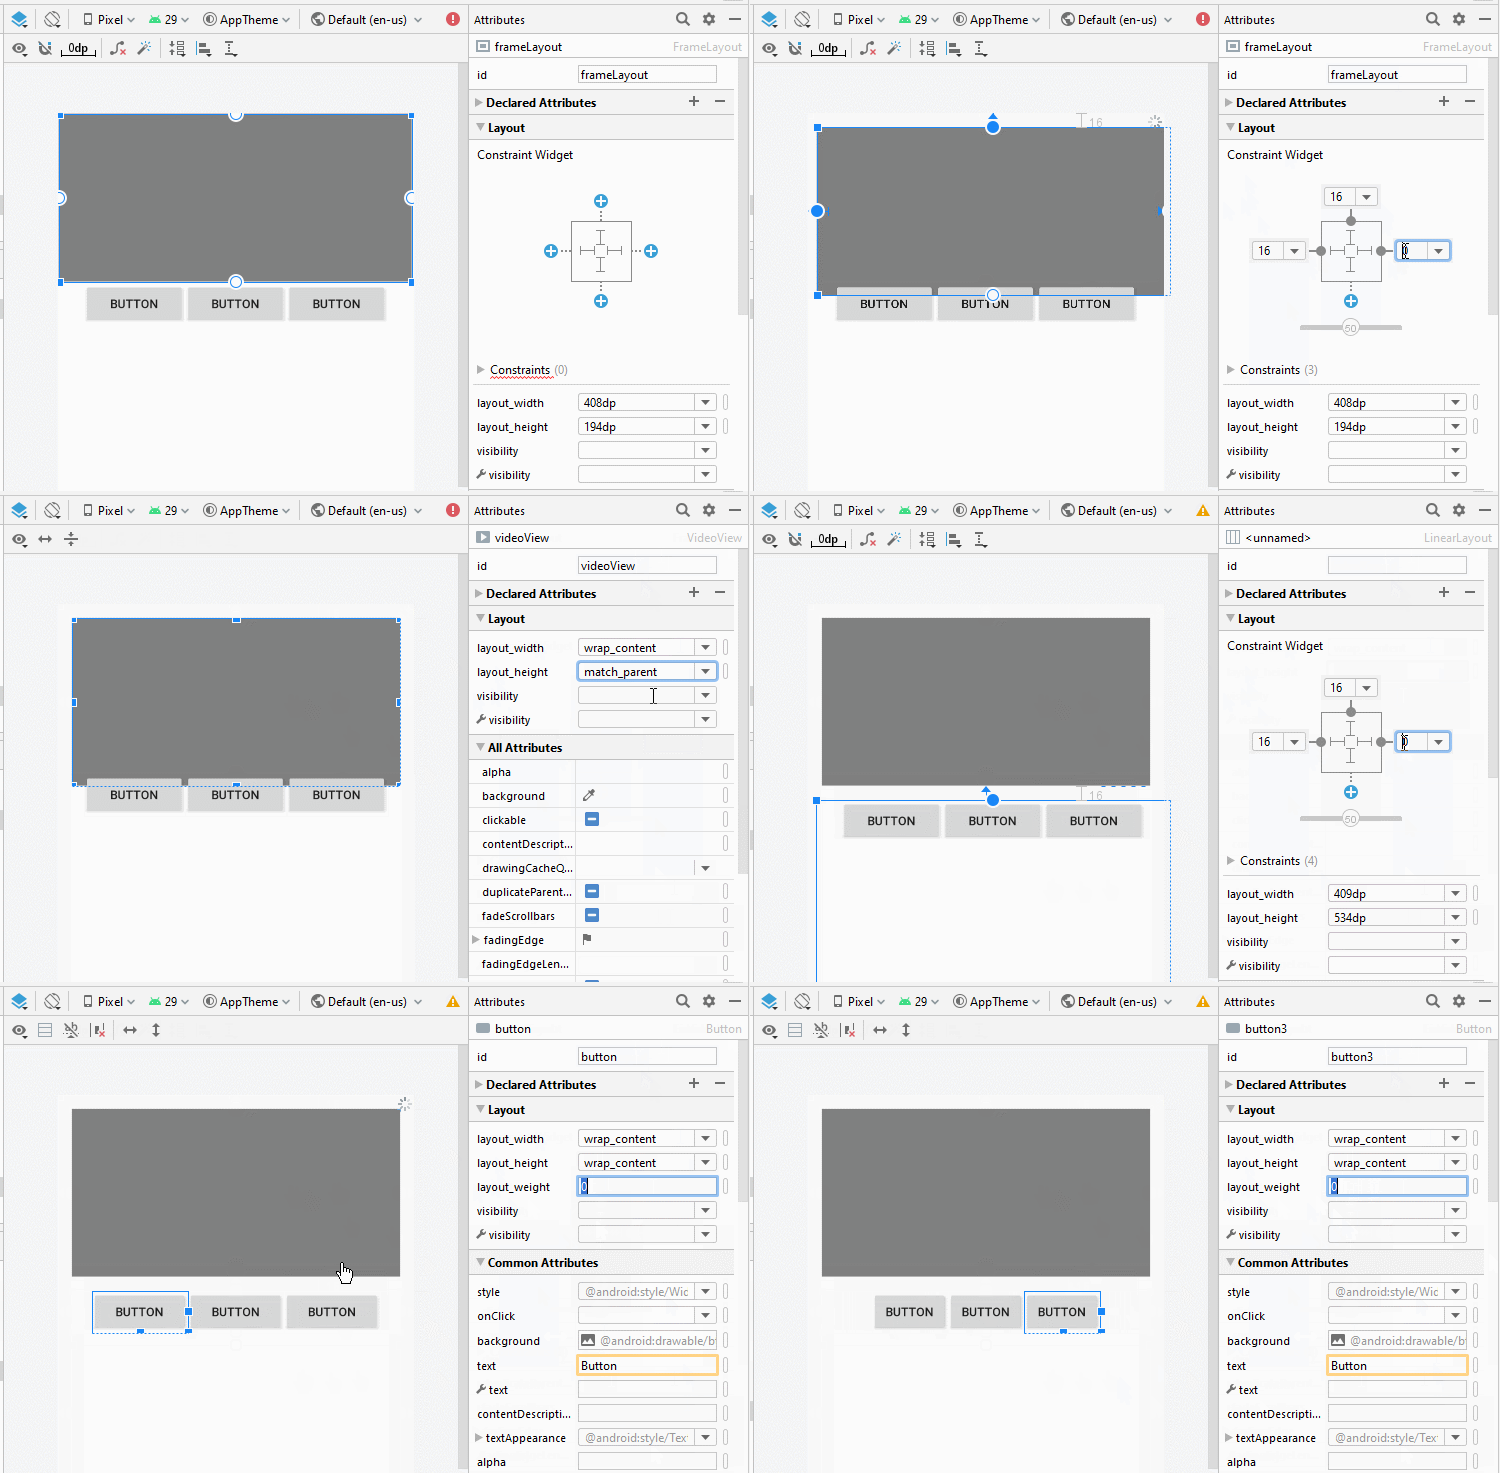
Если вас интересуют шаги дизайна интерфейса данного приложения, смотрите приложение в конце статьи.
activity_main.xml
<?xml version="1.0" encoding="utf-8"?>
<androidx.constraintlayout.widget.ConstraintLayout
    xmlns:android="http://schemas.android.com/apk/res/android"
    xmlns:app="http://schemas.android.com/apk/res-auto"
    xmlns:tools="http://schemas.android.com/tools"
    android:layout_width="match_parent"
    android:layout_height="match_parent"
    tools:context=".MainActivity">

    <FrameLayout
        android:id="@+id/frameLayout"
        android:layout_width="0dp"
        android:layout_height="250dp"
        android:layout_marginStart="16dp"
        android:layout_marginLeft="16dp"
        android:layout_marginTop="16dp"
        android:layout_marginEnd="16dp"
        android:layout_marginRight="16dp"
        app:layout_constraintEnd_toEndOf="parent"
        app:layout_constraintStart_toStartOf="parent"
        app:layout_constraintTop_toTopOf="parent">

        <VideoView
            android:id="@+id/videoView"
            android:layout_width="wrap_content"
            android:layout_height="match_parent" />
    </FrameLayout>

    <LinearLayout
        android:layout_width="0dp"
        android:layout_height="wrap_content"
        android:layout_marginStart="16dp"
        android:layout_marginLeft="16dp"
        android:layout_marginTop="16dp"
        android:layout_marginEnd="16dp"
        android:layout_marginRight="16dp"
        android:orientation="horizontal"
        app:layout_constraintEnd_toEndOf="parent"
        app:layout_constraintStart_toStartOf="parent"
        app:layout_constraintTop_toBottomOf="@+id/frameLayout">

        <Space
            android:layout_width="wrap_content"
            android:layout_height="wrap_content"
            android:layout_weight="1" />

        <Button
            android:id="@+id/button_raw"
            android:layout_width="wrap_content"
            android:layout_height="wrap_content"
            android:layout_weight="0"
            android:text="Raw" />

        <Button
            android:id="@+id/button_local"
            android:layout_width="wrap_content"
            android:layout_height="wrap_content"
            android:layout_weight="1"
            android:text="Local" />

        <Button
            android:id="@+id/button_url"
            android:layout_width="wrap_content"
            android:layout_height="wrap_content"
            android:layout_weight="0"
            android:text="URL" />

        <Space
            android:layout_width="wrap_content"
            android:layout_height="wrap_content"
            android:layout_weight="1" />
    </LinearLayout>
</androidx.constraintlayout.widget.ConstraintLayout>
MainActivity.java
package org.o7planning.androidvideoview;

import androidx.appcompat.app.AppCompatActivity;
import android.os.Bundle;
import android.media.MediaPlayer;
import android.media.MediaPlayer.OnPreparedListener;
import android.view.View;
import android.widget.Button;
import android.widget.MediaController;
import android.widget.VideoView;

public class MainActivity extends AppCompatActivity {

    private VideoView videoView;
    private int position = 0;
    private MediaController mediaController;
    private Button buttonRaw;
    private Button buttonLocal;
    private Button buttonURL;

    @Override
    protected void onCreate(Bundle savedInstanceState) {
        super.onCreate(savedInstanceState);
        setContentView(R.layout.activity_main);

        this.videoView = (VideoView) findViewById(R.id.videoView);
        this.buttonRaw = (Button) findViewById(R.id.button_raw);
        this.buttonLocal = (Button) findViewById(R.id.button_local );
        this.buttonURL = (Button) findViewById(R.id.button_url);

        // Set the media controller buttons
        if (this.mediaController == null) {
            this.mediaController = new MediaController(MainActivity.this);

            // Set the videoView that acts as the anchor for the MediaController.
            this.mediaController.setAnchorView(videoView);

            // Set MediaController for VideoView
            this.videoView.setMediaController(mediaController);
        }


        // When the video file ready for playback.
        this.videoView.setOnPreparedListener(new OnPreparedListener() {

            public void onPrepared(MediaPlayer mediaPlayer) {

                videoView.seekTo(position);
                if (position == 0) {
                    videoView.start();
                }

                // When video Screen change size.
                mediaPlayer.setOnVideoSizeChangedListener(new MediaPlayer.OnVideoSizeChangedListener() {
                    @Override
                    public void onVideoSizeChanged(MediaPlayer mp, int width, int height) {

                        // Re-Set the videoView that acts as the anchor for the MediaController
                        mediaController.setAnchorView(videoView);
                    }
                });
            }
        });

        this.buttonRaw.setOnClickListener(new View.OnClickListener() {
            @Override
            public void onClick(View v) {
                // "myvideo.mp4" in directory "raw".
                String resName = VideoViewUtils.RAW_VIDEO_SAMPLE;
                VideoViewUtils.playRawVideo(MainActivity.this, videoView, resName);
            }
        });

        this.buttonLocal.setOnClickListener(new View.OnClickListener() {
            @Override
            public void onClick(View v) {
                String localPath = VideoViewUtils.LOCAL_VIDEO_SAMPLE;
                VideoViewUtils.playLocalVideo(MainActivity.this, videoView, localPath);
            }
        });

        this.buttonURL.setOnClickListener(new View.OnClickListener() {
            @Override
            public void onClick(View v) {
                String videoURL = VideoViewUtils.URL_VIDEO_SAMPLE;
                VideoViewUtils.playURLVideo(MainActivity.this, videoView, videoURL);
            }
        });
    }

    // When you change direction of phone, this method will be called.
    // It store the state of video (Current position)
    @Override
    public void onSaveInstanceState(Bundle savedInstanceState) {
        super.onSaveInstanceState(savedInstanceState);

        // Store current position.
        savedInstanceState.putInt("CurrentPosition", videoView.getCurrentPosition());
        videoView.pause();
    }


    // After rotating the phone. This method is called.
    @Override
    public void onRestoreInstanceState(Bundle savedInstanceState) {
        super.onRestoreInstanceState(savedInstanceState);

        // Get saved position.
        position = savedInstanceState.getInt("CurrentPosition");
        videoView.seekTo(position);
    }

}
VideoViewUtils.java
package org.o7planning.androidvideoview;

import android.content.Context;
import android.net.Uri;
import android.util.Log;
import android.widget.Toast;
import android.widget.VideoView;

public class VideoViewUtils {

    // "myvideo.mp4" in directory "raw".
    public static final String RAW_VIDEO_SAMPLE = "myvideo";
    public static final String LOCAL_VIDEO_SAMPLE ="/storage/emulated/0/DCIM/Camera/VID_20180212_195520.mp4";
    public static final String URL_VIDEO_SAMPLE  = "https://ex1.o7planning.com/_testdatas_/mov_bbb.mp4";


    public static final String LOG_TAG= "AndroidVideoView";


    // Play a video in directory RAW.
    // Video name = "myvideo.mp4" ==> resName = "myvideo".
    public static void playRawVideo(Context context, VideoView videoView, String resName)  {
        try {
            // ID of video file.
            int id = VideoViewUtils.getRawResIdByName( context, resName);

            Uri uri = Uri.parse("android.resource://" + context.getPackageName() + "/" + id);
            Log.i(LOG_TAG, "Video URI: "+ uri);

            videoView.setVideoURI(uri);
            videoView.requestFocus();

        } catch (Exception e) {
            Log.e(LOG_TAG, "Error Play Raw Video: "+e.getMessage());
            Toast.makeText(context,"Error Play Raw Video: "+ e.getMessage(),Toast.LENGTH_SHORT).show();
            e.printStackTrace();
        }
    }

    // @localPath = "/storage/emulated/0/DCIM/Camera/VID_20180212_195520.mp4"; (For example).
    public static void playLocalVideo(Context context, VideoView videoView, String localPath)  {
        try {

        } catch(Exception e) {
            Log.e(LOG_TAG, "Error Play Local Video: "+ e.getMessage());
            Toast.makeText(context,"Error Play Local Video: "+ e.getMessage(),Toast.LENGTH_SHORT).show();
            e.printStackTrace();
        }
    }

    // String videoURL = "https://ex1.o7planning.com/_testdatas_/mov_bbb.mp4";
    // String videoURL = "https://www.radiantmediaplayer.com/media/bbb-360p.mp4";
    public static void playURLVideo(Context context, VideoView videoView, String videoURL)  {
        try {
            Log.i(LOG_TAG, "Video URL: "+ videoURL);

            Uri uri= Uri.parse( videoURL );

            videoView.setVideoURI(uri);
            videoView.requestFocus();

        } catch(Exception e) {
            Log.e(LOG_TAG, "Error Play URL Video: "+ e.getMessage());
            Toast.makeText(context,"Error Play URL Video: "+ e.getMessage(),Toast.LENGTH_SHORT).show();
            e.printStackTrace();
        }
    }

    // Find ID corresponding to the name of the resource (in the directory RAW).
    public static int getRawResIdByName(Context context, String resName) {
        String pkgName = context.getPackageName();
        // Return 0 if not found.
        int resID = context.getResources().getIdentifier(resName, "raw", pkgName);

        Log.i(LOG_TAG, "Res Name: " + resName + "==> Res ID = " + resID);
        return resID;
    }
}
Некоторые примечания с кодом:
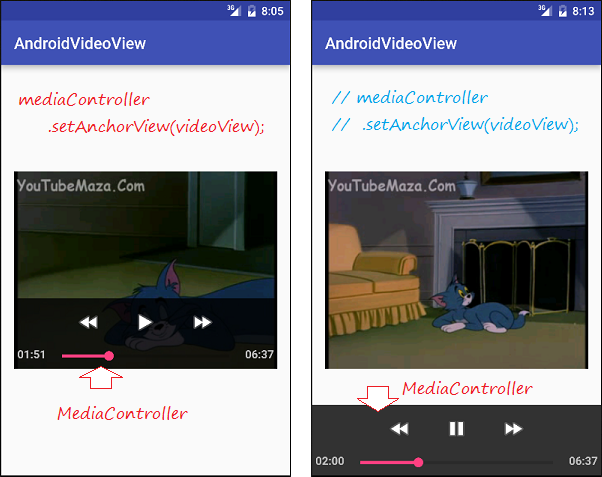
Изображения, когда вы используете setAnchorView() для прикрепления MediaController в VideoView:
Pуководства Android
- Настроить Android Emulator в Android Studio
- Руководство Android ToggleButton
- Создать простой File Finder Dialog в Android
- Руководство Android TimePickerDialog
- Руководство Android DatePickerDialog
- Что мне нужно для начала работы с Android?
- Установите Android Studio в Windows
- Установите Intel® HAXM для Android Studio
- Руководство Android AsyncTask
- Руководство Android AsyncTaskLoader
- Руководство Android для начинающих - основные примеры
- Как узнать номер телефона Android Emulator и изменить его?
- Руководство Android TextInputLayout
- Руководство Android CardView
- Руководство Android ViewPager2
- Получить номер телефона в Android с помощью TelephonyManager
- Руководство Android Phone Call
- Руководство Android Wifi Scanning
- Руководство Android 2D Game для начинающих
- Руководство Android DialogFragment
- Руководство Android CharacterPickerDialog
- Руководство Android для начинающих - Hello Android
- Использование Android Device File Explorer
- Включить USB Debugging на устройстве Android
- Руководство Android UI Layouts
- Руководство Android SMS
- Руководство Android SQLite Database
- Руководство Google Maps Android API
- Руководство Текст в речь на Android
- Руководство Android Space
- Руководство Android Toast
- Создание пользовательских Android Toast
- Руководство Android SnackBar
- Руководство Android TextView
- Руководство Android TextClock
- Руководство Android EditText
- Руководство Android TextWatcher
- Форматирование номера кредитной карты с помощью Android TextWatcher
- Руководство Android Clipboard
- Создать простой File Chooser в Android
- Руководство Android AutoCompleteTextView и MultiAutoCompleteTextView
- Руководство Android ImageView
- Руководство Android ImageSwitcher
- Руководство Android ScrollView и HorizontalScrollView
- Руководство Android WebView
- Руководство Android SeekBar
- Руководство Android Dialog
- Руководство Android AlertDialog
- Руководство Android RatingBar
- Руководство Android ProgressBar
- Руководство Android Spinner
- Руководство Android Button
- Руководство Android Switch
- Руководство Android ImageButton
- Руководство Android FloatingActionButton
- Руководство Android CheckBox
- Руководство Android RadioGroup и RadioButton
- Руководство Android Chip и ChipGroup
- Использование Image assets и Icon assets Android Studio
- Настройка SD Card для Android Emulator
- Пример ChipGroup и Chip Entry
- Как добавить внешние библиотеки в Android Project в Android Studio?
- Как отключить разрешения, уже предоставленные приложению Android?
- Как удалить приложения из Android Emulator?
- Руководство Android LinearLayout
- Руководство Android TableLayout
- Руководство Android FrameLayout
- Руководство Android QuickContactBadge
- Руководство Android StackView
- Руководство Android Camera
- Руководство Android MediaPlayer
- Руководство Android VideoView
- Воспроизведение звуковых эффектов в Android с помощью SoundPool
- Руководство Android Networking
- Руководство Android JSON Parser
- Руководство Android SharedPreferences
- Руководство Android Internal Storage
- Руководство Android External Storage
- Руководство Android Intents
- Пример явного Android Intent, вызов другого Intent
- Пример неявного Android Intent, откройте URL, отправьте email
- Руководство Android Services
- Использовать оповещения в Android - Android Notification
- Руководство Android DatePicker
- Руководство Android TimePicker
- Руководство Android Chronometer
- Руководство Android OptionMenu
- Руководство Android ContextMenu
- Руководство Android PopupMenu
- Руководство Android Fragment
- Руководство Android ListView
- Android ListView с Checkbox с помощью ArrayAdapter
- Руководство Android GridView
Show More
