Пример явного Android Intent, вызов другого Intent
2. Пример с явным Intent
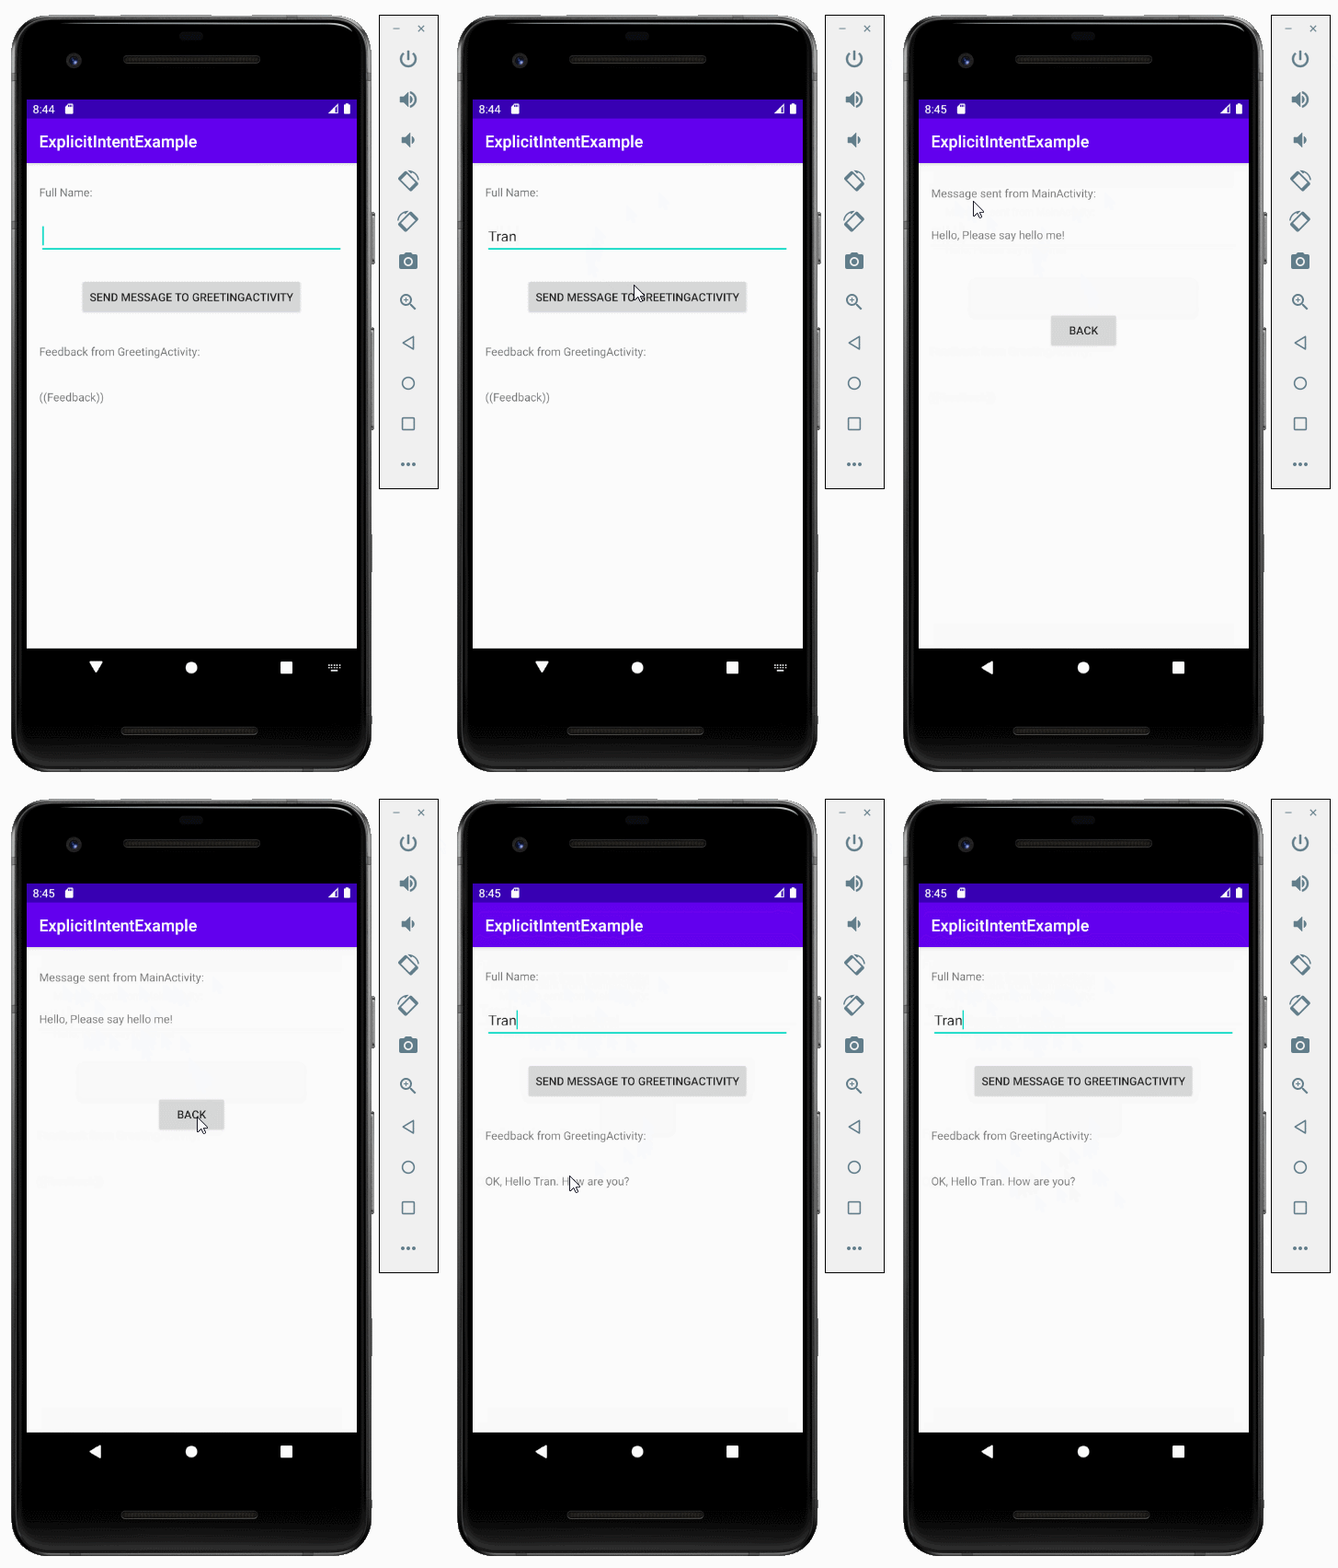
Просмотреть пример:
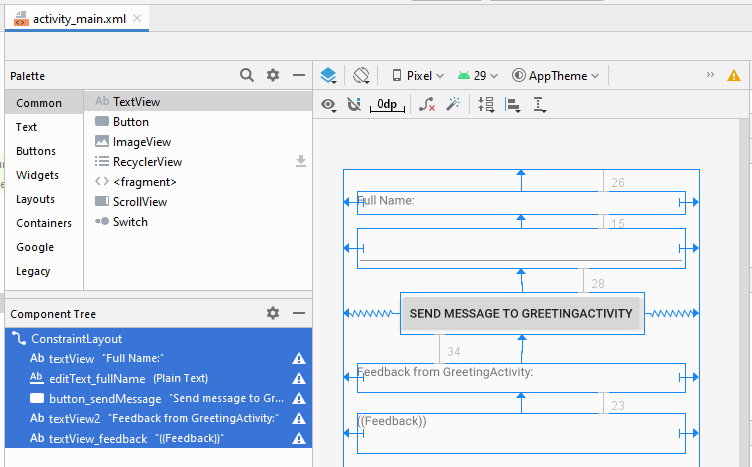
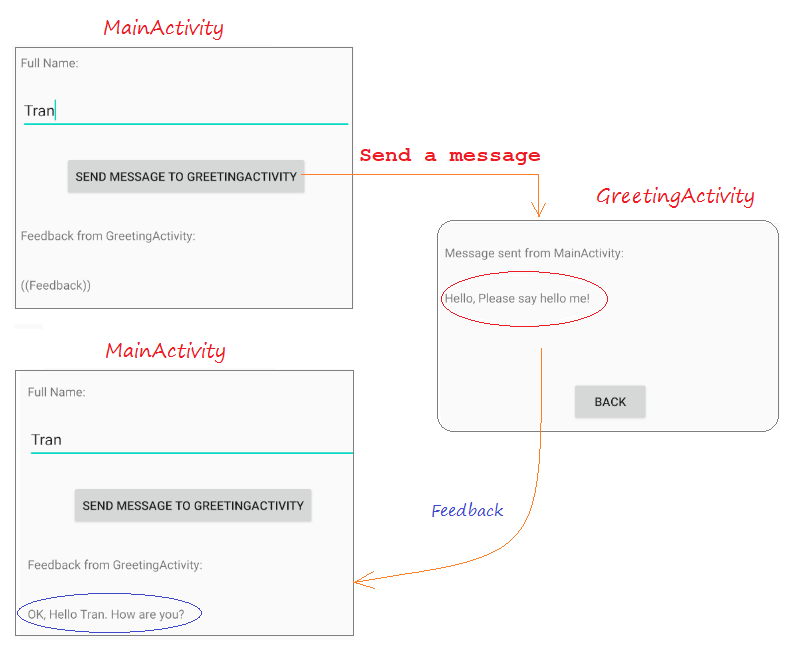
Это модель примера:
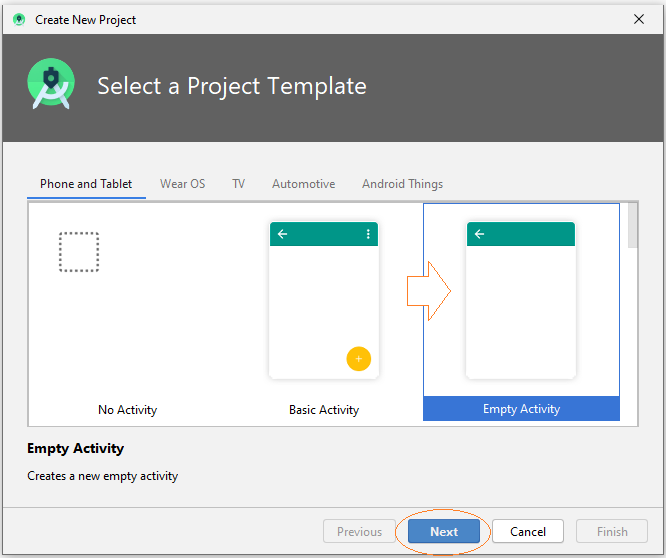
Создать новый "Empty Activity" project с названием ExplicitIntentExample:
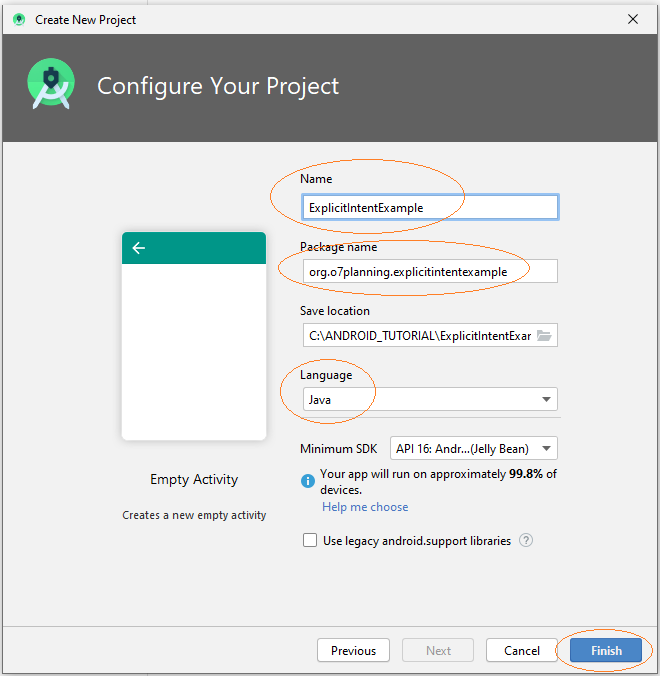
- Name: ExplicitIntentExample
- Package name: org.o7planning.explicitintentexample
- main_activity.xml
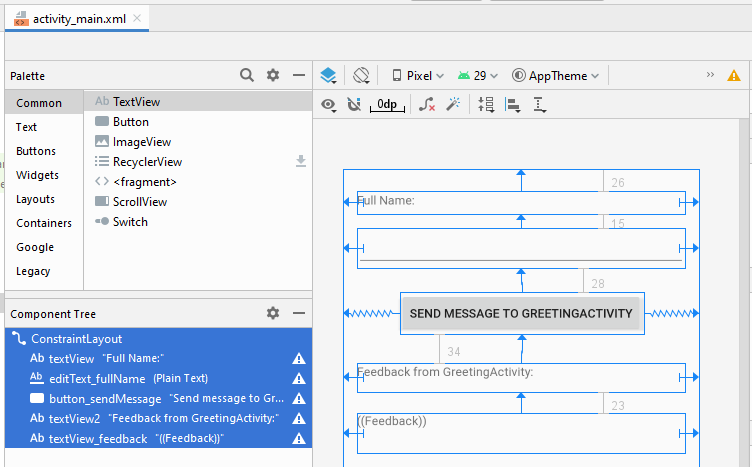
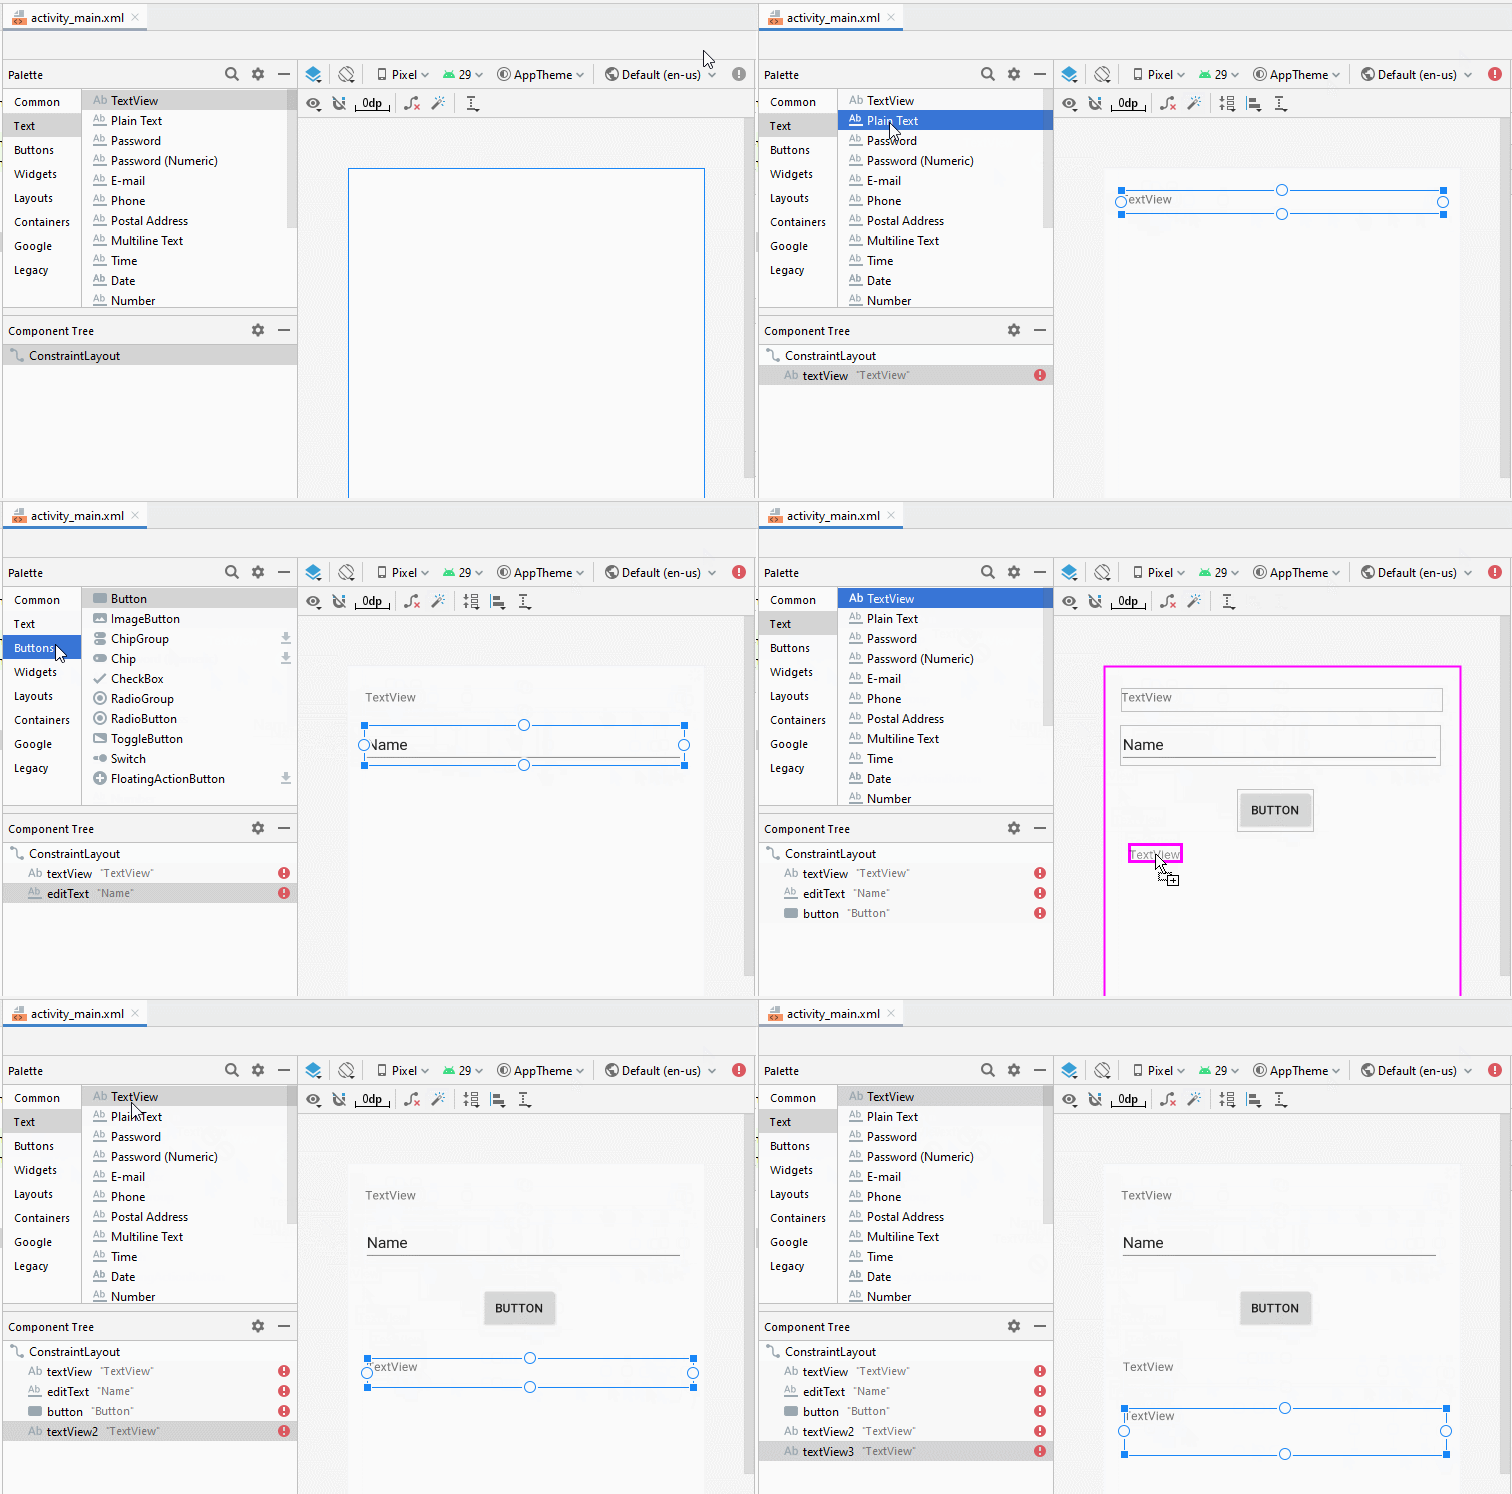
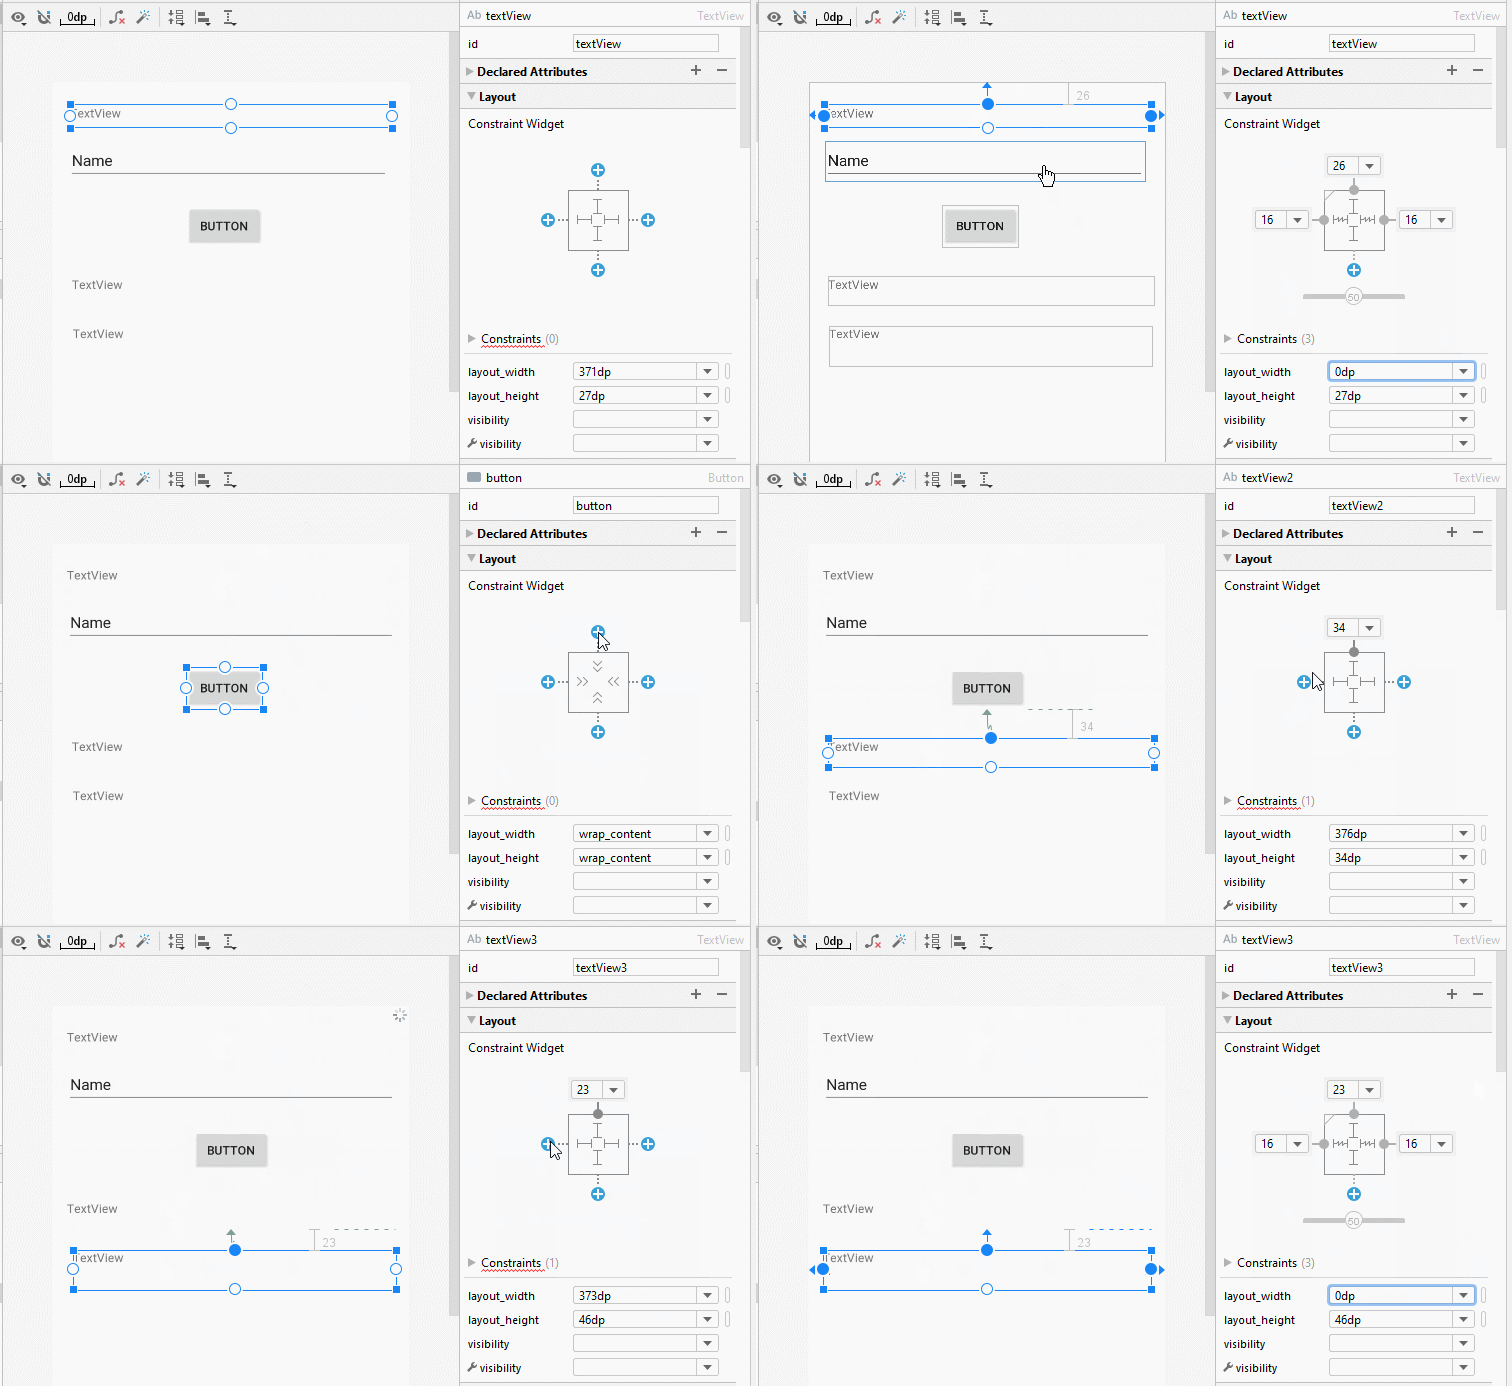
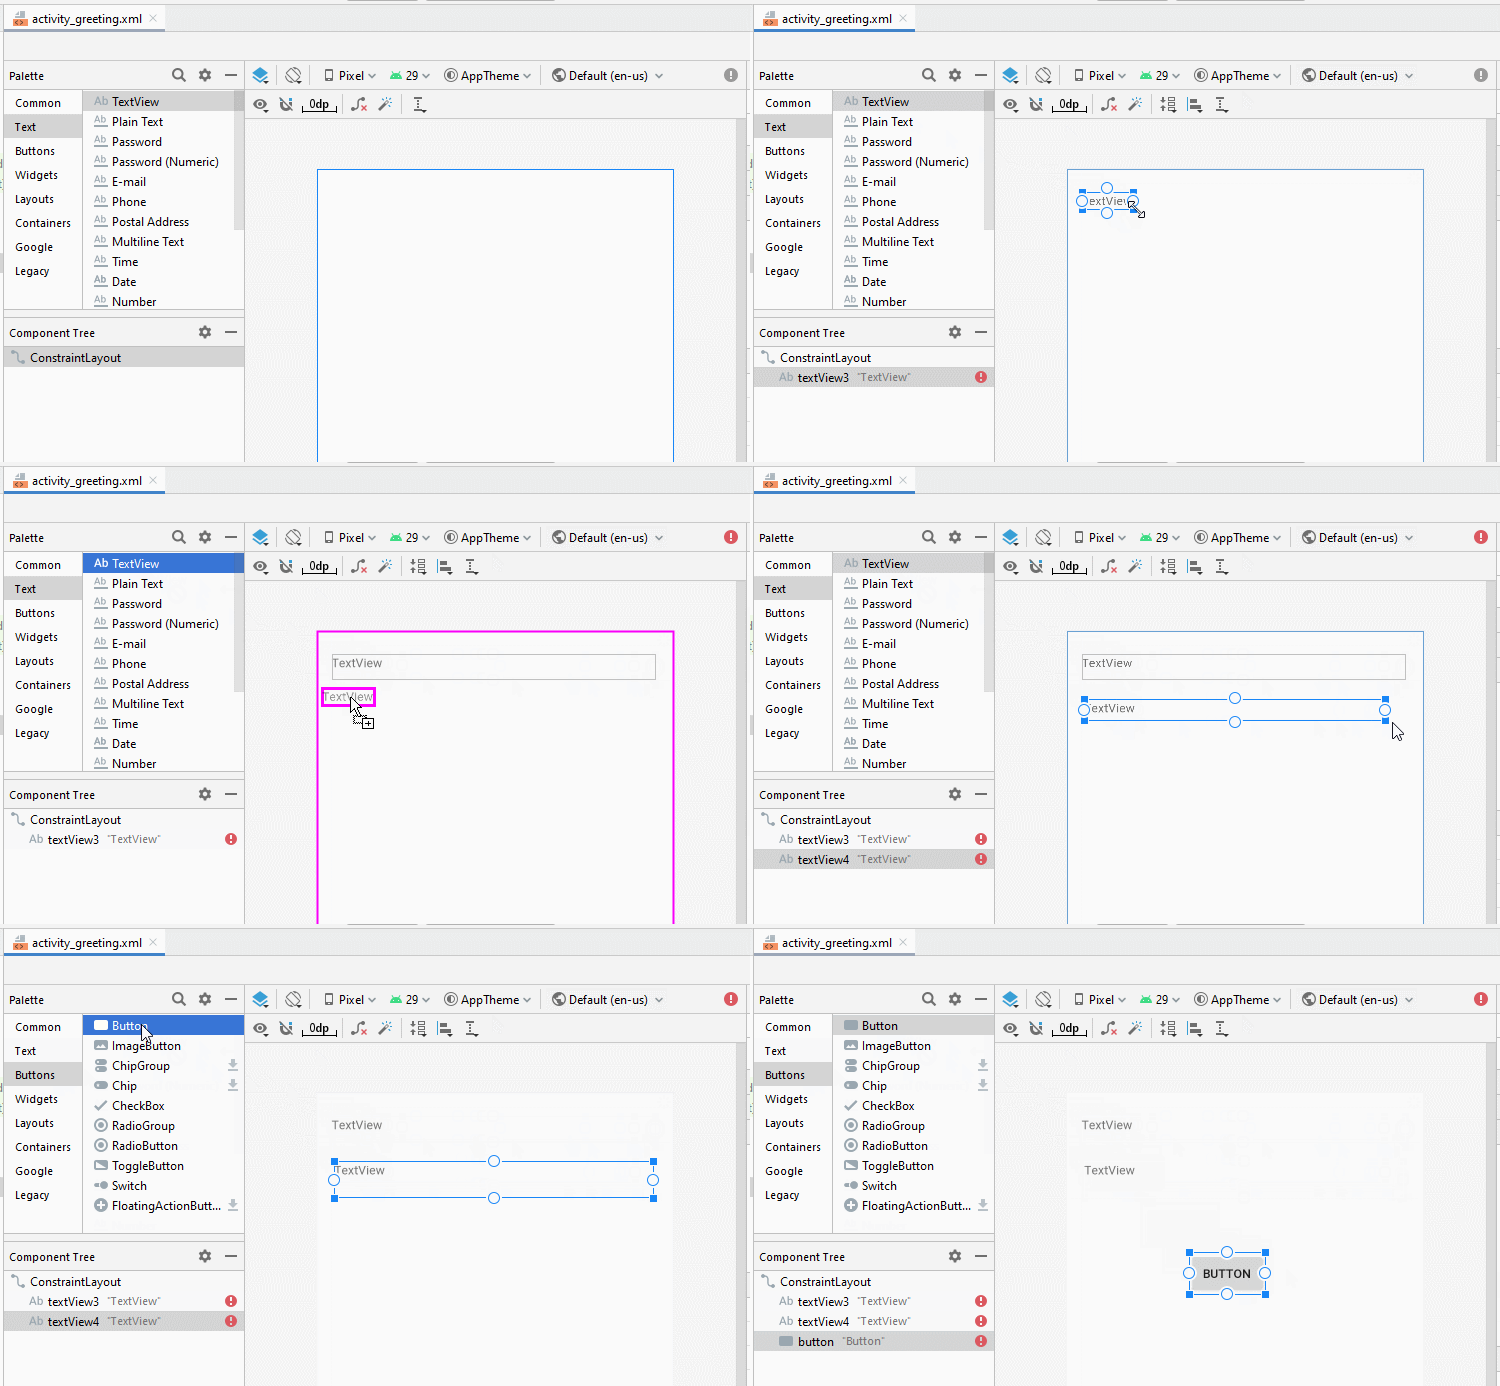
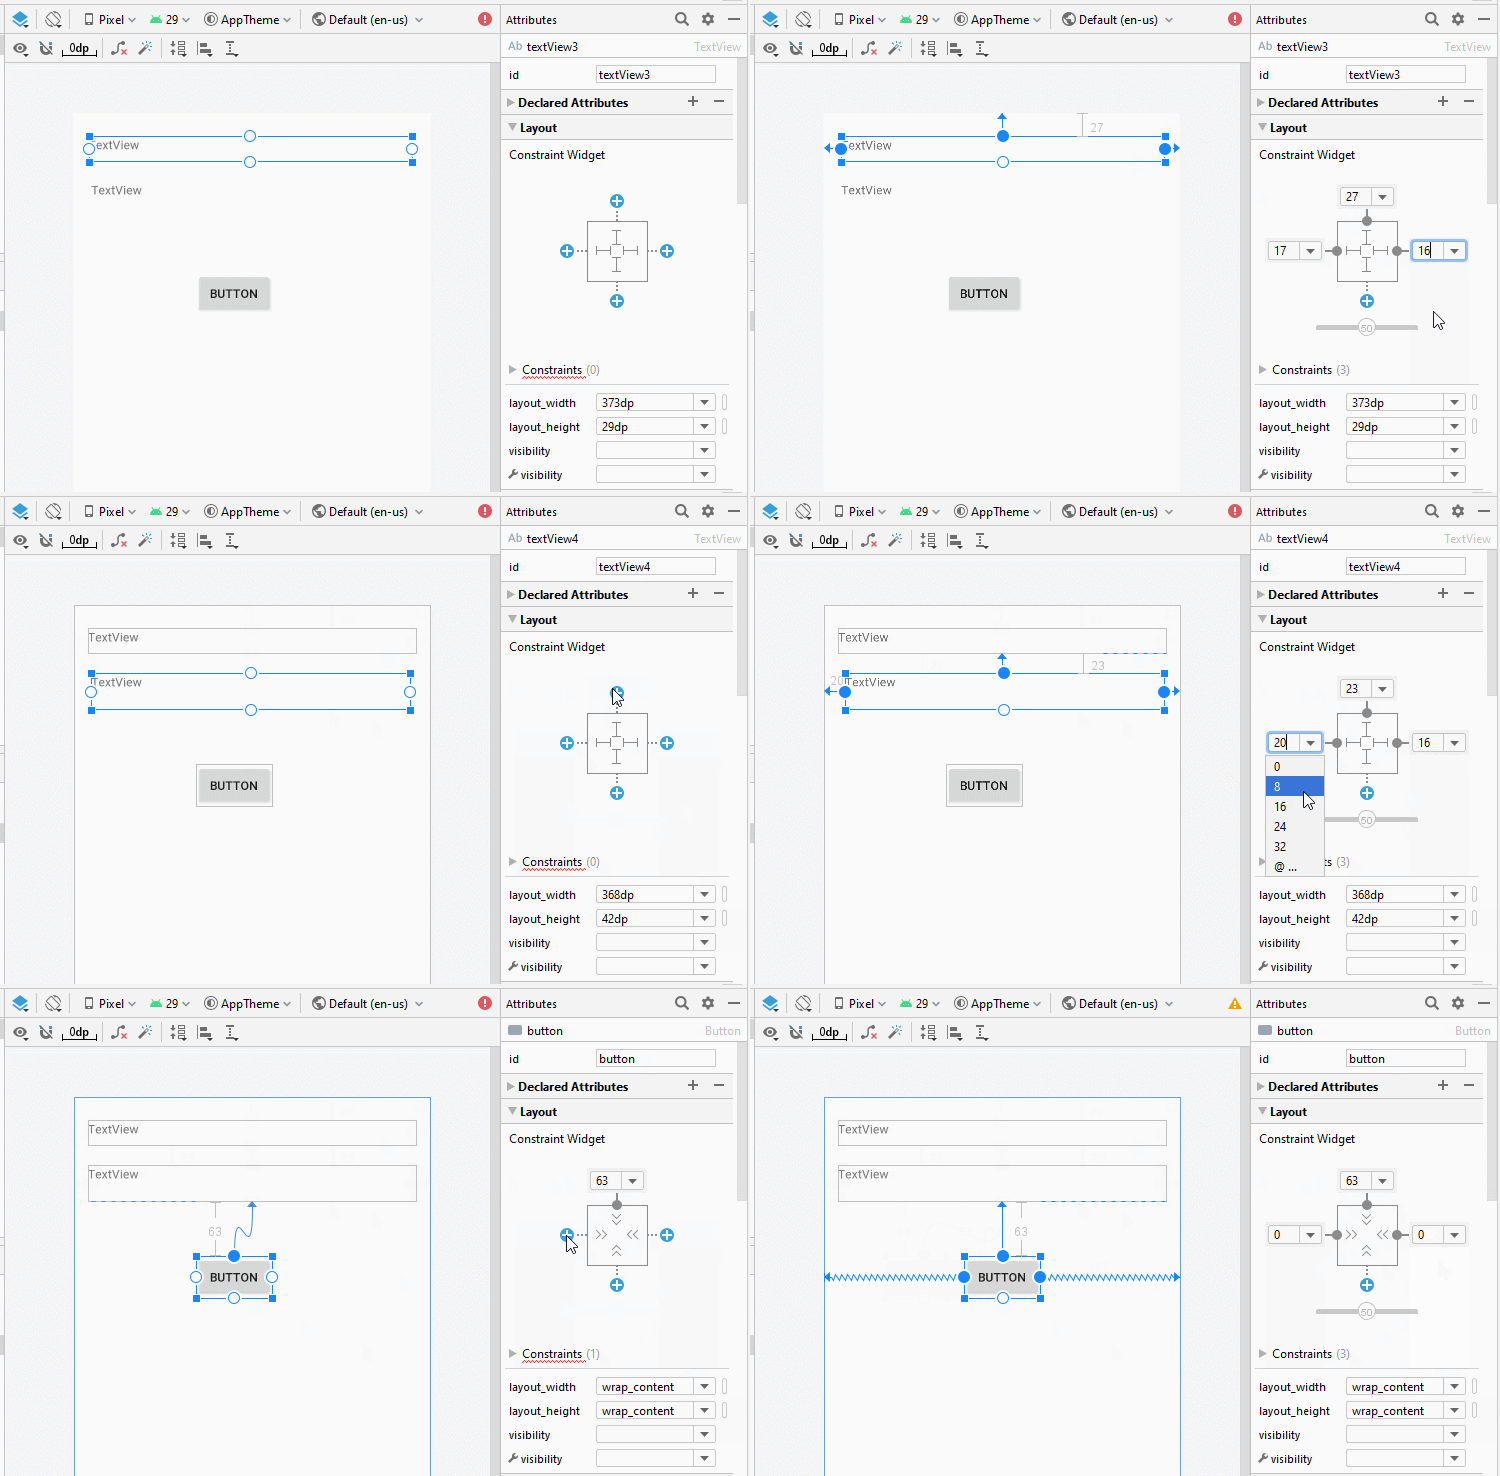
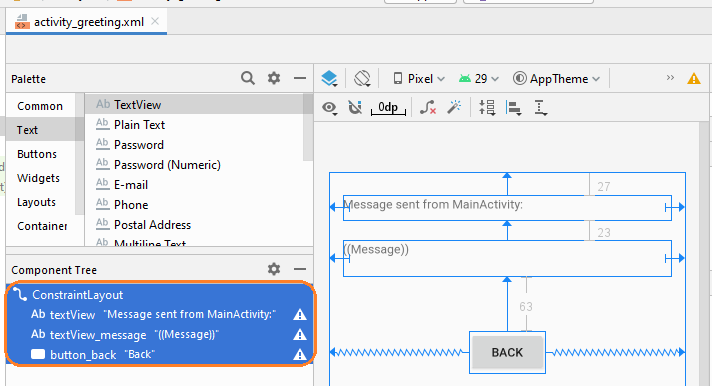
Если вас интересуют шаги дизайна интерфейса данного приложения, смотрите приложение в конце статьи.
activity_main.xml
<?xml version="1.0" encoding="utf-8"?>
<androidx.constraintlayout.widget.ConstraintLayout
    xmlns:android="http://schemas.android.com/apk/res/android"
    xmlns:app="http://schemas.android.com/apk/res-auto"
    xmlns:tools="http://schemas.android.com/tools"
    android:layout_width="match_parent"
    android:layout_height="match_parent"
    tools:context=".MainActivity">

    <TextView
        android:id="@+id/textView"
        android:layout_width="0dp"
        android:layout_height="27dp"
        android:layout_marginStart="16dp"
        android:layout_marginLeft="16dp"
        android:layout_marginTop="26dp"
        android:layout_marginEnd="16dp"
        android:layout_marginRight="16dp"
        android:text="Full Name:"
        app:layout_constraintEnd_toEndOf="parent"
        app:layout_constraintStart_toStartOf="parent"
        app:layout_constraintTop_toTopOf="parent" />

    <EditText
        android:id="@+id/editText_fullName"
        android:layout_width="0dp"
        android:layout_height="46dp"
        android:layout_marginStart="16dp"
        android:layout_marginLeft="16dp"
        android:layout_marginTop="15dp"
        android:layout_marginEnd="16dp"
        android:layout_marginRight="16dp"
        android:ems="10"
        android:inputType="textPersonName"
        app:layout_constraintEnd_toEndOf="parent"
        app:layout_constraintStart_toStartOf="parent"
        app:layout_constraintTop_toBottomOf="@+id/textView" />

    <Button
        android:id="@+id/button_sendMessage"
        android:layout_width="wrap_content"
        android:layout_height="wrap_content"
        android:layout_marginTop="28dp"
        android:text="Send message to GreetingActivity"
        app:layout_constraintEnd_toEndOf="parent"
        app:layout_constraintStart_toStartOf="parent"
        app:layout_constraintTop_toBottomOf="@+id/editText_fullName" />

    <TextView
        android:id="@+id/textView2"
        android:layout_width="0dp"
        android:layout_height="34dp"
        android:layout_marginStart="16dp"
        android:layout_marginLeft="16dp"
        android:layout_marginTop="34dp"
        android:layout_marginEnd="16dp"
        android:layout_marginRight="16dp"
        android:text="Feedback from GreetingActivity:"
        app:layout_constraintEnd_toEndOf="parent"
        app:layout_constraintStart_toStartOf="parent"
        app:layout_constraintTop_toBottomOf="@+id/button_sendMessage" />

    <TextView
        android:id="@+id/textView_feedback"
        android:layout_width="0dp"
        android:layout_height="46dp"
        android:layout_marginStart="16dp"
        android:layout_marginLeft="16dp"
        android:layout_marginTop="23dp"
        android:layout_marginEnd="16dp"
        android:layout_marginRight="16dp"
        android:text="((Feedback))"
        app:layout_constraintEnd_toEndOf="parent"
        app:layout_constraintStart_toStartOf="parent"
        app:layout_constraintTop_toBottomOf="@+id/textView2" />
</androidx.constraintlayout.widget.ConstraintLayout>
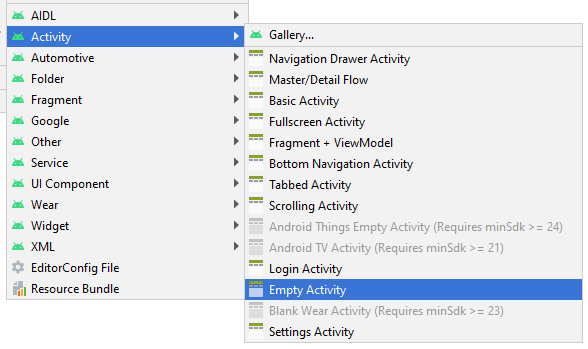
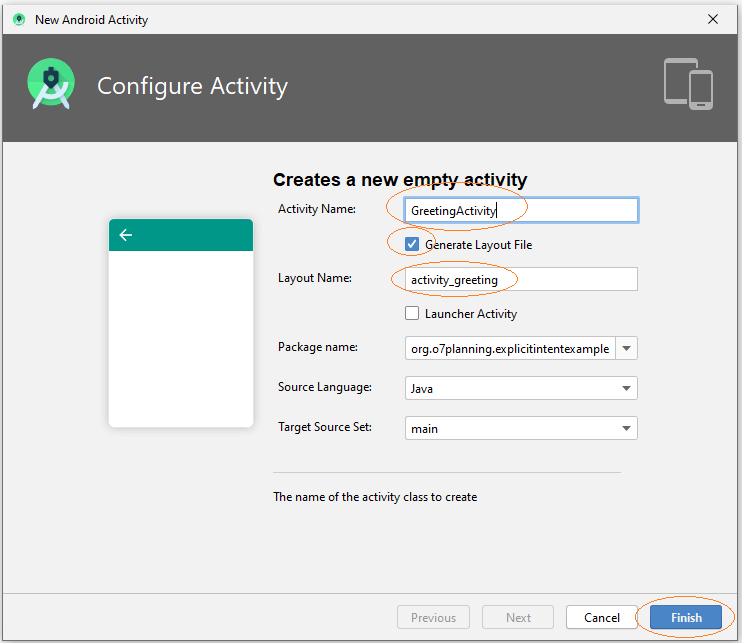
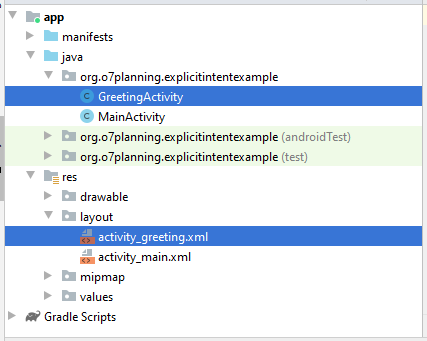
Когда пользователь нажимает на Button, программа вызовет другой Activity чтобы показать приветствие. Вам нужно создать другой Activity с названием GreetingActivity.
- File > New > Activity > Empty Activity
- activity_greeting.xml
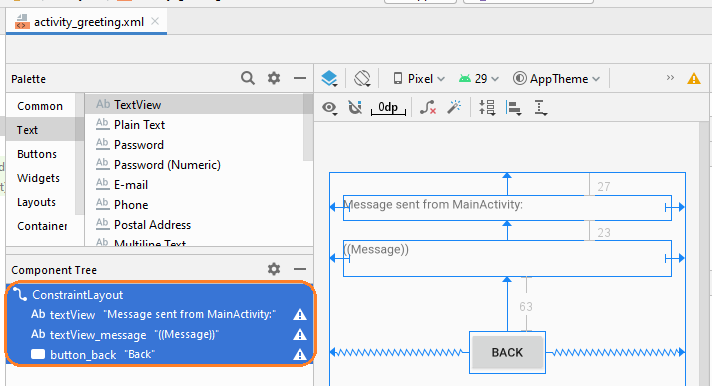
activity_greeting.xml
<?xml version="1.0" encoding="utf-8"?>
<androidx.constraintlayout.widget.ConstraintLayout
    xmlns:android="http://schemas.android.com/apk/res/android"
    xmlns:app="http://schemas.android.com/apk/res-auto"
    xmlns:tools="http://schemas.android.com/tools"
    android:layout_width="match_parent"
    android:layout_height="match_parent"
    tools:context=".GreetingActivity">

    <TextView
        android:id="@+id/textView"
        android:layout_width="0dp"
        android:layout_height="29dp"
        android:layout_marginStart="16dp"
        android:layout_marginLeft="16dp"
        android:layout_marginTop="27dp"
        android:layout_marginEnd="16dp"
        android:layout_marginRight="16dp"
        android:text="Message sent from MainActivity:"
        app:layout_constraintEnd_toEndOf="parent"
        app:layout_constraintStart_toStartOf="parent"
        app:layout_constraintTop_toTopOf="parent" />

    <TextView
        android:id="@+id/textView_message"
        android:layout_width="0dp"
        android:layout_height="42dp"
        android:layout_marginStart="16dp"
        android:layout_marginLeft="16dp"
        android:layout_marginTop="23dp"
        android:layout_marginEnd="16dp"
        android:layout_marginRight="16dp"
        android:text="((Message))"
        app:layout_constraintEnd_toEndOf="parent"
        app:layout_constraintStart_toStartOf="parent"
        app:layout_constraintTop_toBottomOf="@+id/textView" />

    <Button
        android:id="@+id/button_back"
        android:layout_width="wrap_content"
        android:layout_height="wrap_content"
        android:layout_marginTop="63dp"
        android:text="Back"
        app:layout_constraintEnd_toEndOf="parent"
        app:layout_constraintStart_toStartOf="parent"
        app:layout_constraintTop_toBottomOf="@+id/textView_message" />
</androidx.constraintlayout.widget.ConstraintLayout>
MainActivity.java
package org.o7planning.explicitintentexample;

import androidx.appcompat.app.AppCompatActivity;

import android.os.Bundle;
import android.app.Activity;
import android.content.Intent;
import android.view.View;
import android.widget.Button;
import android.widget.EditText;
import android.widget.TextView;

public class MainActivity extends AppCompatActivity {

    private EditText editTextFullName;
    private TextView textFeedback;

    private Button buttonSendMessage;

    public static final int MY_REQUEST_CODE = 100;

    @Override
    protected void onCreate(Bundle savedInstanceState) {
        super.onCreate(savedInstanceState);
        setContentView(R.layout.activity_main);

        this.editTextFullName = (EditText)this.findViewById(R.id.editText_fullName);
        this.textFeedback = (TextView)this.findViewById(R.id.textView_feedback);

        this.buttonSendMessage = (Button)this.findViewById(R.id.button_sendMessage);

        this.buttonSendMessage.setOnClickListener(new View.OnClickListener() {
            @Override
            public void onClick(View v) {
                sendMessage();
            }
        });
    }

    // When 'Greeting Activity' completed, it sends back a feedback.
    // (If you have started it by startActivityForResult())
    @Override
    protected void onActivityResult(int requestCode, int resultCode, Intent data) {
        super.onActivityResult(requestCode, resultCode, data);

        if (resultCode == Activity.RESULT_OK && requestCode == MY_REQUEST_CODE) {
            String feedback = data.getStringExtra("feedback");
            this.textFeedback.setText(feedback);
        } else {
            this.textFeedback.setText("!?");
        }
    }

    // The method is called when the user clicks on "Send Message to GreetingActivity" button.
    public void sendMessage( )  {
        String fullName= this.editTextFullName.getText().toString();
        String message = "Hello, Please say hello me!";

        Intent intent = new Intent(this,GreetingActivity.class);
        intent.putExtra("fullName", fullName);
        intent.putExtra("message", message);

        // Start Activity and no need feedback.
        // this.startActivity(intent);

        // Start Activity and get feedback.
        this.startActivityForResult(intent, MY_REQUEST_CODE);
    }

}
GreetingActivity.java
package org.o7planning.explicitintentexample;

import androidx.appcompat.app.AppCompatActivity;

import android.os.Bundle;
import android.app.Activity;
import android.content.Intent;
import android.view.View;
import android.widget.Button;
import android.widget.TextView;

public class GreetingActivity extends AppCompatActivity {

    private TextView textViewMessage;
    private Button buttonBack;

    private String fullName;
    private String message;

    @Override
    protected void onCreate(Bundle savedInstanceState) {
        super.onCreate(savedInstanceState);
        setContentView(R.layout.activity_greeting);

        this.textViewMessage =(TextView) this.findViewById(R.id.textView_message);
        this.buttonBack = (Button) this.findViewById(R.id.button_back);

        this.buttonBack.setOnClickListener(new View.OnClickListener() {
            @Override
            public void onClick(View v) {
                goBack();
            }
        });

        // Intent is passed into
        Intent intent = this.getIntent();

        this.fullName = intent.getStringExtra("fullName");
        this.message = intent.getStringExtra("message");

        this.textViewMessage.setText(this.message );
    }

    // When completed this Activity, send feedback to the caller.
    @Override
    public void finish() {
        // Prepare data intent
        Intent data = new Intent();
        String feedback = "OK, Hello " + this.fullName + ". How are you?";
        data.putExtra("feedback", feedback);

        // Activity finished ok, return the data
        this.setResult(Activity.RESULT_OK, data);
        super.finish();
    }


    // The method is called when the user clicks the "Back" button.
    public void goBack()  {
        // Calling onBackPressed() method to back to the previous Activity.
        this.onBackPressed();
    }


}
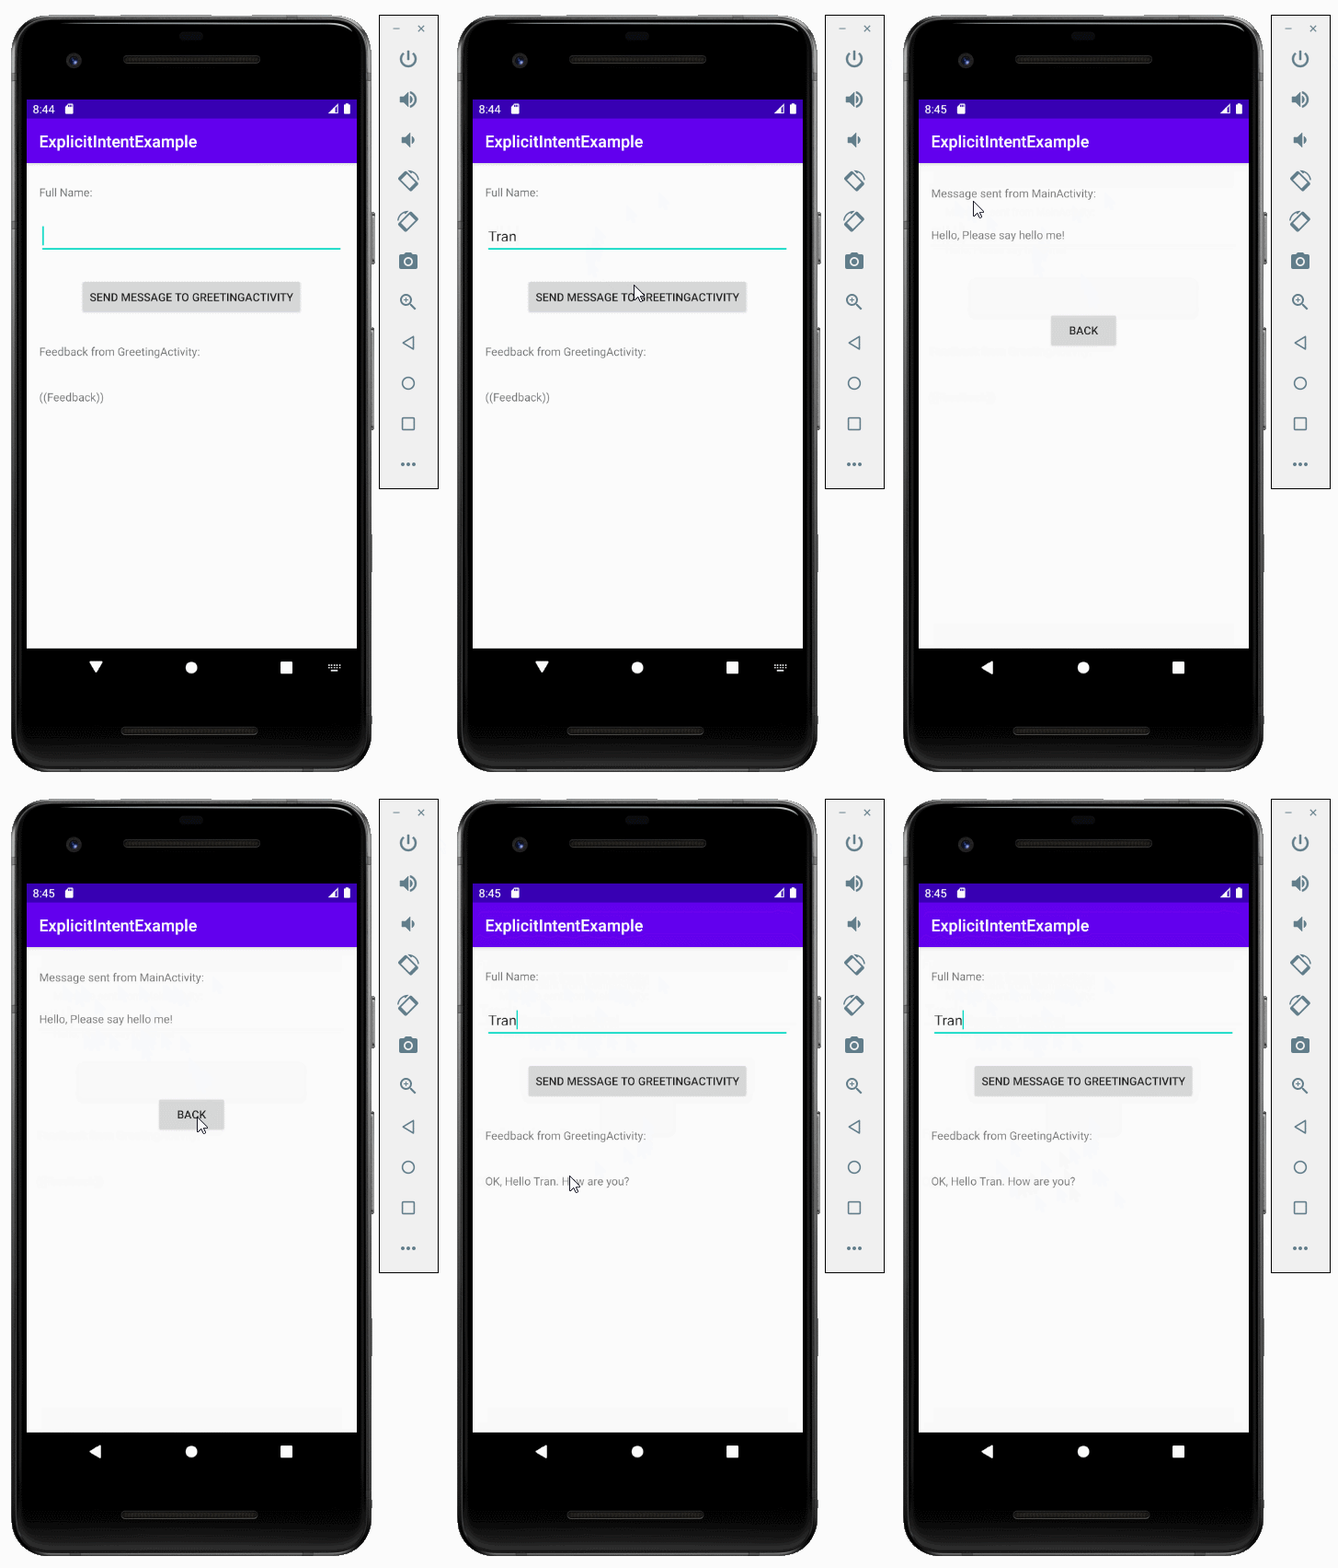
Запус приложения:
Pуководства Android
- Настроить Android Emulator в Android Studio
- Руководство Android ToggleButton
- Создать простой File Finder Dialog в Android
- Руководство Android TimePickerDialog
- Руководство Android DatePickerDialog
- Что мне нужно для начала работы с Android?
- Установите Android Studio в Windows
- Установите Intel® HAXM для Android Studio
- Руководство Android AsyncTask
- Руководство Android AsyncTaskLoader
- Руководство Android для начинающих - основные примеры
- Как узнать номер телефона Android Emulator и изменить его?
- Руководство Android TextInputLayout
- Руководство Android CardView
- Руководство Android ViewPager2
- Получить номер телефона в Android с помощью TelephonyManager
- Руководство Android Phone Call
- Руководство Android Wifi Scanning
- Руководство Android 2D Game для начинающих
- Руководство Android DialogFragment
- Руководство Android CharacterPickerDialog
- Руководство Android для начинающих - Hello Android
- Использование Android Device File Explorer
- Включить USB Debugging на устройстве Android
- Руководство Android UI Layouts
- Руководство Android SMS
- Руководство Android SQLite Database
- Руководство Google Maps Android API
- Руководство Текст в речь на Android
- Руководство Android Space
- Руководство Android Toast
- Создание пользовательских Android Toast
- Руководство Android SnackBar
- Руководство Android TextView
- Руководство Android TextClock
- Руководство Android EditText
- Руководство Android TextWatcher
- Форматирование номера кредитной карты с помощью Android TextWatcher
- Руководство Android Clipboard
- Создать простой File Chooser в Android
- Руководство Android AutoCompleteTextView и MultiAutoCompleteTextView
- Руководство Android ImageView
- Руководство Android ImageSwitcher
- Руководство Android ScrollView и HorizontalScrollView
- Руководство Android WebView
- Руководство Android SeekBar
- Руководство Android Dialog
- Руководство Android AlertDialog
- Руководство Android RatingBar
- Руководство Android ProgressBar
- Руководство Android Spinner
- Руководство Android Button
- Руководство Android Switch
- Руководство Android ImageButton
- Руководство Android FloatingActionButton
- Руководство Android CheckBox
- Руководство Android RadioGroup и RadioButton
- Руководство Android Chip и ChipGroup
- Использование Image assets и Icon assets Android Studio
- Настройка SD Card для Android Emulator
- Пример ChipGroup и Chip Entry
- Как добавить внешние библиотеки в Android Project в Android Studio?
- Как отключить разрешения, уже предоставленные приложению Android?
- Как удалить приложения из Android Emulator?
- Руководство Android LinearLayout
- Руководство Android TableLayout
- Руководство Android FrameLayout
- Руководство Android QuickContactBadge
- Руководство Android StackView
- Руководство Android Camera
- Руководство Android MediaPlayer
- Руководство Android VideoView
- Воспроизведение звуковых эффектов в Android с помощью SoundPool
- Руководство Android Networking
- Руководство Android JSON Parser
- Руководство Android SharedPreferences
- Руководство Android Internal Storage
- Руководство Android External Storage
- Руководство Android Intents
- Пример явного Android Intent, вызов другого Intent
- Пример неявного Android Intent, откройте URL, отправьте email
- Руководство Android Services
- Использовать оповещения в Android - Android Notification
- Руководство Android DatePicker
- Руководство Android TimePicker
- Руководство Android Chronometer
- Руководство Android OptionMenu
- Руководство Android ContextMenu
- Руководство Android PopupMenu
- Руководство Android Fragment
- Руководство Android ListView
- Android ListView с Checkbox с помощью ArrayAdapter
- Руководство Android GridView
Show More
