Руководство Android ListView
1. Что такое ListView?
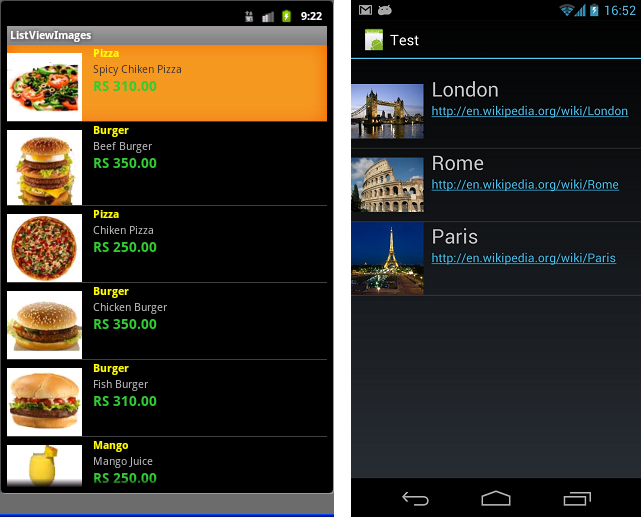
ListView это view group, отображающий элементы (elements) в виде списка, который можно прокручивать вертикально. ListView это важный view, который широко распространен в использовании для приложений Android. Простой пример ListView это ваша контактная книга, там где у вас есть список ваших контактов отображенных в одном ListView.
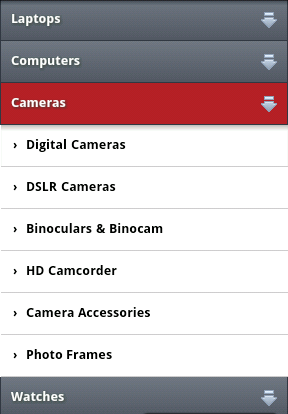
Помимо ListView, Android так же предоставляет вам другой индентичный view это ExpandableListView.
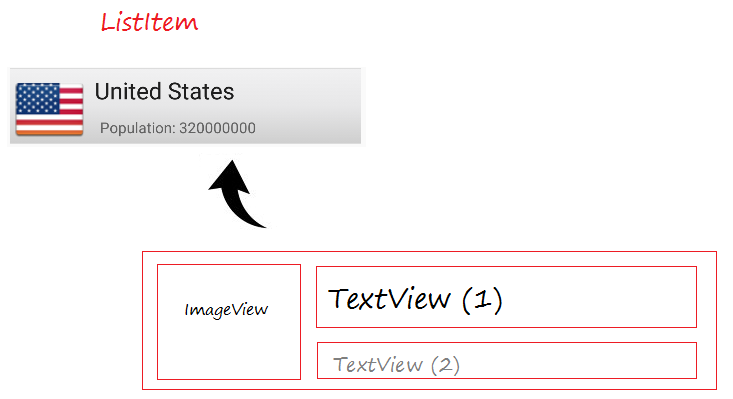
ListItem
ListView создан из списка ListItem. ListItem это отдельная строка (row) в listview там где отображаются данные. Любые данные в listview только отображаются через listItem. Можно считать listview прокручиваемой группой ListItem.
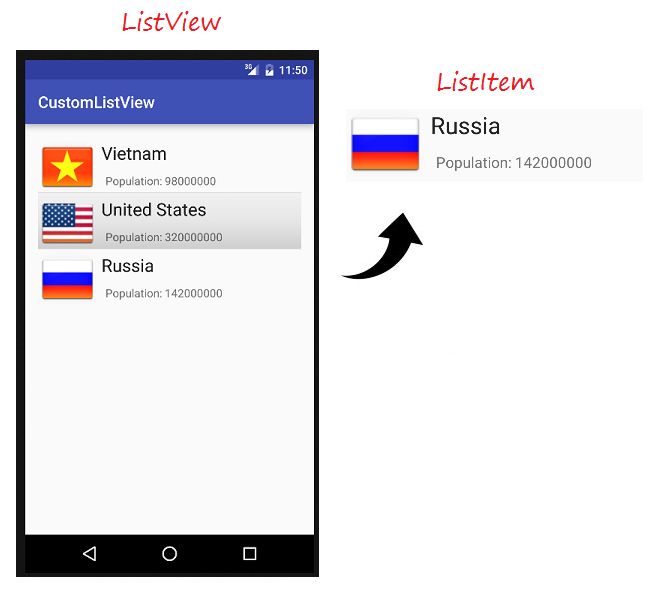
ListItem это часть интерфейса, который может быть создан с помощью View.
Android строит разные готорвые формы ListItem, называются предопределенные Layout, будут упомянуты мною в примерах данной статьи.
Adapter (Адаптор)
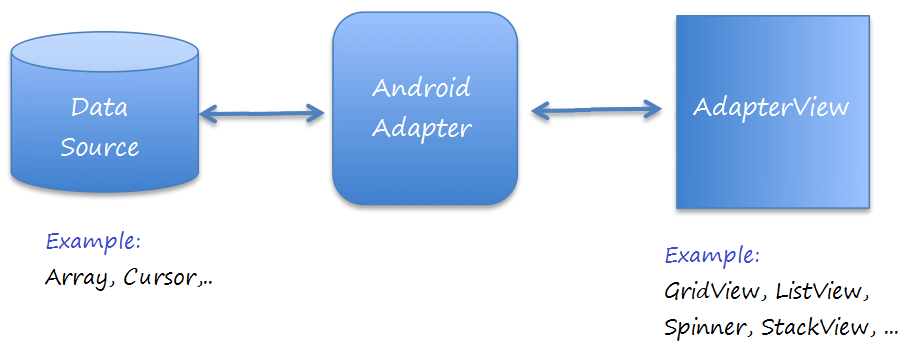
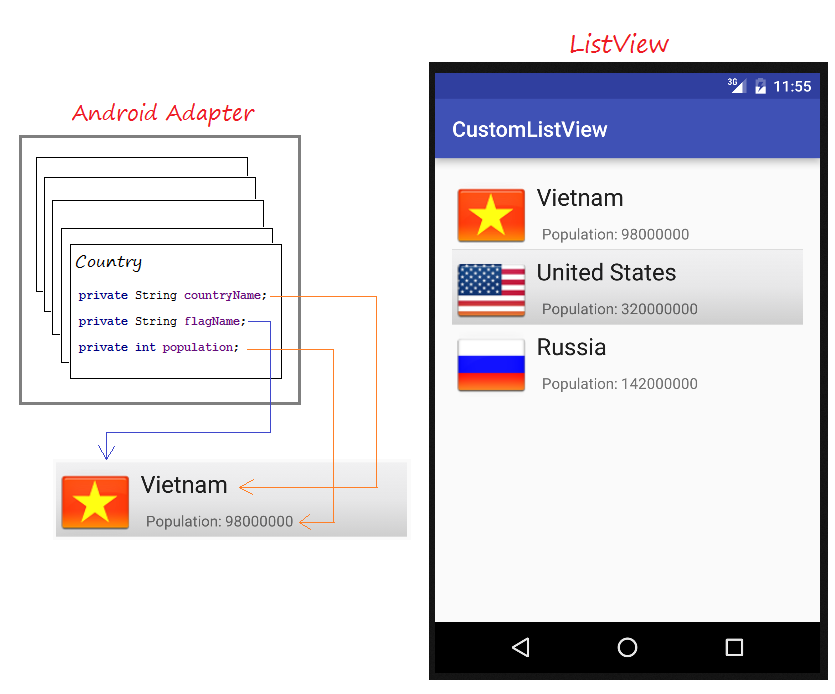
Android Adapter это соединяющий мост между View (например ListView) и основные данные того View. Adapter управляет данными и соединяет с отдельные строки (ListItem) в view.
Вы можете прикрепить Adapter с Android ListView через метод setAdapter. Теперь, посмотрим как работает Adapter с помощью изображений ниже.
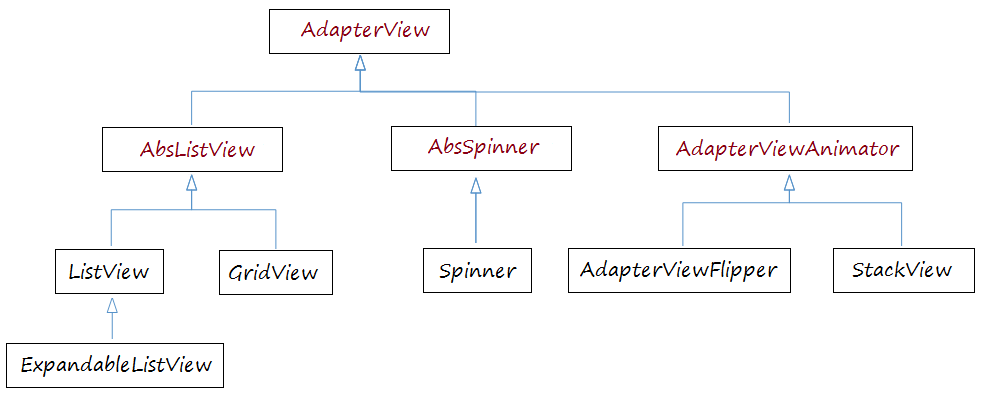
AdapterView
Многим View нужен Android Adapter для управления отображенных данных, эти View являются подклассами AdapterView, вы можете посмотреть в изображении ниже:
Android Adapter
ListView Selector
Чтобы ListView отображался красивее, вам нужно кастомизировать эффекты, например при изменении цвета ListItem когда курсор перемещается на нем или когда меняется цвет фона когда выбран ListItem. Вы можете посмотреть пример кастомизации ListView Selector в конце данной статьи.
2. Основной ListView использует ArrayAdapter
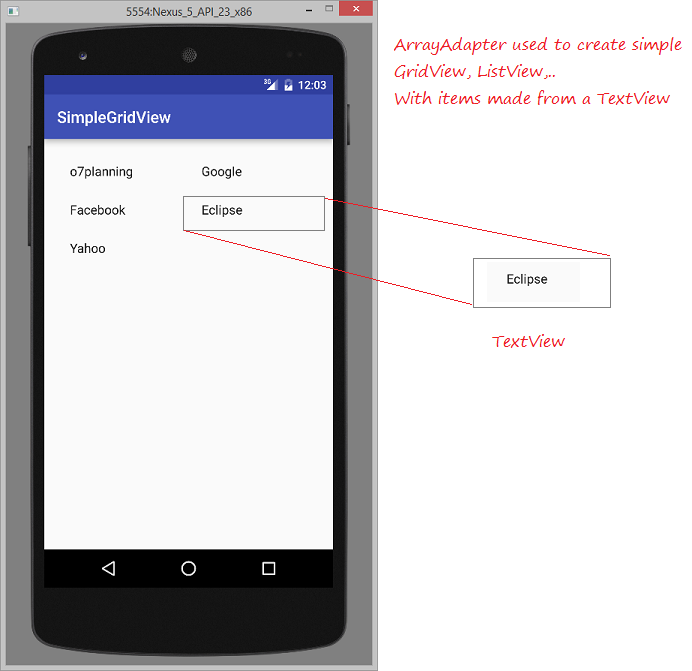
ArrayAdapter
ArrayAdapter используется для отображения ListView с простыми ListItem, ListItem можно создать из только одного TextView, CheckedTextView, EditText,...
В случае если вы хотите иметь ListView с более сложным ListItem, вы можете сами создать кастомизированный Adapter.
В случае если вы хотите иметь ListView с более сложным ListItem, вы можете сами создать кастомизированный Adapter.
Пример ListView с ArrayAdapter
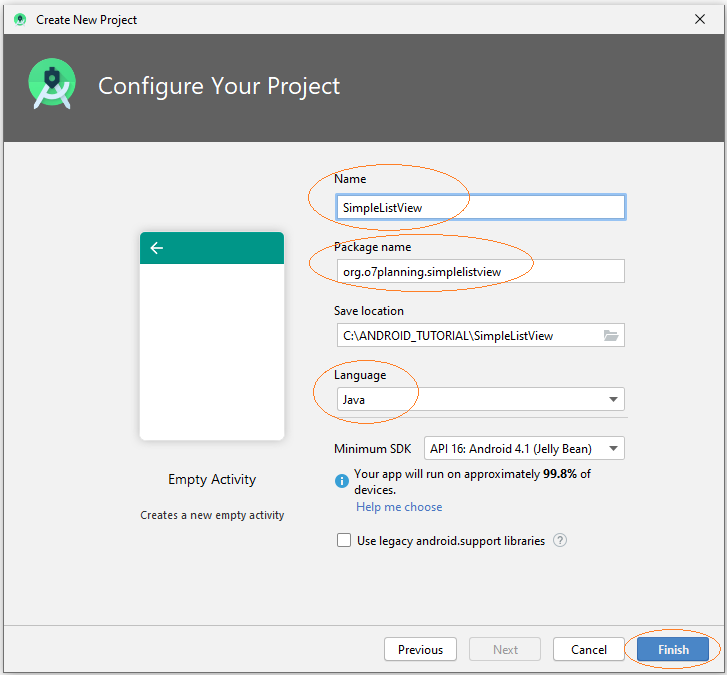
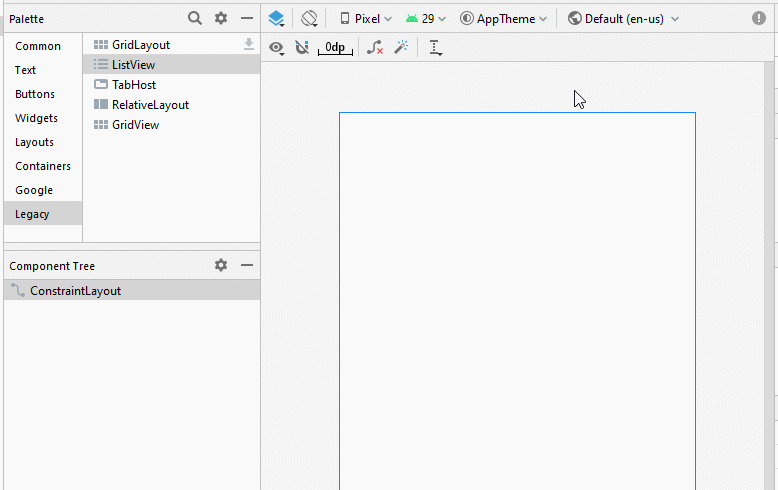
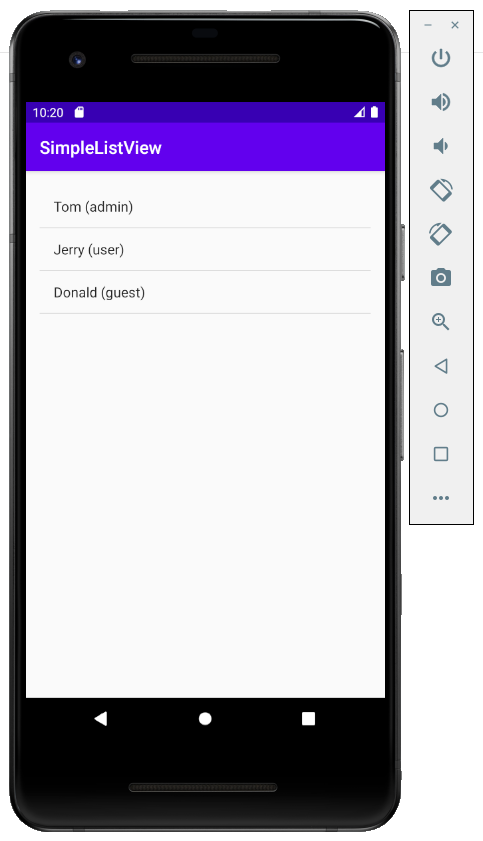
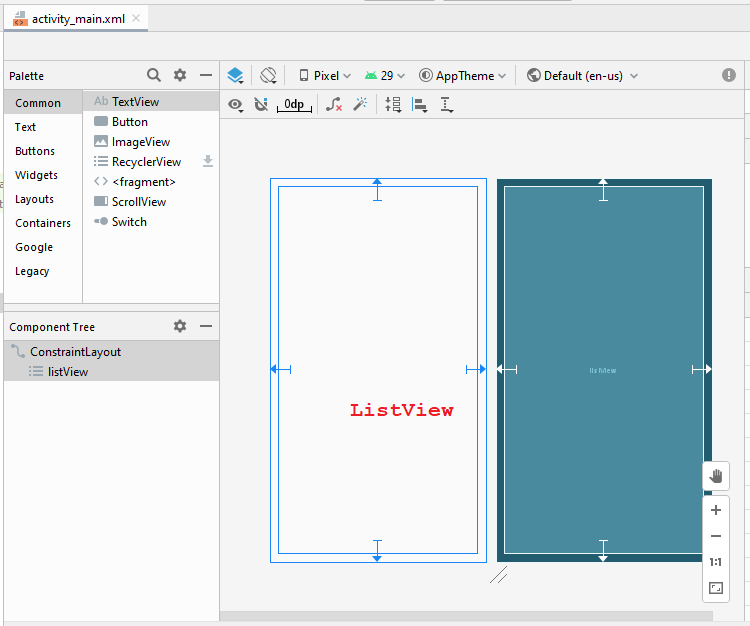
Создать новый Project с названием SimpleListView.

Интерфейс приложения:
activity_main.xml
<?xml version="1.0" encoding="utf-8"?>
<androidx.constraintlayout.widget.ConstraintLayout
    xmlns:android="http://schemas.android.com/apk/res/android"
    xmlns:app="http://schemas.android.com/apk/res-auto"
    xmlns:tools="http://schemas.android.com/tools"
    android:layout_width="match_parent"
    android:layout_height="match_parent"
    tools:context=".MainActivity">

    <ListView
        android:id="@+id/listView"
        android:layout_width="0dp"
        android:layout_height="0dp"
        android:layout_marginStart="16dp"
        android:layout_marginLeft="16dp"
        android:layout_marginTop="16dp"
        android:layout_marginEnd="16dp"
        android:layout_marginRight="16dp"
        android:layout_marginBottom="16dp"
        app:layout_constraintBottom_toBottomOf="parent"
        app:layout_constraintEnd_toEndOf="parent"
        app:layout_constraintStart_toStartOf="parent"
        app:layout_constraintTop_toTopOf="parent" />
</androidx.constraintlayout.widget.ConstraintLayout>
UserAccount.java
package org.o7planning.simplelistview;

import java.io.Serializable;

public class UserAccount implements Serializable {

    private String userName;
    private String userType;

    private boolean active;

    public UserAccount(String userName, String userType)  {
        this.userName= userName;
        this.userType = userType;
        this.active= true;
    }

    public UserAccount(String userName, String userType, boolean active)  {
        this.userName= userName;
        this.userType = userType;
        this.active= active;
    }

    public String getUserType() {
        return userType;
    }

    public void setUserType(String userType) {
        this.userType = userType;
    }

    public String getUserName() {
        return userName;
    }

    public void setUserName(String userName) {
        this.userName = userName;
    }

    public boolean isActive() {
        return active;
    }

    public void setActive(boolean active) {
        this.active = active;
    }

    @Override
    public String toString() {
        return this.userName +" ("+ this.userType+")";
    }

}
MainActivity.java
package org.o7planning.simplelistview;

import androidx.appcompat.app.AppCompatActivity;

import android.os.Bundle;
import android.widget.ArrayAdapter;
import android.widget.ListView;

public class MainActivity extends AppCompatActivity {

    @Override
    protected void onCreate(Bundle savedInstanceState) {
        super.onCreate(savedInstanceState);
        setContentView(R.layout.activity_main);

        ListView listView = (ListView)findViewById(R.id.listView);

        //

        UserAccount tom = new UserAccount("Tom","admin");
        UserAccount jerry = new UserAccount("Jerry","user");
        UserAccount donald = new UserAccount("Donald","guest", false);

        UserAccount[] users = new UserAccount[]{tom,jerry, donald};


        // android.R.layout.simple_list_item_1 is a constant predefined layout of Android.
        // used to create a ListView with simple ListItem (Only one TextView).

        ArrayAdapter<UserAccount> arrayAdapter
                = new ArrayAdapter<UserAccount>(this, android.R.layout.simple_list_item_1 , users);

        listView.setAdapter(arrayAdapter);
    }


}
Запуск примера:
Готовые Layout для работы с ArrayAdapter
Android построил некоторые готовые Layout (для ListItem) чтобы работать с ArrayAdapter.
android.R.layout.simple_list_item_1
- Это простой Layout в ListItem, созданный лишь одним TextView (Можете посмотреть пример выше).
android.R.layout.simple_list_item_checked & android.R.layout.simple_list_item_multiple_choice
- 2 Layout выше это простые layout для создания ListView с ListItem с одним checkbox.
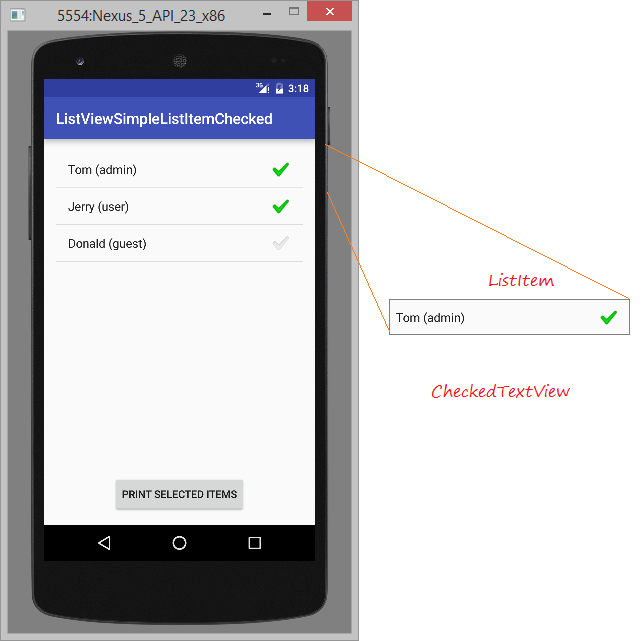
Можете посмотреть пример по ссылке:
3. Кастомизировать ListView используя BaseAdapter
Вы можете кастомизировать ListViewer. Вашему Adapter стоит расширить из класса BaseAdapter.
Пример кастомизированного ListView
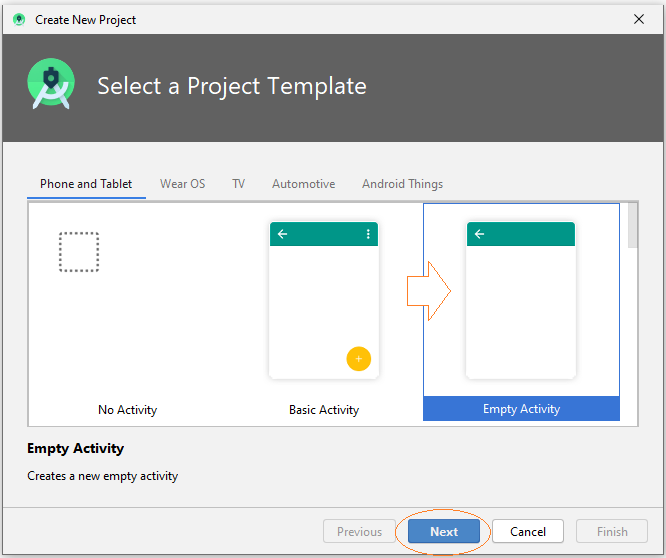
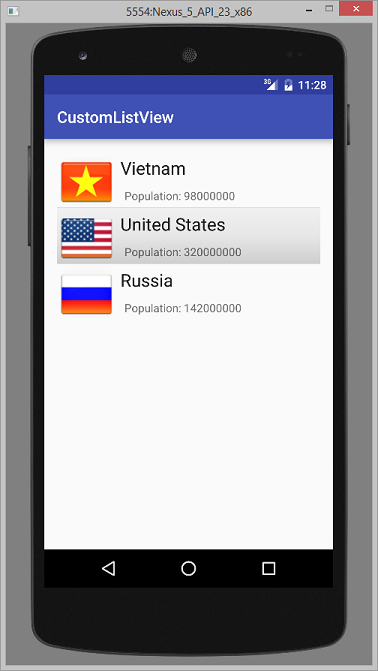
Создать новый "Empty Activity" project с названием CustomListView.

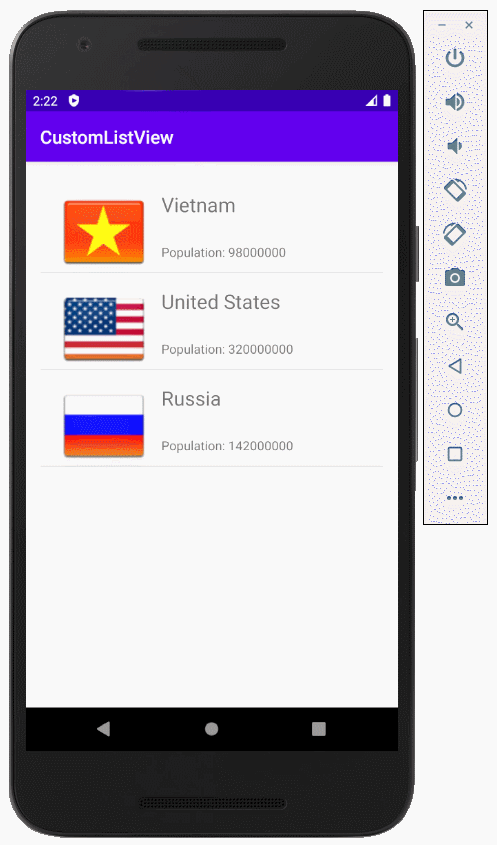
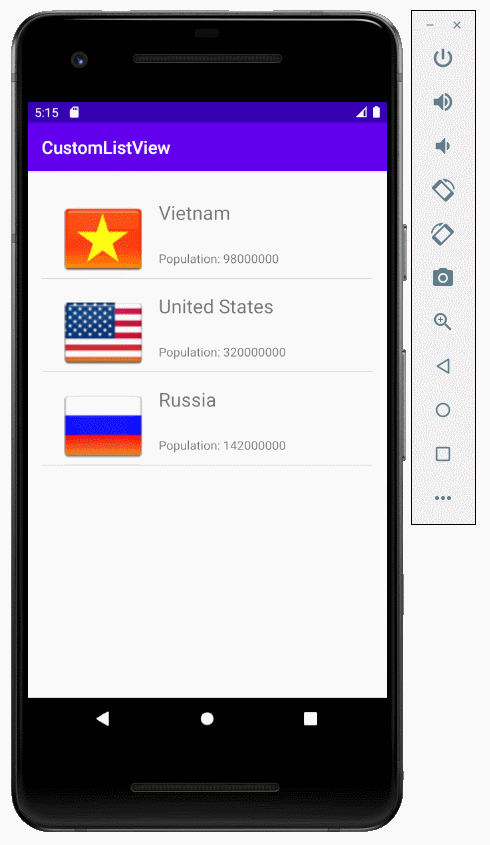
Это изображение приложения:
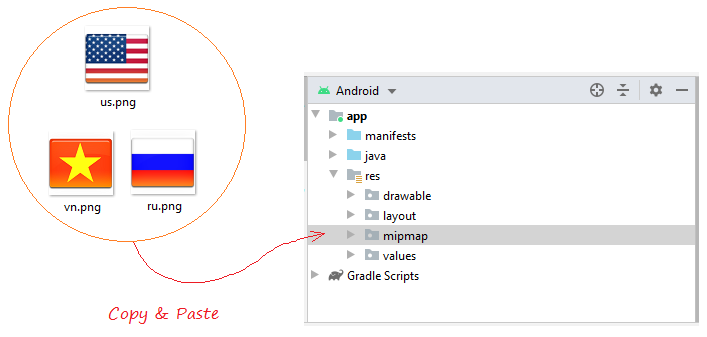
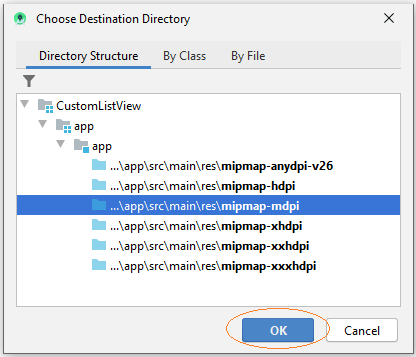
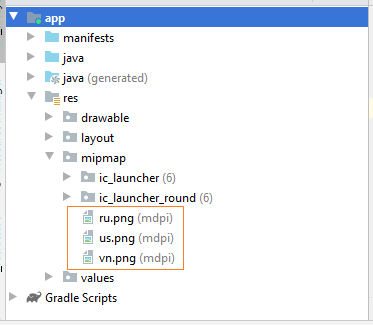
Для начала вам нужно приготовить несколько файлов изображения:
Копировать и вставить эти файлы изображения в папку mipmap:
 |  |  |
vn.png | us.png | ru.png |
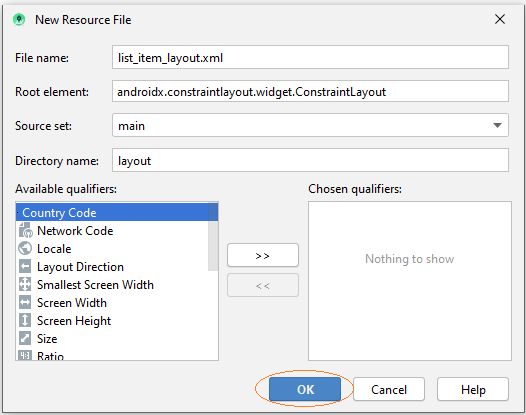
Вам нужно создать List item layouts. На Android Studio нажмите на правую кнопку мыши на res/layout выберите:
- New/Layout resource file
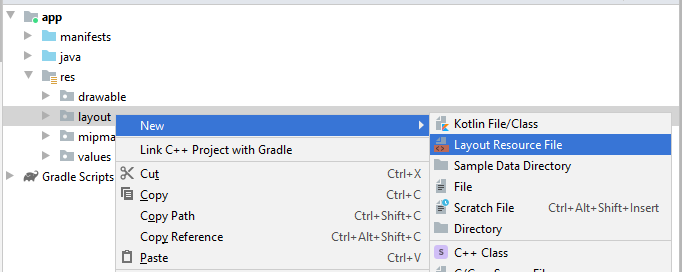
Ввести:
- File name: list_item_layout.xml
- Root element: androidx.constraintlayout.widget.ConstraintLayout
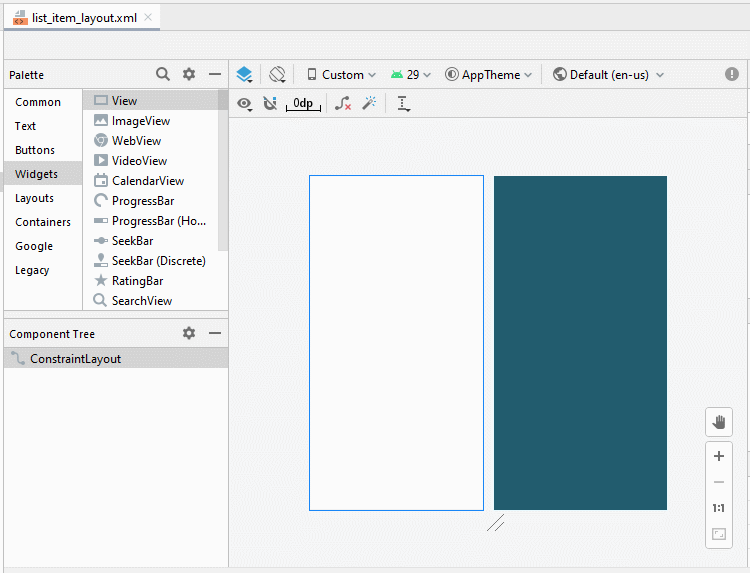
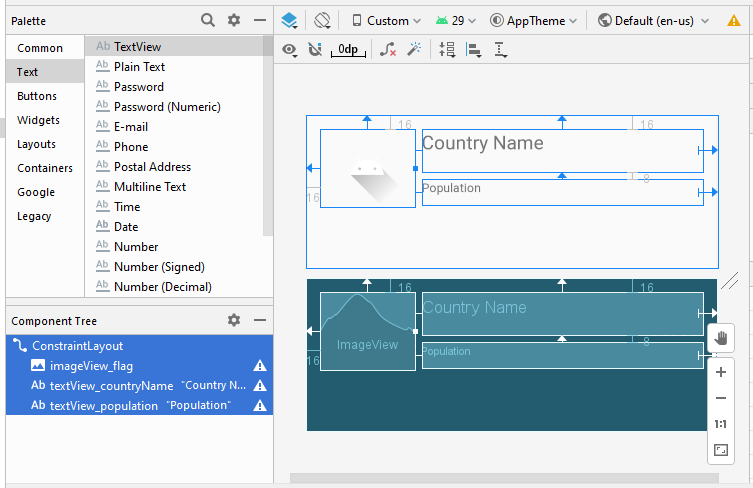
Сделать дизайн интерфейса для List Item.
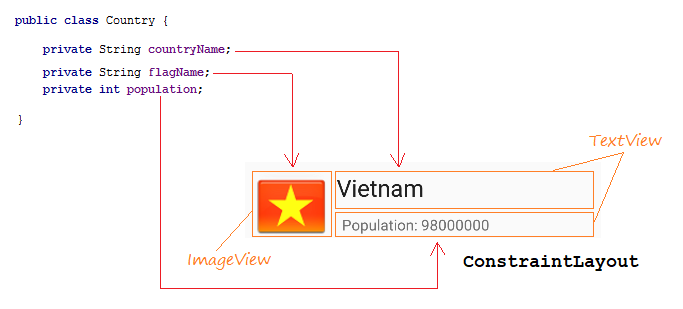
Дизайн интерфейса:
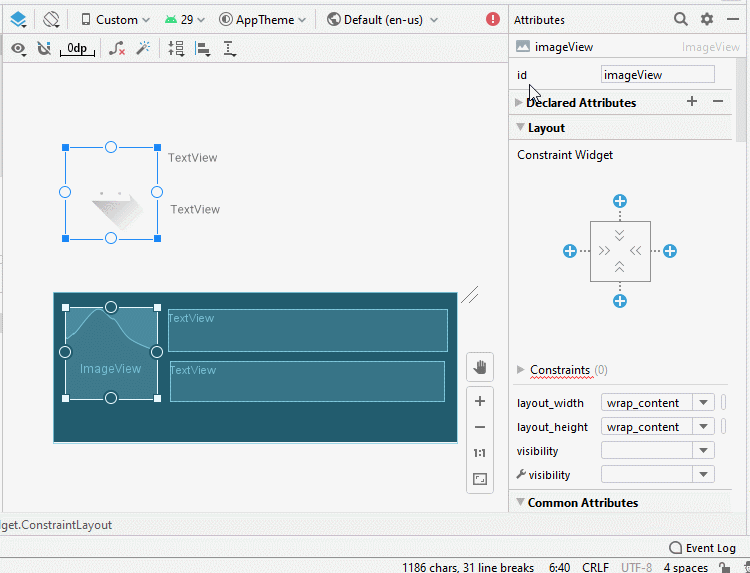
Настроить ID, Text для компонентов на интерфейсе.
ImageView
TextView 1:
TextView 2:
- ID: imageView_flag
TextView 1:
- ID: textView_countryName
- Text: Country Name
TextView 2:
- ID: textView_population
- Text: Population ....
list_item_layout.xml
<?xml version="1.0" encoding="utf-8"?>
<androidx.constraintlayout.widget.ConstraintLayout
    xmlns:android="http://schemas.android.com/apk/res/android"
    xmlns:app="http://schemas.android.com/apk/res-auto"
    xmlns:tools="http://schemas.android.com/tools"
    android:layout_width="match_parent"
    android:layout_height="match_parent">

    <ImageView
        android:id="@+id/imageView_flag"
        android:layout_width="110sp"
        android:layout_height="90sp"
        android:layout_marginStart="16dp"
        android:layout_marginLeft="16dp"
        android:layout_marginTop="16dp"
        app:layout_constraintStart_toStartOf="parent"
        app:layout_constraintTop_toTopOf="parent"
        app:srcCompat="@drawable/ic_launcher_foreground"
        tools:ignore="VectorDrawableCompat" />

    <TextView
        android:id="@+id/textView_countryName"
        android:layout_width="0dp"
        android:layout_height="50dp"
        android:layout_marginStart="8dp"
        android:layout_marginLeft="8dp"
        android:layout_marginTop="16dp"
        android:layout_marginEnd="16dp"
        android:layout_marginRight="16dp"
        android:text="Country Name"
        android:textSize="22sp"
        app:layout_constraintEnd_toEndOf="parent"
        app:layout_constraintStart_toEndOf="@+id/imageView_flag"
        app:layout_constraintTop_toTopOf="parent" />

    <TextView
        android:id="@+id/textView_population"
        android:layout_width="0dp"
        android:layout_height="30dp"
        android:layout_marginStart="8dp"
        android:layout_marginLeft="8dp"
        android:layout_marginTop="8dp"
        android:layout_marginEnd="16dp"
        android:layout_marginRight="16dp"
        android:text="Population"
        app:layout_constraintEnd_toEndOf="parent"
        app:layout_constraintStart_toEndOf="@+id/imageView_flag"
        app:layout_constraintTop_toBottomOf="@+id/textView_countryName" />
</androidx.constraintlayout.widget.ConstraintLayout>
Country.java
package org.o7planning.customlistview;

public class Country {

    private String countryName;

    // Image name (Without extension)
    private String flagName;
    private int population;

    public Country(String countryName, String flagName, int population) {
        this.countryName= countryName;
        this.flagName= flagName;
        this.population= population;
    }

    public int getPopulation() {
        return population;
    }

    public void setPopulation(int population) {
        this.population = population;
    }

    public String getCountryName() {
        return countryName;
    }

    public void setCountryName(String countryName) {
        this.countryName = countryName;
    }

    public String getFlagName() {
        return flagName;
    }

    public void setFlagName(String flagName) {
        this.flagName = flagName;
    }

    @Override
    public String toString()  {
        return this.countryName+" (Population: "+ this.population+")";
    }
}- activity_main.xml
activity_main.xml
<?xml version="1.0" encoding="utf-8"?>
<androidx.constraintlayout.widget.ConstraintLayout
    xmlns:android="http://schemas.android.com/apk/res/android"
    xmlns:app="http://schemas.android.com/apk/res-auto"
    xmlns:tools="http://schemas.android.com/tools"
    android:layout_width="match_parent"
    android:layout_height="match_parent"
    tools:context=".MainActivity">

    <ListView
        android:id="@+id/listView"
        android:layout_width="0dp"
        android:layout_height="0dp"
        android:layout_marginStart="16dp"
        android:layout_marginLeft="16dp"
        android:layout_marginTop="16dp"
        android:layout_marginEnd="16dp"
        android:layout_marginRight="16dp"
        android:layout_marginBottom="16dp"
        app:layout_constraintBottom_toBottomOf="parent"
        app:layout_constraintEnd_toEndOf="parent"
        app:layout_constraintStart_toStartOf="parent"
        app:layout_constraintTop_toTopOf="parent" />
</androidx.constraintlayout.widget.ConstraintLayout>
CustomListAdapter это расширенный класс из BaseAdapter, который выполняет функцию отображения данных на List Item.

CustomListAdapter.java
package org.o7planning.customlistview;

import android.content.Context;
import android.util.Log;
import android.view.LayoutInflater;
import android.view.View;
import android.view.ViewGroup;
import android.widget.BaseAdapter;
import android.widget.ImageView;
import android.widget.TextView;
import java.util.List;

public class CustomListAdapter  extends BaseAdapter {

    private List<Country> listData;
    private LayoutInflater layoutInflater;
    private Context context;

    public CustomListAdapter(Context aContext,  List<Country> listData) {
        this.context = aContext;
        this.listData = listData;
        layoutInflater = LayoutInflater.from(aContext);
    }

    @Override
    public int getCount() {
        return listData.size();
    }

    @Override
    public Object getItem(int position) {
        return listData.get(position);
    }

    @Override
    public long getItemId(int position) {
        return position;
    }

    public View getView(int position, View convertView, ViewGroup parent) {
        ViewHolder holder;
        if (convertView == null) {
            convertView = layoutInflater.inflate(R.layout.list_item_layout, null);
            holder = new ViewHolder();
            holder.flagView = (ImageView) convertView.findViewById(R.id.imageView_flag);
            holder.countryNameView = (TextView) convertView.findViewById(R.id.textView_countryName);
            holder.populationView = (TextView) convertView.findViewById(R.id.textView_population);
            convertView.setTag(holder);
        } else {
            holder = (ViewHolder) convertView.getTag();
        }

        Country country = this.listData.get(position);
        holder.countryNameView.setText(country.getCountryName());
        holder.populationView.setText("Population: " + country.getPopulation());

        int imageId = this.getMipmapResIdByName(country.getFlagName());

        holder.flagView.setImageResource(imageId);

        return convertView;
    }

    // Find Image ID corresponding to the name of the image (in the directory mipmap).
    public int getMipmapResIdByName(String resName)  {
        String pkgName = context.getPackageName();
        // Return 0 if not found.
        int resID = context.getResources().getIdentifier(resName , "mipmap", pkgName);
        Log.i("CustomListView", "Res Name: "+ resName+"==> Res ID = "+ resID);
        return resID;
    }

    static class ViewHolder {
        ImageView flagView;
        TextView countryNameView;
        TextView populationView;
    }

}
ActivityMain.java
package org.o7planning.customlistview;

import androidx.appcompat.app.AppCompatActivity;

import android.os.Bundle;
import android.view.View;
import android.widget.AdapterView;
import android.widget.ListView;
import android.widget.Toast;
import java.util.ArrayList;
import java.util.List;

public class MainActivity extends AppCompatActivity {

    @Override
    protected void onCreate(Bundle savedInstanceState) {
        super.onCreate(savedInstanceState);
        setContentView(R.layout.activity_main);


        List<Country> image_details = getListData();
        final ListView listView = (ListView) findViewById(R.id.listView);
        listView.setAdapter(new CustomListAdapter(this, image_details));

        // When the user clicks on the ListItem
        listView.setOnItemClickListener(new AdapterView.OnItemClickListener() {

            @Override
            public void onItemClick(AdapterView<?> a, View v, int position, long id) {
                Object o = listView.getItemAtPosition(position);
                Country country = (Country) o;
                Toast.makeText(MainActivity.this, "Selected :" + " " + country, Toast.LENGTH_LONG).show();
            }
        });
    }

    private  List<Country> getListData() {
        List<Country> list = new ArrayList<Country>();
        Country vietnam = new Country("Vietnam", "vn", 98000000);
        Country usa = new Country("United States", "us", 320000000);
        Country russia = new Country("Russia", "ru", 142000000);


        list.add(vietnam);
        list.add(usa);
        list.add(russia);

        return list;
    }

}
Запуск примера:
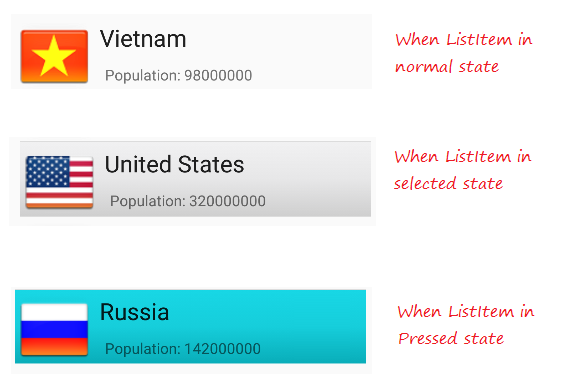
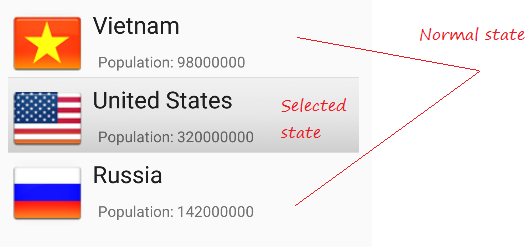
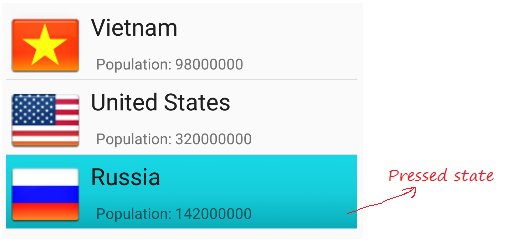
Пример кастомизации Selector
Чтобы ListView отображался красивее, вам нужно кастомизировать эффекты, например когда меняется цвет фона ListItem при перемещении курсора на нем или менятся цвет фона когда выбран тот ListItem. Мы продолжаем с примером выше.
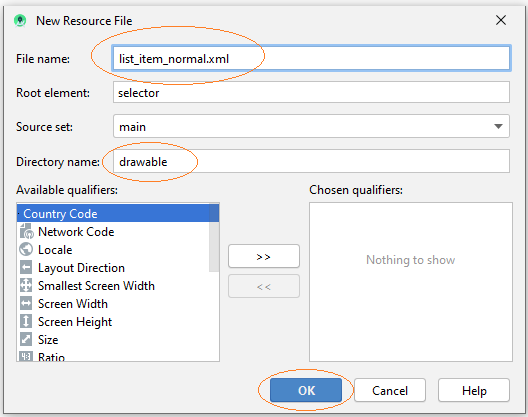
Создать файлы конфигурации:
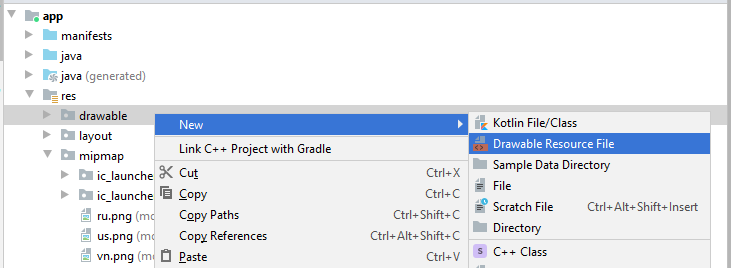
- File name: item_state_normal.xml
- Directory: drawable
item_state_normal.xml
<?xml version="1.0" encoding="utf-8"?>

<shape xmlns:android="http://schemas.android.com/apk/res/android"
  android:shape="rectangle">

  <gradient
      android:startColor="#f1f1f2"
      android:centerColor="#e7e7e8"
      android:endColor="#cfcfcf"
      android:angle="270" />

</shape>
Когда List Item в нормальном состоянии стили настроенные в item_state_normal.xml будут применены к ListItem.
Индентично создать 3 других файла:
- item_state_pressed.xml
- item_state_selected.xml
- list_selector.xml
Когда нажимается List Item стили настроенные в item_state_pressed.xml будут применены к ListItem
item_state_pressed.xml
<?xml version="1.0" encoding="utf-8"?>

<shape xmlns:android="http://schemas.android.com/apk/res/android"
  android:shape="rectangle">

  <gradient
      android:startColor="#18d7e5"
      android:centerColor="#16cedb"
      android:endColor="#09adb9"
      android:angle="270" />

</shape>
огда нажимается List Item стили настроенные в item_state_selected.xml будут применены к ListItem
item_state_selected.xml
<?xml version="1.0" encoding="utf-8"?>

<shape xmlns:android="http://schemas.android.com/apk/res/android"
  android:shape="rectangle">

  <gradient
      android:startColor="#18d7e5"
      android:centerColor="#16cedb"
      android:endColor="#09adb9"
      android:angle="270" />

</shape>
Прикрепить определенные состояния List Item с файлами xml.
list_selector.xml
<?xml version="1.0" encoding="utf-8"?>

<selector xmlns:android="http://schemas.android.com/apk/res/android">

       <item
           android:state_selected="false"
           android:state_pressed="false"
           android:drawable="@drawable/item_state_normal" />

       <item android:state_pressed="true"
           android:drawable="@drawable/item_state_pressed" />

       <item android:state_selected="true"
           android:state_pressed="false"
           android:drawable="@drawable/item_state_selected" />


</selector>
Настроить ListSelector для ListView:
<ListView
     ...
     android:listSelector="@drawable/list_selector"/>
activity_main.xml
<?xml version="1.0" encoding="utf-8"?>
<androidx.constraintlayout.widget.ConstraintLayout
    xmlns:android="http://schemas.android.com/apk/res/android"
    xmlns:app="http://schemas.android.com/apk/res-auto"
    xmlns:tools="http://schemas.android.com/tools"
    android:layout_width="match_parent"
    android:layout_height="match_parent"
    tools:context=".MainActivity">

    <ListView
        android:id="@+id/listView"
        android:layout_width="0dp"
        android:layout_height="0dp"
        android:layout_marginStart="16dp"
        android:layout_marginLeft="16dp"
        android:layout_marginTop="16dp"
        android:layout_marginEnd="16dp"
        android:layout_marginRight="16dp"
        android:layout_marginBottom="16dp"
        app:layout_constraintBottom_toBottomOf="parent"
        app:layout_constraintEnd_toEndOf="parent"
        app:layout_constraintStart_toStartOf="parent"
        app:layout_constraintTop_toTopOf="parent"
        android:listSelector="@drawable/list_selector"/>

</androidx.constraintlayout.widget.ConstraintLayout>
Перезапустить ваше приложение.
Pуководства Android
- Настроить Android Emulator в Android Studio
- Руководство Android ToggleButton
- Создать простой File Finder Dialog в Android
- Руководство Android TimePickerDialog
- Руководство Android DatePickerDialog
- Что мне нужно для начала работы с Android?
- Установите Android Studio в Windows
- Установите Intel® HAXM для Android Studio
- Руководство Android AsyncTask
- Руководство Android AsyncTaskLoader
- Руководство Android для начинающих - основные примеры
- Как узнать номер телефона Android Emulator и изменить его?
- Руководство Android TextInputLayout
- Руководство Android CardView
- Руководство Android ViewPager2
- Получить номер телефона в Android с помощью TelephonyManager
- Руководство Android Phone Call
- Руководство Android Wifi Scanning
- Руководство Android 2D Game для начинающих
- Руководство Android DialogFragment
- Руководство Android CharacterPickerDialog
- Руководство Android для начинающих - Hello Android
- Использование Android Device File Explorer
- Включить USB Debugging на устройстве Android
- Руководство Android UI Layouts
- Руководство Android SMS
- Руководство Android SQLite Database
- Руководство Google Maps Android API
- Руководство Текст в речь на Android
- Руководство Android Space
- Руководство Android Toast
- Создание пользовательских Android Toast
- Руководство Android SnackBar
- Руководство Android TextView
- Руководство Android TextClock
- Руководство Android EditText
- Руководство Android TextWatcher
- Форматирование номера кредитной карты с помощью Android TextWatcher
- Руководство Android Clipboard
- Создать простой File Chooser в Android
- Руководство Android AutoCompleteTextView и MultiAutoCompleteTextView
- Руководство Android ImageView
- Руководство Android ImageSwitcher
- Руководство Android ScrollView и HorizontalScrollView
- Руководство Android WebView
- Руководство Android SeekBar
- Руководство Android Dialog
- Руководство Android AlertDialog
- Руководство Android RatingBar
- Руководство Android ProgressBar
- Руководство Android Spinner
- Руководство Android Button
- Руководство Android Switch
- Руководство Android ImageButton
- Руководство Android FloatingActionButton
- Руководство Android CheckBox
- Руководство Android RadioGroup и RadioButton
- Руководство Android Chip и ChipGroup
- Использование Image assets и Icon assets Android Studio
- Настройка SD Card для Android Emulator
- Пример ChipGroup и Chip Entry
- Как добавить внешние библиотеки в Android Project в Android Studio?
- Как отключить разрешения, уже предоставленные приложению Android?
- Как удалить приложения из Android Emulator?
- Руководство Android LinearLayout
- Руководство Android TableLayout
- Руководство Android FrameLayout
- Руководство Android QuickContactBadge
- Руководство Android StackView
- Руководство Android Camera
- Руководство Android MediaPlayer
- Руководство Android VideoView
- Воспроизведение звуковых эффектов в Android с помощью SoundPool
- Руководство Android Networking
- Руководство Android JSON Parser
- Руководство Android SharedPreferences
- Руководство Android Internal Storage
- Руководство Android External Storage
- Руководство Android Intents
- Пример явного Android Intent, вызов другого Intent
- Пример неявного Android Intent, откройте URL, отправьте email
- Руководство Android Services
- Использовать оповещения в Android - Android Notification
- Руководство Android DatePicker
- Руководство Android TimePicker
- Руководство Android Chronometer
- Руководство Android OptionMenu
- Руководство Android ContextMenu
- Руководство Android PopupMenu
- Руководство Android Fragment
- Руководство Android ListView
- Android ListView с Checkbox с помощью ArrayAdapter
- Руководство Android GridView
Show More