Руководство Android EditText
1. Android EditText
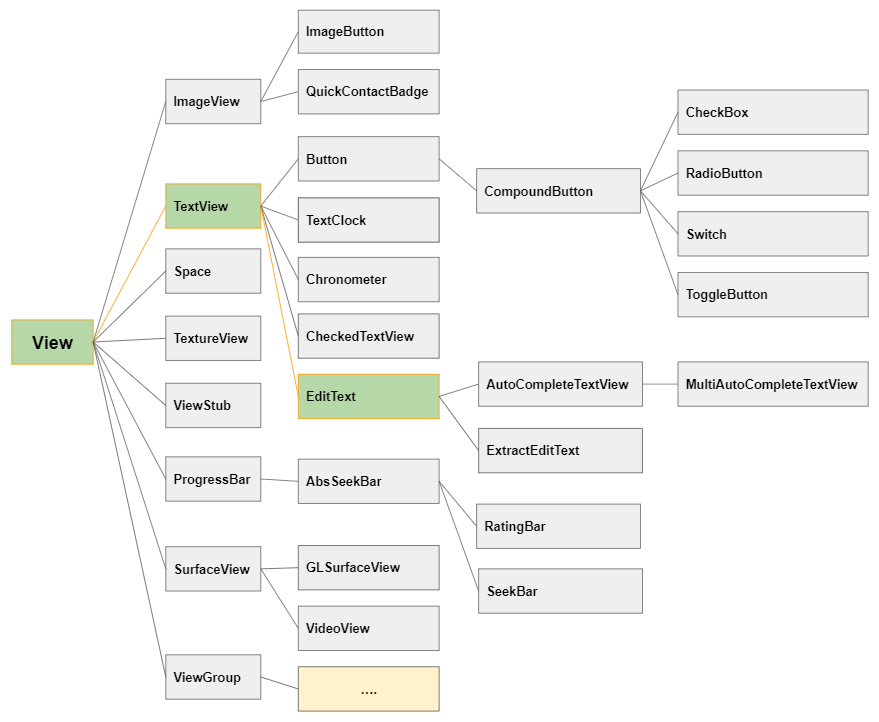
В Android, EditText это подкласс у TextView поэтому он наследует все функции TextView, помимо этого, он имеет новые функции позволяющие пользователю ввести или изменить текст с разными целями, поэтому вам нужно определить вид данных, которые можно принять через атрибут android:inputType.
<EditText
     android:id="@+id/txtSub"
     android:layout_width="match_parent"
     android:layout_height="wrap_content"
     android:hint="Subject"
     android:inputType="text"
     ... />
EditText editText = (EditText) this.findViewById(R.id.editText1);
// Set Text:
editText.setText("New Text");
// Get Text
String text = editText.getText().toString();Создайте EditText с Java кодом:
public class MainActivity extends AppCompatActivity {

    @Override
    protected void onCreate(Bundle savedInstanceState) {
        super.onCreate(savedInstanceState);
        setContentView(R.layout.activity_main);

        LinearLayout linearLayout =  (LinearLayout) findViewById(R.id.linearlayout);

        // Create a EditText
        EditText editText = new EditText(this);
        editText.setHint("Subject");
        linearLayout.addView(editText);

        // Set Text
        editText.setText("Some Text");

        // Get Text
        String text = editText.getText().toString();
    }

}
2. android:inputType
Атрибут android:inputType определяет вид данных, который EditText может принять, в то же время предлагает Android поддержать пользователя, когда он/она воодит данные, например отобразить подходящую виртуальную клавишу для вида данных EditText. Но он не гарантирует, что пользователь введет правильный вид данных, поэтому вам еще нужны некоторые дополнительные манипуляции.
Распространенные значения android:inputType:
textUri | Allow to enter a URI. |
textEmailAddress | Allow to enter an Email address. |
textPersonName | Allow to enter the name of a person |
textPassword | Allow to enter a password, users only see the asterisk characters (*) (or similar). |
textVisiblePassword | Allow enter a password, and the user can read its contents. |
number | For entering numeric data. |
phone | For entering a phone number |
date | For entering a date |
time | For entering a time |
textMultiLine | Allows entering text data on multiple lines. |
Вы можете сочетать много значений, чтобы создать новое значение для android:inputType, значения разделены знаком ( | ).
<EditText
  android:inputType="textCapSentences|textMultiLine"
/>
android:inputType="textPassword"
Разрешить ввести пароль, пользователь увидит только символы звездочек ( * ) (Или тому подобное).

<!-- A Text Password -->
<EditText
    android:id="@+id/editText_password"
    android:hint="Password"
    android:inputType="textPassword" ...
/>
android:inputType="numberPassword"
Разрешить пользователю ввести пароль, содержащий только числовые символы.
<!-- A Numeric Password -->
<EditText
    android:id="@+id/editText_password"
    android:hint="Numeric Password"
    android:inputType="numberPassword"  ...
/>
android:inputType="textVisiblePassword"
android:inputType="text"
EditText принимает все виды данных чистого текста (plain text).
android:inputType=" textMultiLine"
Атрибут android:inputType="textMultiLine" позволяет EditText отобразить текст на нескольких строках, вам так же нужно сочетать его с атрибутом android.gravity="left|top" чтобы настроить отображение текста в верхнем левом углу.
<EditText
    android:id="@+id/editText_test1"
    android:background="#F1FDDC"
    android:gravity="top|left"
    android:inputType="textMultiLine|text"
    android:padding="10dp"
    android:text="0123456789" ... />
android:inputType="number"
Разрешить пользователю ввести числовые данные, в то же время поддерживать виртуальную клавиатуру для числовых входных данных.
android:inputType="textEmailAddress"
Виртуальная клавиатура поддерживает ввод электронной почты, проще по сравнению с обычной виртуальной клавиатурой, она убирает недействительные символы для электронной почты.

<EditText
    android:id="@+id/editText_email"
    android:hint="Email"
    android:inputType="textEmailAddress"
    ...
/>
Java код проверяет действителен ли введенный email пользователя:
public boolean isEmailValid(CharSequence email) {
    return android.util.Patterns.EMAIL_ADDRESS.matcher(email).matches();
}
android:inputType="date"
С целью введения пользователем данные Date, виртуальная клавиатура имеет подходящий лэйаут для такого вида данных.
<EditText
    android:id="@+id/editText_birthday"
    android:hint="dd-MM-yyyy"
    android:inputType="date"
    ...
/>
Примечание: С android:inputType="date" пользователь все еще может ввести недействительные данные Date с вашей подсказкой (hint). Поэтому, если вы хотите удостовериться в точности введения пользователем подходящих данных с определенным форматом Date, например"dd-MM-yyyy" (день - месяц - год) вы должны сочетать EditText и TextWatcher.
3. EditText Attributes
В основном, почти все атрибуты EditText унаследованы от TextView:
android:gravity | It is used to specify how to align the text like left, right, center, top, etc. |
android:text | It is used to set the text. |
android:hint | It is used to display the hint text when text is empty |
android:textColor | It is used to change the color of the text. |
android:textColorHint | It is used to change the text color of hint text. |
android:textSize | It is used to specify the size of the text. |
android:textStyle | It is used to change the style (bold, italic, bolditalic) of text. |
android:background | It is used to set the background color for edit text control |
android:ems | It is used to make the textview be exactly this many ems wide. |
android:width | It makes the TextView be exactly this many pixels wide. |
android:height | It makes the TextView be exactly this many pixels tall. |
android:maxWidth | It is used to make the TextView be at most this many pixels wide. |
android:minWidth | It is used to make the TextView be at least this many pixels wide. |
android:textAllCaps | It is used to present the text in all CAPS |
android:typeface | It is used to specify the Typeface (normal, sans, serif, monospace) for the text. |
android:textColorHighlight | It is used to change the color of text selection highlight. |
android:inputType | It is used to specify the type of text being placed in text fields. |
android:fontFamily | It is used to specify the fontFamily for the text. |
android:editable | If we set false, EditText won't allow us to enter or modify the text |
android:textColorHint
Атрибут android:hint используется для отображения текста подсказки для пользователя, когда текст EditText пустой.
android:textColorHighlight
Настройте фоновый цвет для выбранного подтекста.
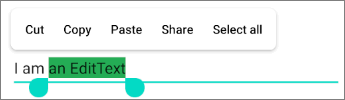
<EditText
    android:id="@+id/editText"
    android:inputType="text"
    android:text="I am an EditText"
    android:textColorHighlight="#24AC55" ... />
android: android:maxLength
Определите максимальное количество символов текста.
android:editable
Данный атрибут больше не используется в EditText. Если вы не хотите, чтобы пользователь менял содержание текста EditText использователь одно из следующих решений:
Решение 1:
<EditText
    android:id="@+id/myEditText"
    android:layout_width="match_parent"
    android:layout_height="wrap_content"
    android:hint="Hint"
    android:focusable="false"
    android:clickable="false"
    android:cursorVisible="false"
    />
Вы можете получить одинаковый результат с Java кодом:
EditText editText = findViewById(R.id.myEditText);
editText.setFocusable(false);
editText.setClickable(false);
editText.setCursorVisible(false);
Решение 2:
EditText editText = (EditText) findViewById(R.id.editText);
editText.setKeyListener(null);
Решение 3:
private void setNonEditable(EditText editText) {
    // Need to disable displaying Virtual Keyboard.
    editText.setInputType(InputType.TYPE_NULL);

    // editText.setTextIsSelectable(false); // ?
    editText.setOnKeyListener(new View.OnKeyListener() {
        @Override
        public boolean onKey(View v, int keyCode, KeyEvent event) {
            // Blocks input from hardware keyboards.
            return true;
        }
    });
}
4. EditText Methods
Помимо унаследованных методов от TextView, EditText так же имеет некоторые свои методы:
- void selectAll()
- void setSelection(int start, int stop) .
- void setSelection(int index)
- void extendSelection(int index)
selectAll()
Выбрать весь текст.
setSelection(int start, int stop)
Выбрать подтекст от start до stop. Индекс начинается с 0, 1, 2...
setSelection(int index)
Переместить курсор (cursor) в позицию имеющую индекс "index".
extendSelection(int index)
Выбрать подтекст из настоящего положения курсора (cursor) к позиции с индексом "index".
Примечание: Вы можете посмотреть пример использования данных методов в конце статьи.
5. Ví dụ EditText
В этом примере, я покажу вам как использовать методы selectAll(), extendSelection(), setSelection() у EditText. И это изображение предварительного просмотра примера:
Интерфейс приложения:
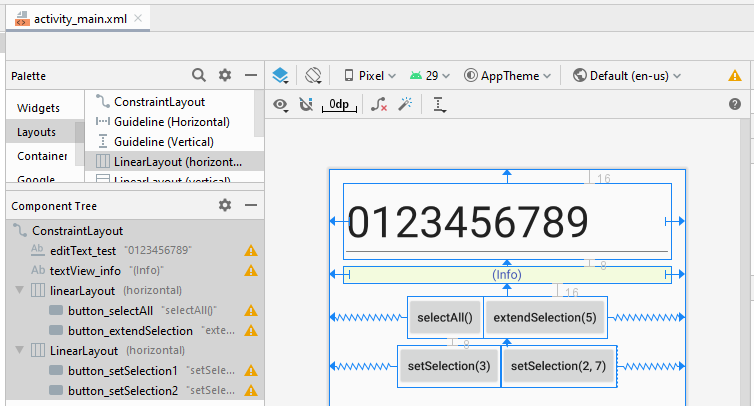
activity_main.xml
<?xml version="1.0" encoding="utf-8"?>
<androidx.constraintlayout.widget.ConstraintLayout
    xmlns:android="http://schemas.android.com/apk/res/android"
    xmlns:app="http://schemas.android.com/apk/res-auto"
    xmlns:tools="http://schemas.android.com/tools"
    android:layout_width="match_parent"
    android:layout_height="match_parent"
    tools:context=".MainActivity">

    <EditText
        android:id="@+id/editText_test"
        android:layout_width="0dp"
        android:layout_height="wrap_content"
        android:layout_marginStart="16dp"
        android:layout_marginLeft="16dp"
        android:layout_marginTop="16dp"
        android:layout_marginEnd="16dp"
        android:layout_marginRight="16dp"
        android:ems="10"
        android:inputType="text"
        android:text="0123456789"
        android:textSize="50sp"
        app:layout_constraintEnd_toEndOf="parent"
        app:layout_constraintStart_toStartOf="parent"
        app:layout_constraintTop_toTopOf="parent" />

    <TextView
        android:id="@+id/textView_info"
        android:layout_width="0dp"
        android:layout_height="wrap_content"
        android:layout_marginStart="16dp"
        android:layout_marginLeft="16dp"
        android:layout_marginTop="8dp"
        android:layout_marginEnd="16dp"
        android:layout_marginRight="16dp"
        android:background="#F3FBDE"
        android:gravity="center_horizontal"
        android:text="(Info)"
        android:textColor="#3F51B5"
        app:layout_constraintEnd_toEndOf="parent"
        app:layout_constraintStart_toStartOf="parent"
        app:layout_constraintTop_toBottomOf="@+id/editText_test" />

    <LinearLayout
        android:id="@+id/linearLayout"
        android:layout_width="wrap_content"
        android:layout_height="wrap_content"
        android:layout_marginTop="16dp"
        android:orientation="horizontal"
        app:layout_constraintEnd_toEndOf="parent"
        app:layout_constraintStart_toStartOf="parent"
        app:layout_constraintTop_toBottomOf="@+id/textView_info">

        <Button
            android:id="@+id/button_selectAll"
            android:layout_width="wrap_content"
            android:layout_height="wrap_content"
            android:text="selectAll()"
            android:textAllCaps="false" />

        <Button
            android:id="@+id/button_extendSelection"
            android:layout_width="wrap_content"
            android:layout_height="wrap_content"
            android:text="extendSelection(5)"
            android:textAllCaps="false" />
    </LinearLayout>

    <LinearLayout
        android:layout_width="wrap_content"
        android:layout_height="wrap_content"
        android:layout_marginTop="8dp"
        android:orientation="horizontal"
        app:layout_constraintEnd_toEndOf="parent"
        app:layout_constraintStart_toStartOf="parent"
        app:layout_constraintTop_toBottomOf="@+id/linearLayout">

        <Button
            android:id="@+id/button_setSelection1"
            android:layout_width="wrap_content"
            android:layout_height="wrap_content"
            android:text="setSelection(3)"
            android:textAllCaps="false" />

        <Button
            android:id="@+id/button_setSelection2"
            android:layout_width="wrap_content"
            android:layout_height="wrap_content"
            android:text="setSelection(2, 7)"
            android:textAllCaps="false" />
    </LinearLayout>

</androidx.constraintlayout.widget.ConstraintLayout>
MainActivity.java
package com.example.edittextexample;

import androidx.appcompat.app.AppCompatActivity;

import android.os.Bundle;
import android.text.TextWatcher;
import android.view.View;
import android.widget.Button;
import android.widget.EditText;
import android.widget.TextView;

public class MainActivity extends AppCompatActivity {

    private EditText editTextTest;
    private TextView textViewInfo;

    private Button button_selectAll;
    private Button button_setSelection1;
    private Button button_setSelection2;
    private Button button_extendSelection;

    @Override
    protected void onCreate(Bundle savedInstanceState) {
        super.onCreate(savedInstanceState);
        setContentView(R.layout.activity_main);

        this.editTextTest = (EditText) this.findViewById(R.id.editText_test);
        this.textViewInfo = (TextView) this.findViewById(R.id.textView_info);

        this.button_selectAll = (Button) this.findViewById(R.id.button_selectAll);
        this.button_setSelection1 = (Button) this.findViewById(R.id.button_setSelection1);
        this.button_setSelection2 = (Button) this.findViewById(R.id.button_setSelection2);
        this.button_extendSelection = (Button) this.findViewById(R.id.button_extendSelection);

        // Focus
        this.editTextTest.requestFocus();

        this.button_selectAll.setOnClickListener(new View.OnClickListener() {
            @Override
            public void onClick(View v) {
                selectAllHandler();
            }
        });

        this.button_setSelection1.setOnClickListener(new View.OnClickListener() {
            @Override
            public void onClick(View v) {
                setSelection1Handler();
            }
        });

        this.button_setSelection2.setOnClickListener(new View.OnClickListener() {
            @Override
            public void onClick(View v) {
                setSelection2Handler();
            }
        });

        this.button_extendSelection.setOnClickListener(new View.OnClickListener() {
            @Override
            public void onClick(View v) {
                extendSelectionHandler();
            }
        });
    }

    // Usage of: editText.selectALl()
    private void selectAllHandler() {
        this.editTextTest.selectAll();
        this.textViewInfo.setText("selectAll()");
    }

    // Usage of: editText.setSelection(int index)
    private void setSelection1Handler() {
        this.editTextTest.setSelection(3);
        this.textViewInfo.setText("setSelection(3)");
    }

    // Usage of: editText.setSelection(int start, int stop)
    private void setSelection2Handler() {
        this.editTextTest.setSelection(2, 7);
        this.textViewInfo.setText("setSelection(2, 7)");
    }

    // Usage of: editText.extendSelection(int index)
    private void extendSelectionHandler() {
        this.editTextTest.extendSelection(5);

        int selectionStart = this.editTextTest.getSelectionStart();
        this.textViewInfo.setText("selectionStart = " + selectionStart+ " --> extendSelection(5)");
    }

}

Pуководства Android
- Настроить Android Emulator в Android Studio
- Руководство Android ToggleButton
- Создать простой File Finder Dialog в Android
- Руководство Android TimePickerDialog
- Руководство Android DatePickerDialog
- Что мне нужно для начала работы с Android?
- Установите Android Studio в Windows
- Установите Intel® HAXM для Android Studio
- Руководство Android AsyncTask
- Руководство Android AsyncTaskLoader
- Руководство Android для начинающих - основные примеры
- Как узнать номер телефона Android Emulator и изменить его?
- Руководство Android TextInputLayout
- Руководство Android CardView
- Руководство Android ViewPager2
- Получить номер телефона в Android с помощью TelephonyManager
- Руководство Android Phone Call
- Руководство Android Wifi Scanning
- Руководство Android 2D Game для начинающих
- Руководство Android DialogFragment
- Руководство Android CharacterPickerDialog
- Руководство Android для начинающих - Hello Android
- Использование Android Device File Explorer
- Включить USB Debugging на устройстве Android
- Руководство Android UI Layouts
- Руководство Android SMS
- Руководство Android SQLite Database
- Руководство Google Maps Android API
- Руководство Текст в речь на Android
- Руководство Android Space
- Руководство Android Toast
- Создание пользовательских Android Toast
- Руководство Android SnackBar
- Руководство Android TextView
- Руководство Android TextClock
- Руководство Android EditText
- Руководство Android TextWatcher
- Форматирование номера кредитной карты с помощью Android TextWatcher
- Руководство Android Clipboard
- Создать простой File Chooser в Android
- Руководство Android AutoCompleteTextView и MultiAutoCompleteTextView
- Руководство Android ImageView
- Руководство Android ImageSwitcher
- Руководство Android ScrollView и HorizontalScrollView
- Руководство Android WebView
- Руководство Android SeekBar
- Руководство Android Dialog
- Руководство Android AlertDialog
- Руководство Android RatingBar
- Руководство Android ProgressBar
- Руководство Android Spinner
- Руководство Android Button
- Руководство Android Switch
- Руководство Android ImageButton
- Руководство Android FloatingActionButton
- Руководство Android CheckBox
- Руководство Android RadioGroup и RadioButton
- Руководство Android Chip и ChipGroup
- Использование Image assets и Icon assets Android Studio
- Настройка SD Card для Android Emulator
- Пример ChipGroup и Chip Entry
- Как добавить внешние библиотеки в Android Project в Android Studio?
- Как отключить разрешения, уже предоставленные приложению Android?
- Как удалить приложения из Android Emulator?
- Руководство Android LinearLayout
- Руководство Android TableLayout
- Руководство Android FrameLayout
- Руководство Android QuickContactBadge
- Руководство Android StackView
- Руководство Android Camera
- Руководство Android MediaPlayer
- Руководство Android VideoView
- Воспроизведение звуковых эффектов в Android с помощью SoundPool
- Руководство Android Networking
- Руководство Android JSON Parser
- Руководство Android SharedPreferences
- Руководство Android Internal Storage
- Руководство Android External Storage
- Руководство Android Intents
- Пример явного Android Intent, вызов другого Intent
- Пример неявного Android Intent, откройте URL, отправьте email
- Руководство Android Services
- Использовать оповещения в Android - Android Notification
- Руководство Android DatePicker
- Руководство Android TimePicker
- Руководство Android Chronometer
- Руководство Android OptionMenu
- Руководство Android ContextMenu
- Руководство Android PopupMenu
- Руководство Android Fragment
- Руководство Android ListView
- Android ListView с Checkbox с помощью ArrayAdapter
- Руководство Android GridView
Show More