Руководство Android CardView
1. Android CardView
Android 5.0 (API Level 21) представляет новый компонент CardView, в основном это прямоугольный контейнер (container) с 4-мя закругленными углами (Rounded Corner), и имеет эффект тени (Shawdow) на границах. CardView обычно используется как исходный контейнер у Item в ListView, GridView или RecyclerView.
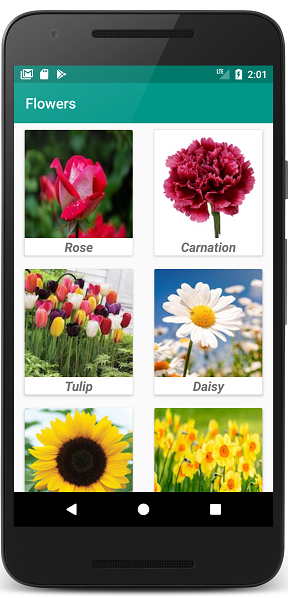
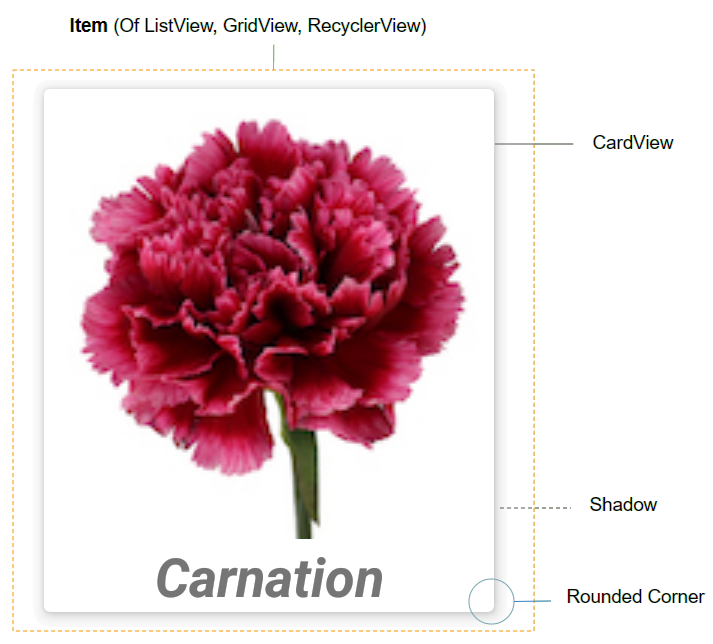
По умолчанию CardView не имеется наготове в Android SDK. Поэтому если вы хотите его использовать, вам нужно добавить библиотеку в ваш project.
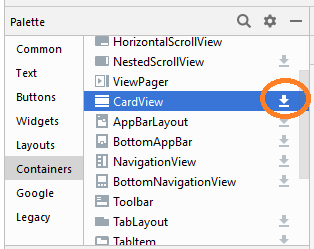
На Android Studio вы можете установить библиотеку CardView из Palette.
После установки, вы увидите, что библиотека объявлена на build.gradle (Module: app).
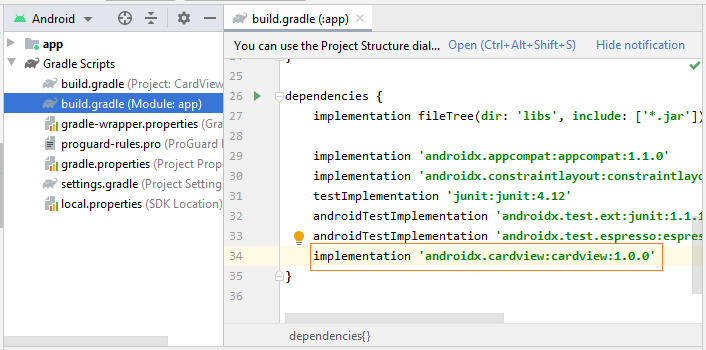
implementation 'androidx.cardview:cardview:1.0.0'Некоторые важные атрибуты CardView, которые вам нужно настроить:
- android:layout_marginLeft
- android:layout_marginTop
- android:layout_marginRight
- android:layout_marginBottom
- app:cardBackgroundColor
2. Пример CardView
Сейчас мы сделаем пример с RecyclerView и CardView. OK, это изображение для просмотра данного примера:
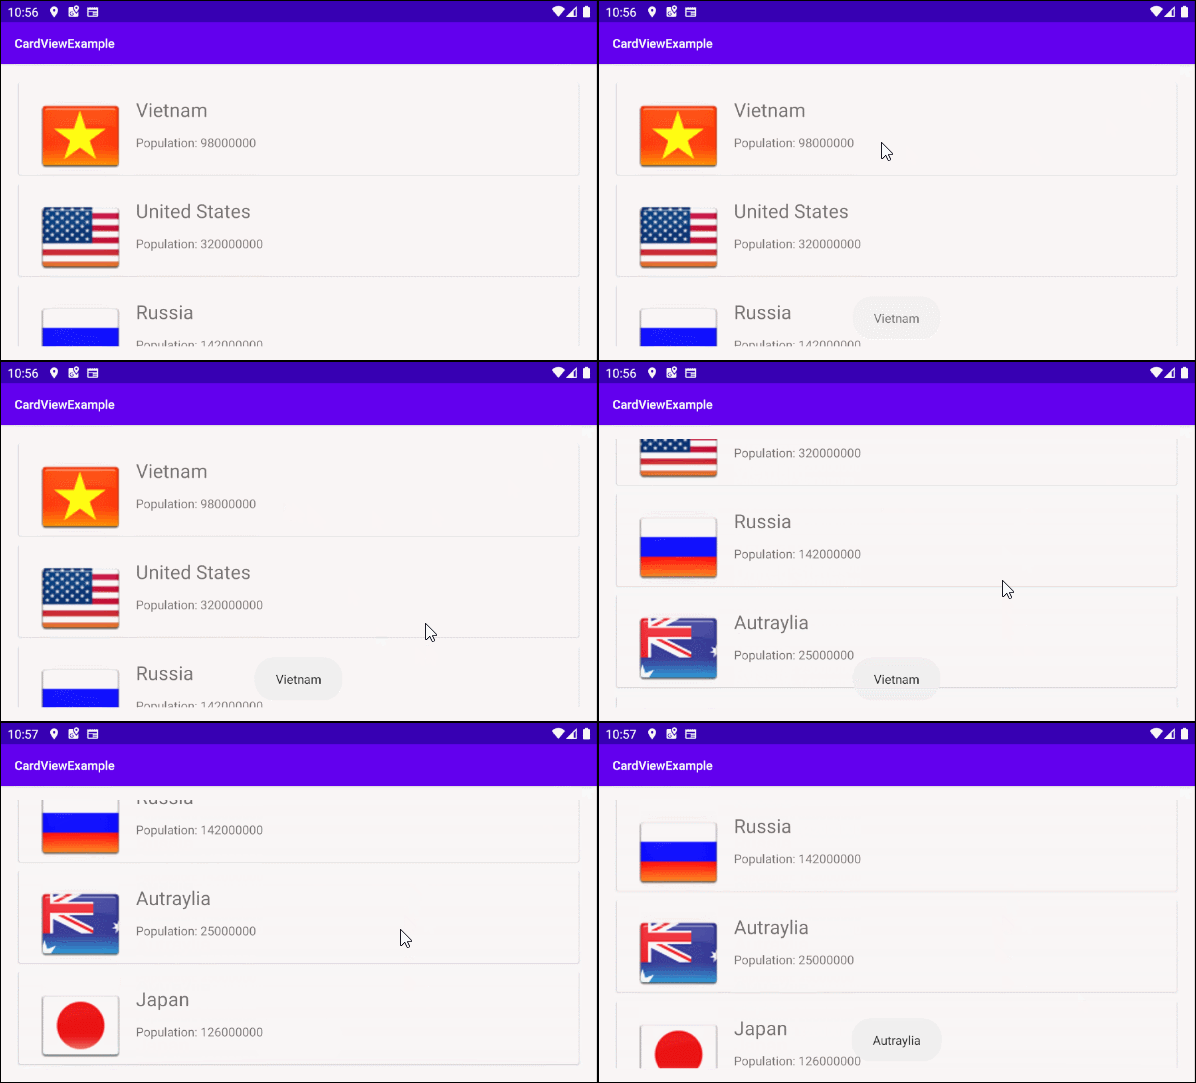
На Android Studio создайте project:
- File > New > New Project > Empty Activity
- Name: CardViewExample
- Package name: org.o7planning.cardviewexample
Установите библиотеки RecyclerView и CardView в ваш project:
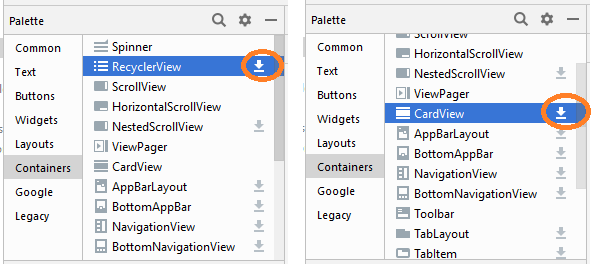
После установки, вы увидите как библиотеки были объявлены в build.gradle (Module: app):
implementation 'androidx.cardview:cardview:1.0.0'
implementation 'androidx.recyclerview:recyclerview:1.0.0'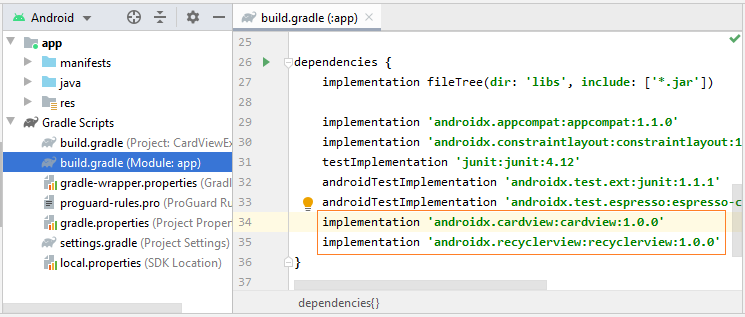
Вам нужно несколько файлов изображений, скопируйте их в папку drawable в project:
vn.png | us.png | ru.png | jp.png | au.png |
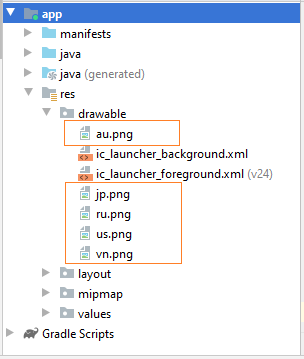
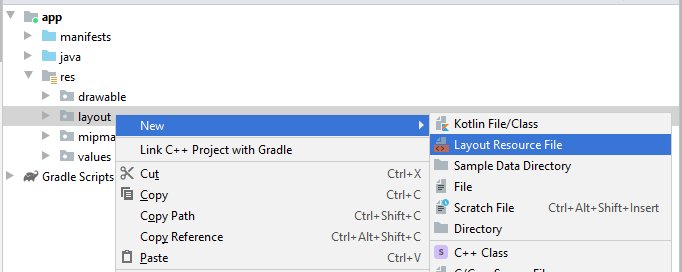
Далее, вам нужно создать Layout у RecyclerView Item. Нажмите на правую кнопку мыши на папку "res/layout" выберите:
- New > Layout resource file
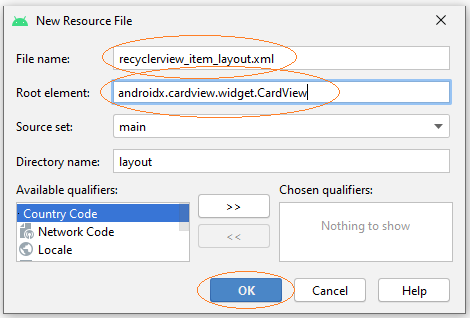
Введите:
- File name: recyclerview_item_layout.xml
- Root element: androidx.cardview.widget.CardView
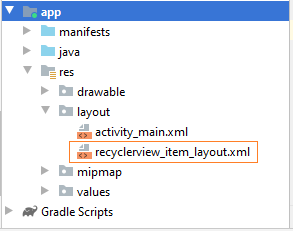
Дизайн интерфейса RecyclerView Item:
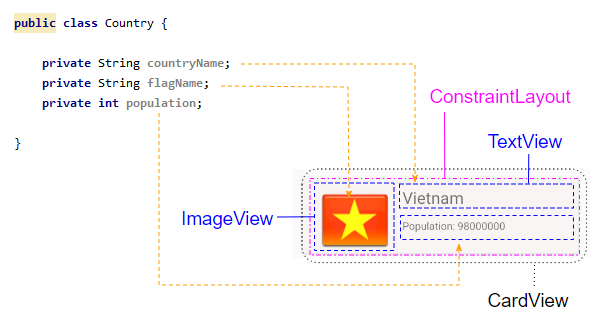
Откройте файл recyclerview_item_layout.xml и настройте некоторые важные атрибуты для CardView:
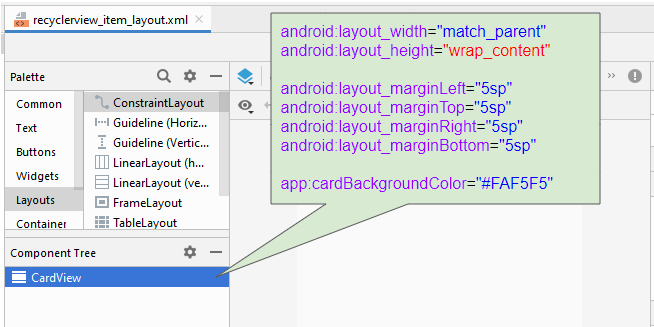
* recyclerview_item_layout.xml *
<?xml version="1.0" encoding="utf-8"?>
<androidx.cardview.widget.CardView
    xmlns:android="http://schemas.android.com/apk/res/android"
    xmlns:app="http://schemas.android.com/apk/res-auto"
    xmlns:tools="http://schemas.android.com/tools"
    android:layout_width="match_parent"
    android:layout_height="wrap_content"
    android:layout_marginLeft="5sp"
    android:layout_marginTop="5sp"
    android:layout_marginRight="5sp"
    android:layout_marginBottom="5sp"
    app:cardBackgroundColor="#FAF5F5">

</androidx.cardview.widget.CardView>
Продолжайте делать дизайн интерфейса для RecyclerView Item:
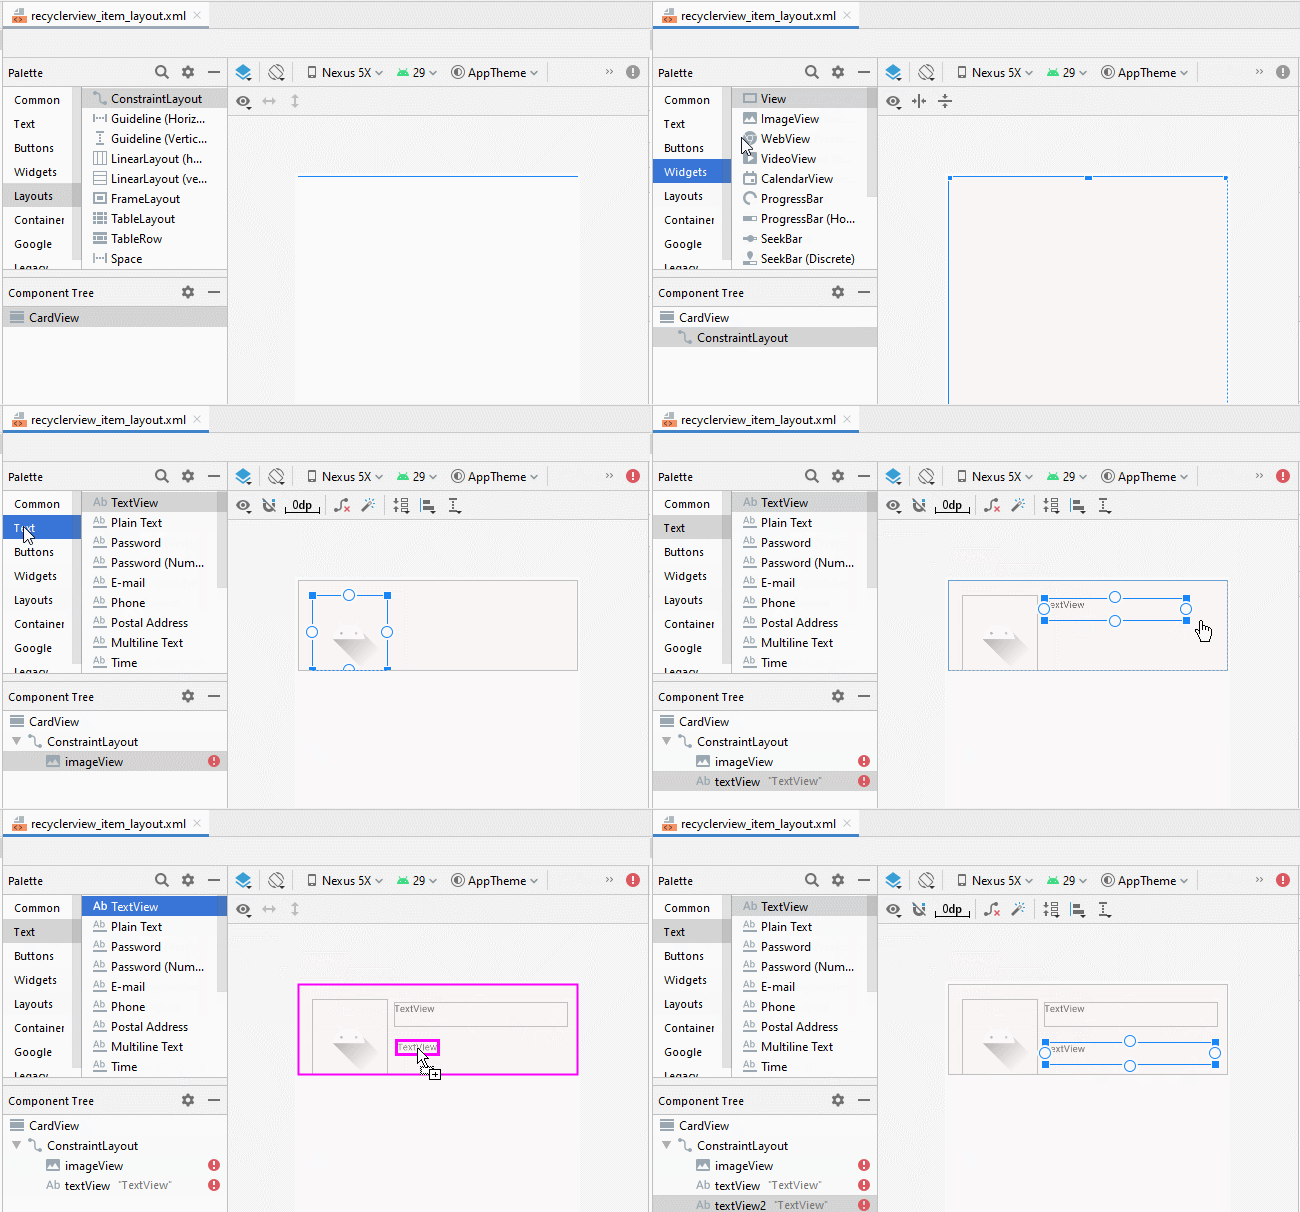
Скорректируйте расположение компонентов на интерфейсе:
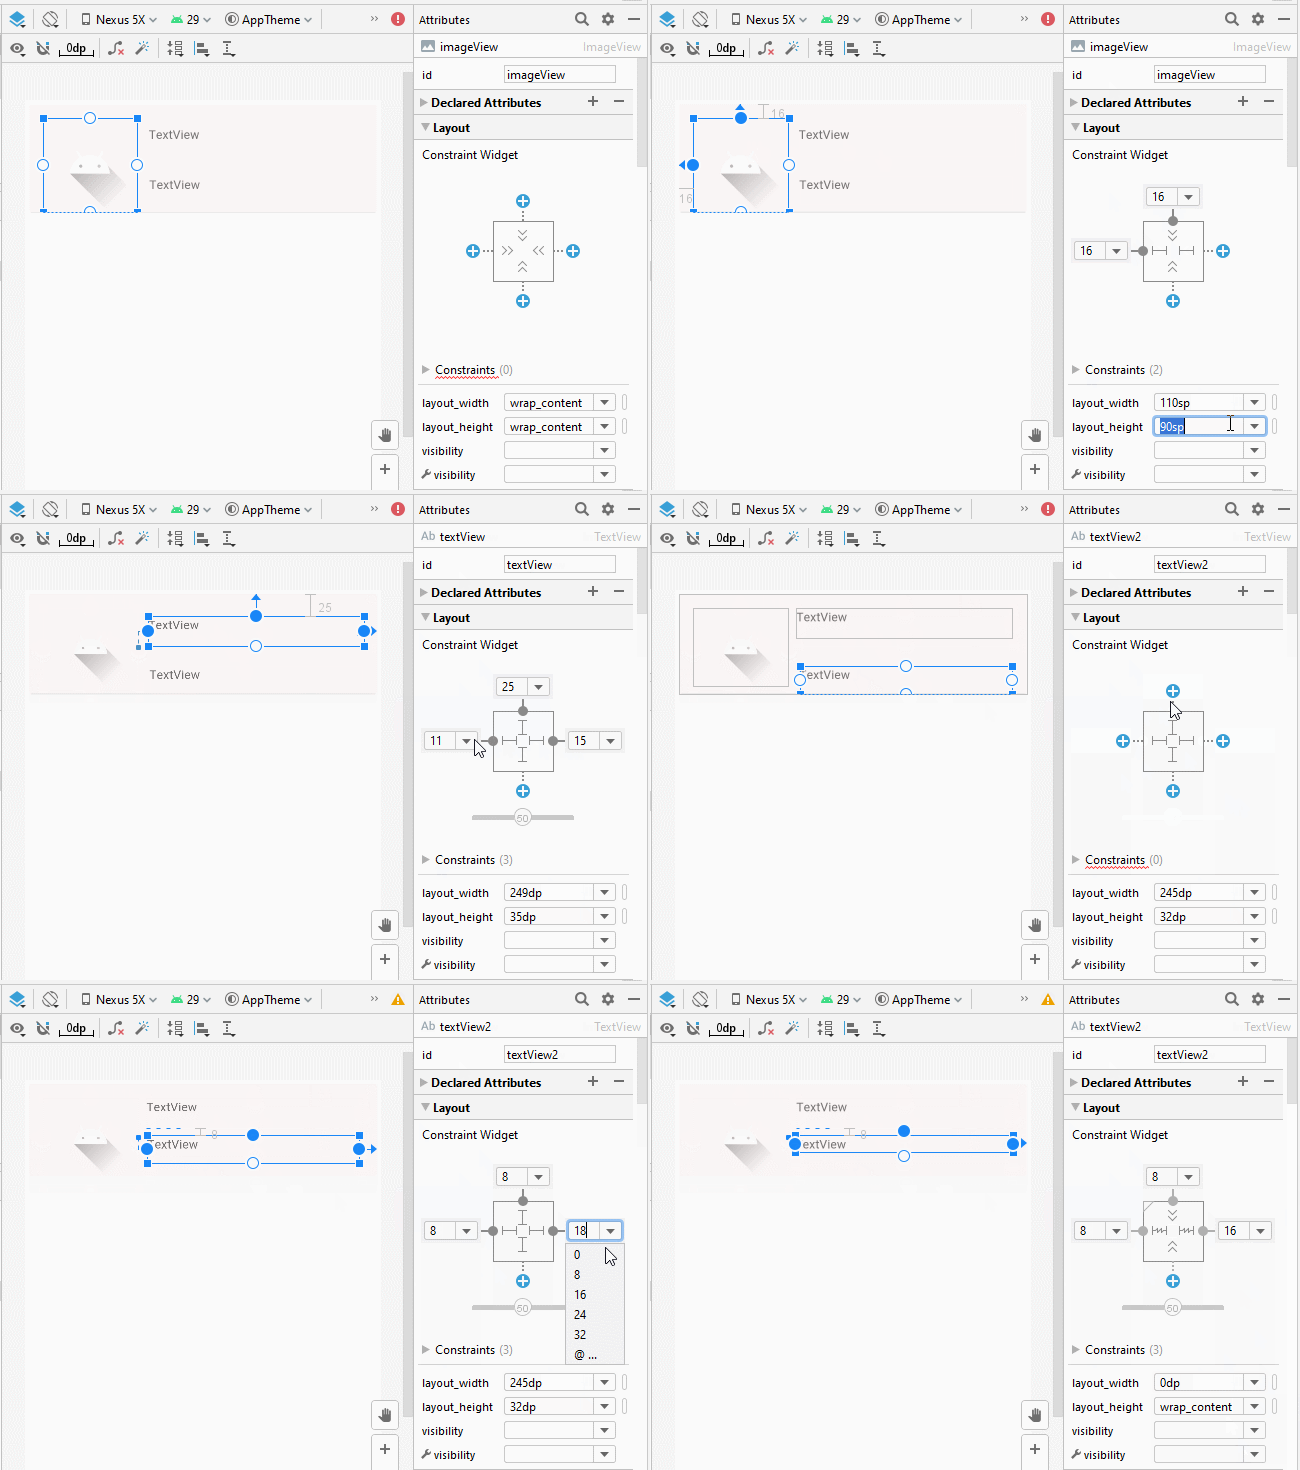
Настроить ID, Text, textSize для компонентов на интерфейсе:
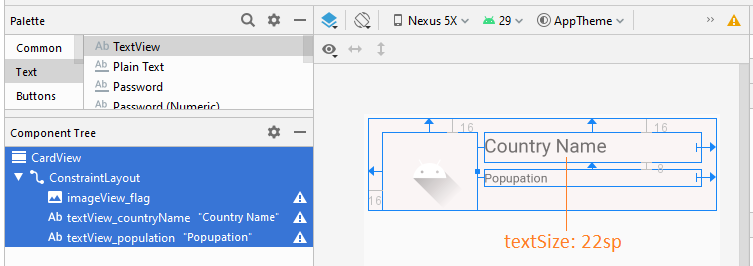
recyclerview_item_layout.xml
<?xml version="1.0" encoding="utf-8"?>
<androidx.cardview.widget.CardView
    xmlns:android="http://schemas.android.com/apk/res/android"
    xmlns:app="http://schemas.android.com/apk/res-auto"
    xmlns:tools="http://schemas.android.com/tools"
    android:layout_width="match_parent"
    android:layout_height="wrap_content"
    android:layout_marginLeft="5sp"
    android:layout_marginTop="5sp"
    android:layout_marginRight="5sp"
    android:layout_marginBottom="5sp"
    app:cardBackgroundColor="#FAF5F5">

    <androidx.constraintlayout.widget.ConstraintLayout
        android:layout_width="match_parent"
        android:layout_height="match_parent">

        <ImageView
            android:id="@+id/imageView_flag"
            android:layout_width="110sp"
            android:layout_height="90sp"
            android:layout_marginStart="16dp"
            android:layout_marginLeft="16dp"
            android:layout_marginTop="16dp"
            app:layout_constraintStart_toStartOf="parent"
            app:layout_constraintTop_toTopOf="parent"
            app:srcCompat="@drawable/ic_launcher_foreground"
            tools:ignore="VectorDrawableCompat" />

        <TextView
            android:id="@+id/textView_countryName"
            android:layout_width="0dp"
            android:layout_height="35dp"
            android:layout_marginStart="8dp"
            android:layout_marginLeft="8dp"
            android:layout_marginTop="16dp"
            android:layout_marginEnd="16dp"
            android:layout_marginRight="16dp"
            android:text="Country Name"
            android:textSize="22sp"
            app:layout_constraintEnd_toEndOf="parent"
            app:layout_constraintStart_toEndOf="@+id/imageView_flag"
            app:layout_constraintTop_toTopOf="parent" />

        <TextView
            android:id="@+id/textView_population"
            android:layout_width="0dp"
            android:layout_height="wrap_content"
            android:layout_marginStart="8dp"
            android:layout_marginLeft="8dp"
            android:layout_marginTop="8dp"
            android:layout_marginEnd="16dp"
            android:layout_marginRight="16dp"
            android:text="Popupation"
            app:layout_constraintEnd_toEndOf="parent"
            app:layout_constraintStart_toEndOf="@+id/imageView_flag"
            app:layout_constraintTop_toBottomOf="@+id/textView_countryName" />
    </androidx.constraintlayout.widget.ConstraintLayout>
</androidx.cardview.widget.CardView>
Смоделировать дизайн интерфейса для activity_main.xml:
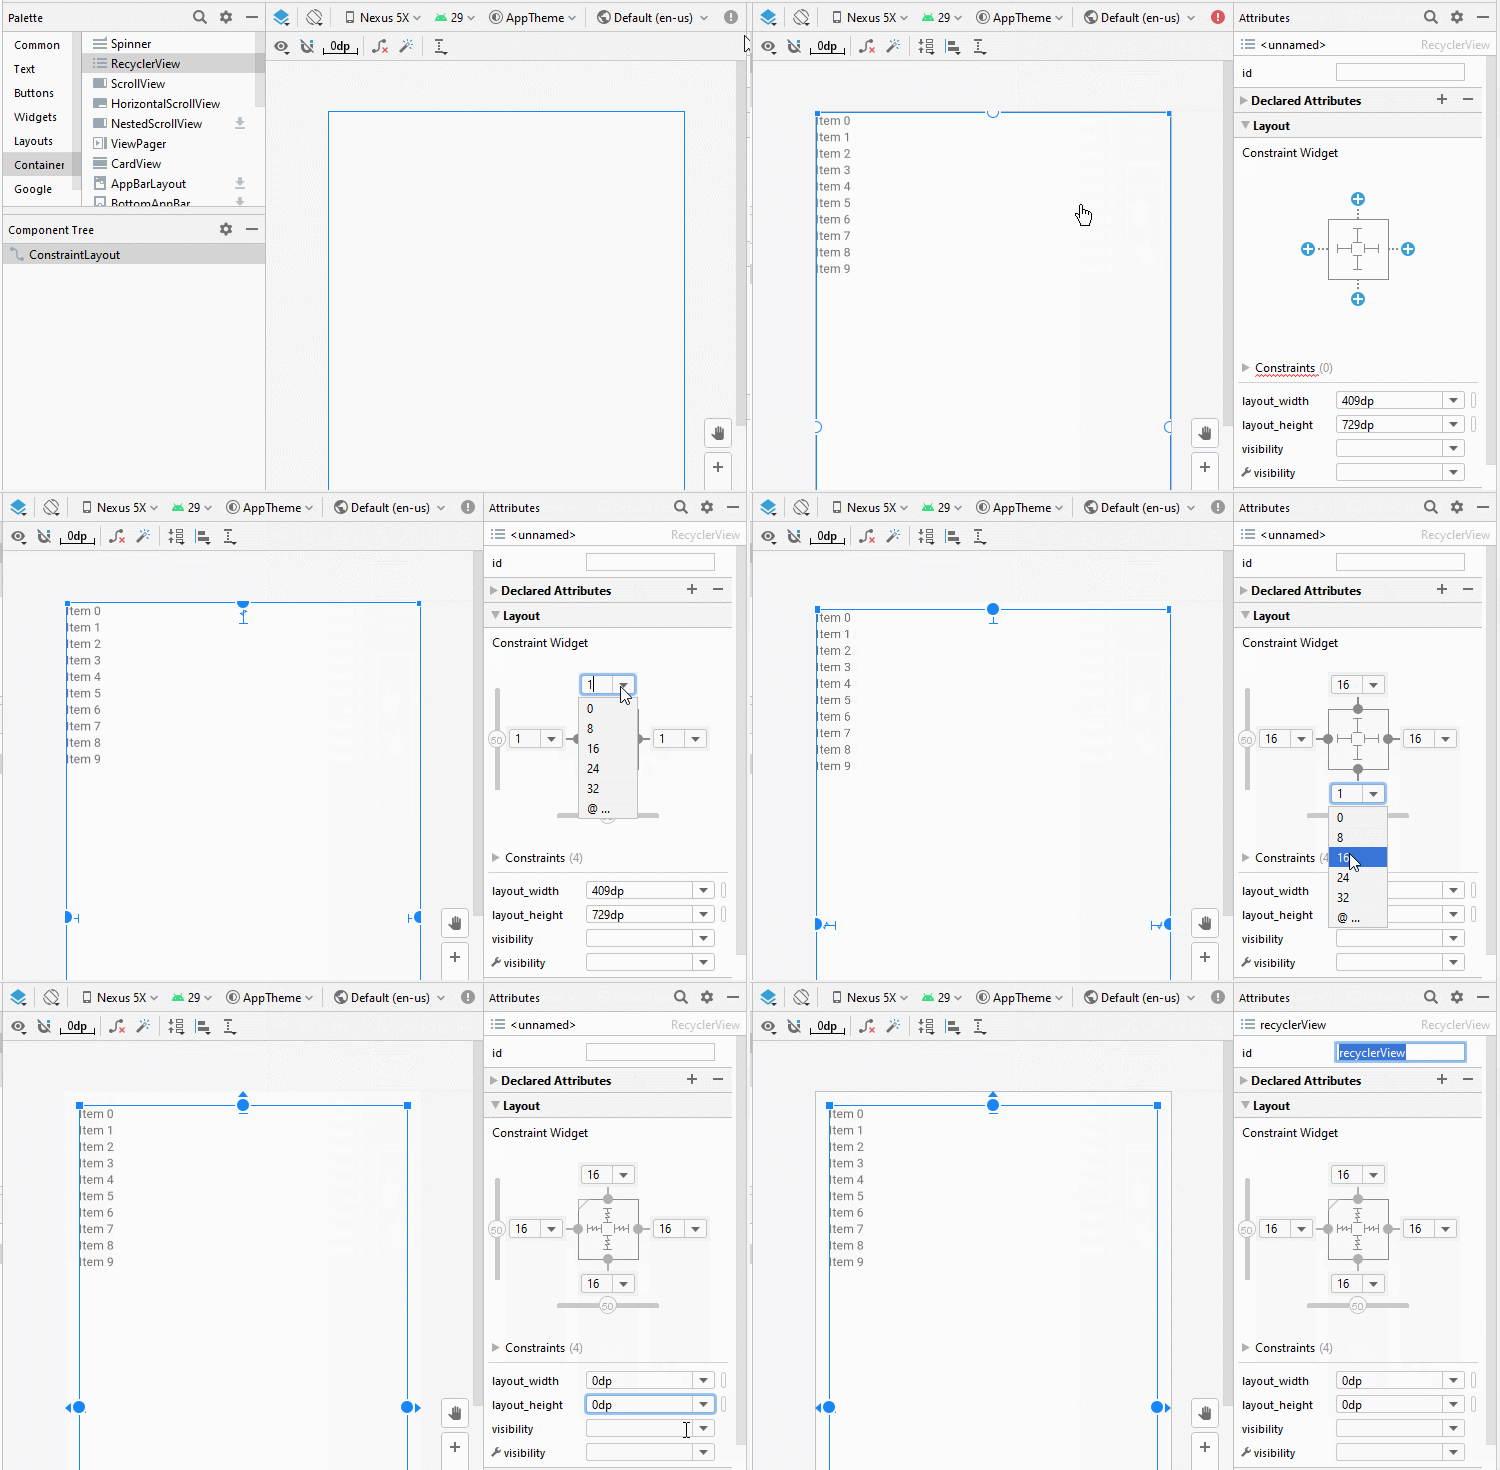
Country.java
package org.o7planning.cardviewexample;

public class Country {

    private String countryName;

    // Image name (Without extension)
    private String flagName;
    private int population;

    public Country(String countryName, String flagName, int population) {
        this.countryName= countryName;
        this.flagName= flagName;
        this.population= population;
    }

    public int getPopulation() {
        return population;
    }

    public void setPopulation(int population) {
        this.population = population;
    }

    public String getCountryName() {
        return countryName;
    }

    public void setCountryName(String countryName) {
        this.countryName = countryName;
    }

    public String getFlagName() {
        return flagName;
    }

    public void setFlagName(String flagName) {
        this.flagName = flagName;
    }

    @Override
    public String toString()  {
        return this.countryName+" (Population: "+ this.population+")";
    }
}
activity_main.xml
<?xml version="1.0" encoding="utf-8"?>
<androidx.constraintlayout.widget.ConstraintLayout
    xmlns:android="http://schemas.android.com/apk/res/android"
    xmlns:app="http://schemas.android.com/apk/res-auto"
    xmlns:tools="http://schemas.android.com/tools"
    android:layout_width="match_parent"
    android:layout_height="match_parent"
    tools:context=".MainActivity">

    <androidx.recyclerview.widget.RecyclerView
        android:id="@+id/recyclerView"
        android:layout_width="0dp"
        android:layout_height="0dp"
        android:layout_marginStart="16dp"
        android:layout_marginLeft="16dp"
        android:layout_marginTop="16dp"
        android:layout_marginEnd="16dp"
        android:layout_marginRight="16dp"
        android:layout_marginBottom="16dp"
        app:layout_constraintBottom_toBottomOf="parent"
        app:layout_constraintEnd_toEndOf="parent"
        app:layout_constraintStart_toStartOf="parent"
        app:layout_constraintTop_toTopOf="parent" />
</androidx.constraintlayout.widget.ConstraintLayout>
CustomRecyclerViewAdapter это расширенный класс от RecyclerView.Adapter, он ответственный за отображение данных на RecyclerView Item.
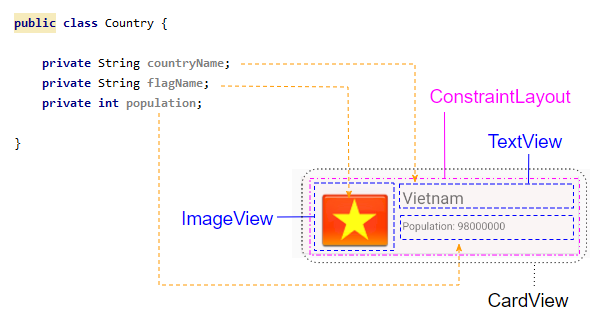
CustomRecyclerViewAdapter.java
package org.o7planning.cardviewexample;
import android.content.Context;
import android.util.Log;
import android.view.LayoutInflater;
import android.view.View;
import android.view.ViewGroup;
import android.widget.Toast;

import androidx.recyclerview.widget.RecyclerView;

import java.util.List;

public class CustomRecyclerViewAdapter extends RecyclerView.Adapter<CountryViewHolder> {


    private List<Country> countries;
    private Context context;
    private LayoutInflater mLayoutInflater;

    public CustomRecyclerViewAdapter(Context context, List<Country> datas ) {
        this.context = context;
        this.countries = datas;
        this.mLayoutInflater = LayoutInflater.from(context);
    }

    @Override
    public CountryViewHolder onCreateViewHolder(final ViewGroup parent, int viewType) {
        // Inflate view from recyclerview_item_layout.xml
        View recyclerViewItem = mLayoutInflater.inflate(R.layout.recyclerview_item_layout, parent, false);

        recyclerViewItem.setOnClickListener(new View.OnClickListener() {
            @Override
            public void onClick(View v) {
                handleRecyclerItemClick( (RecyclerView)parent, v);
            }
        });
        return new CountryViewHolder(recyclerViewItem);
    }


    @Override
    public void onBindViewHolder(CountryViewHolder holder, int position) {
        // Cet country in countries via position
        Country country = this.countries.get(position);

        int imageResId = this.getDrawableResIdByName(country.getFlagName());
        // Bind data to viewholder
        holder.flagView.setImageResource(imageResId);
        holder.countryNameView.setText(country.getCountryName() );
        holder.populationView.setText("Population: "+ country.getPopulation());
    }

    @Override
    public int getItemCount() {
        return this.countries.size();
    }

    // Find Image ID corresponding to the name of the image (in the directory drawable).
    public int getDrawableResIdByName(String resName)  {
        String pkgName = context.getPackageName();
        // Return 0 if not found.
        int resID = context.getResources().getIdentifier(resName , "drawable", pkgName);
        Log.i(MainActivity.LOG_TAG, "Res Name: "+ resName+"==> Res ID = "+ resID);
        return resID;
    }

    // Click on RecyclerView Item.
    private void handleRecyclerItemClick(RecyclerView recyclerView, View itemView) {
        int itemPosition = recyclerView.getChildLayoutPosition(itemView);
        Country country  = this.countries.get(itemPosition);

        Toast.makeText(this.context, country.getCountryName(), Toast.LENGTH_LONG).show();
    }
}
CountryViewHolder.java
package org.o7planning.cardviewexample;

import android.view.View;
import android.widget.ImageView;
import android.widget.TextView;

import androidx.annotation.NonNull;
import androidx.recyclerview.widget.RecyclerView;

public class CountryViewHolder extends   RecyclerView.ViewHolder {

    ImageView flagView;
    TextView countryNameView;
    TextView populationView;

    // @itemView: recyclerview_item_layout.xml
    public CountryViewHolder(@NonNull View itemView) {
        super(itemView);

        this.flagView = (ImageView) itemView.findViewById(R.id.imageView_flag);
        this.countryNameView = (TextView) itemView.findViewById(R.id.textView_countryName);
        this.populationView = (TextView) itemView.findViewById(R.id.textView_population);
    }
}
MainActivity.java
package org.o7planning.cardviewexample;

import android.os.Bundle;

import androidx.appcompat.app.AppCompatActivity;
import androidx.recyclerview.widget.LinearLayoutManager;
import androidx.recyclerview.widget.RecyclerView;

import java.util.ArrayList;
import java.util.List;

public class MainActivity extends AppCompatActivity {

    public static final String LOG_TAG = "AndroidExample";
    private RecyclerView recyclerView;

    @Override
    protected void onCreate(Bundle savedInstanceState) {
        super.onCreate(savedInstanceState);
        setContentView(R.layout.activity_main);


        List<Country> countries = getListData();
        this.recyclerView = (RecyclerView) this.findViewById(R.id.recyclerView);
        recyclerView.setAdapter(new CustomRecyclerViewAdapter(this, countries));

        // RecyclerView scroll vertical
        LinearLayoutManager linearLayoutManager = new LinearLayoutManager(this, LinearLayoutManager.VERTICAL, false);
        recyclerView.setLayoutManager(linearLayoutManager);
    }

    private  List<Country> getListData() {
        List<Country> list = new ArrayList<Country>();
        Country vietnam = new Country("Vietnam", "vn", 98000000);
        Country usa = new Country("United States", "us", 320000000);
        Country russia = new Country("Russia", "ru", 142000000);
        Country autraylia = new Country("Autraylia", "au", 25000000);
        Country japan = new Country("Japan", "jp", 126000000);

        list.add(vietnam);
        list.add(usa);
        list.add(russia);
        list.add(autraylia);
        list.add(japan);

        return list;
    }


}
Pуководства Android
- Настроить Android Emulator в Android Studio
- Руководство Android ToggleButton
- Создать простой File Finder Dialog в Android
- Руководство Android TimePickerDialog
- Руководство Android DatePickerDialog
- Что мне нужно для начала работы с Android?
- Установите Android Studio в Windows
- Установите Intel® HAXM для Android Studio
- Руководство Android AsyncTask
- Руководство Android AsyncTaskLoader
- Руководство Android для начинающих - основные примеры
- Как узнать номер телефона Android Emulator и изменить его?
- Руководство Android TextInputLayout
- Руководство Android CardView
- Руководство Android ViewPager2
- Получить номер телефона в Android с помощью TelephonyManager
- Руководство Android Phone Call
- Руководство Android Wifi Scanning
- Руководство Android 2D Game для начинающих
- Руководство Android DialogFragment
- Руководство Android CharacterPickerDialog
- Руководство Android для начинающих - Hello Android
- Использование Android Device File Explorer
- Включить USB Debugging на устройстве Android
- Руководство Android UI Layouts
- Руководство Android SMS
- Руководство Android SQLite Database
- Руководство Google Maps Android API
- Руководство Текст в речь на Android
- Руководство Android Space
- Руководство Android Toast
- Создание пользовательских Android Toast
- Руководство Android SnackBar
- Руководство Android TextView
- Руководство Android TextClock
- Руководство Android EditText
- Руководство Android TextWatcher
- Форматирование номера кредитной карты с помощью Android TextWatcher
- Руководство Android Clipboard
- Создать простой File Chooser в Android
- Руководство Android AutoCompleteTextView и MultiAutoCompleteTextView
- Руководство Android ImageView
- Руководство Android ImageSwitcher
- Руководство Android ScrollView и HorizontalScrollView
- Руководство Android WebView
- Руководство Android SeekBar
- Руководство Android Dialog
- Руководство Android AlertDialog
- Руководство Android RatingBar
- Руководство Android ProgressBar
- Руководство Android Spinner
- Руководство Android Button
- Руководство Android Switch
- Руководство Android ImageButton
- Руководство Android FloatingActionButton
- Руководство Android CheckBox
- Руководство Android RadioGroup и RadioButton
- Руководство Android Chip и ChipGroup
- Использование Image assets и Icon assets Android Studio
- Настройка SD Card для Android Emulator
- Пример ChipGroup и Chip Entry
- Как добавить внешние библиотеки в Android Project в Android Studio?
- Как отключить разрешения, уже предоставленные приложению Android?
- Как удалить приложения из Android Emulator?
- Руководство Android LinearLayout
- Руководство Android TableLayout
- Руководство Android FrameLayout
- Руководство Android QuickContactBadge
- Руководство Android StackView
- Руководство Android Camera
- Руководство Android MediaPlayer
- Руководство Android VideoView
- Воспроизведение звуковых эффектов в Android с помощью SoundPool
- Руководство Android Networking
- Руководство Android JSON Parser
- Руководство Android SharedPreferences
- Руководство Android Internal Storage
- Руководство Android External Storage
- Руководство Android Intents
- Пример явного Android Intent, вызов другого Intent
- Пример неявного Android Intent, откройте URL, отправьте email
- Руководство Android Services
- Использовать оповещения в Android - Android Notification
- Руководство Android DatePicker
- Руководство Android TimePicker
- Руководство Android Chronometer
- Руководство Android OptionMenu
- Руководство Android ContextMenu
- Руководство Android PopupMenu
- Руководство Android Fragment
- Руководство Android ListView
- Android ListView с Checkbox с помощью ArrayAdapter
- Руководство Android GridView
Show More